Table of Contents:
- How easily can you create a Mega Menu in the GeneratePress?
- What is a mega menu?
- CSS Code for Mega Menu
- The CSS code into the template
- How to modify the main website menu to create a mega menu
- What does the mega menu look like?
- Video Guide
- How easily can you create a Mega Menu in the GeneratePress?
- Conclusion
Last updated December 6th, 2023 21:12
GeneratePress is an amazing template you’ll quickly fall in love with. It’s simple, easy to customize, and boasts fantastic customer support. If you encounter any issues with the template, customer support responds within minutes during business hours, or within a few hours otherwise. They’ve always provided solutions and assistance whenever I needed it. This template is free, and you can extend its functionality by purchasing the PRO version. However, what this template never had is a mega menu. The mega menu isn’t available in either the free or the paid PRO version. That’s why today, I’ll show you how easily you can create a Mega Menu in the GeneratePress template using CSS and menu customization. Anyone can do it.
How easily can you create a Mega Menu in the GeneratePress?
What is a mega menu?
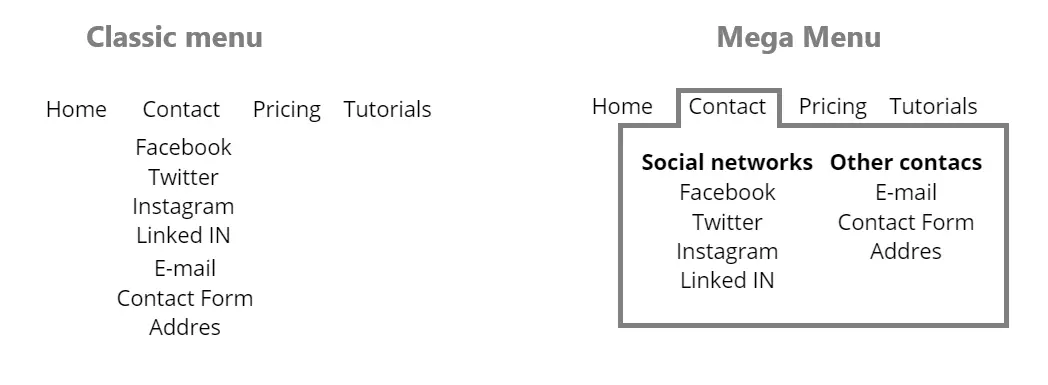
A mega menu is a term used for an expanded main menu option. Traditionally, menus offer only a single column. However, in a mega menu, you can have many more columns available. Let’s illustrate this with a graphic.

As you can see, when using the menu provided by GeneratePress, you can have a main item for contacts, followed by a list of all available contacts underneath. In this context, the mega menu is more organized. You can have two or more columns and categorize your contacts, such as by social networks, work contacts, forms, or as you see fit. This makes the mega menu much more structured.
CSS Code for Mega Menu
The first thing you’ll need to create a mega menu is the CSS code. Insert it into the CSS template as follows:
- Click on ‘Appearance‘ in the left menu.
- Select ‘Customize‘ from the submenu.
- In the template settings on the left menu, click on ‘CSS‘.
- Paste the code provided below and click on ‘Publish‘.
The CSS code into the template
					@media (min-width: 769px) {
    nav .main-nav .mega-menu {
        position: static;
    }

    nav .main-nav .mega-menu > ul {
        position: absolute;
        width: 100%;
        left: 0 !important;
        display: flex;
        flex-wrap: wrap;
    }

    nav .main-nav .mega-menu > ul > li > a {
        font-weight: bold;
    }

    nav .main-nav .mega-menu>ul>li {
        display: inline-block;
        width: 25%;
        vertical-align: top;
    }

    nav .main-nav .mega-menu.mega-menu-col-2>ul>li {
        width: 50%;
    }

    nav .main-nav .mega-menu.mega-menu-col-3>ul>li {
        width: 33.3333%;
    }

    nav .main-nav .mega-menu.mega-menu-col-5>ul>li {
        width: 20%;
    }

    nav .main-nav .mega-menu > ul > li:hover > a,
    nav .main-nav .mega-menu > ul > li:focus > a,
    nav .main-nav .mega-menu > ul > li[class*="current-"] > a,
    nav .main-nav .mega-menu ul ul {
        background-color: transparent !important;
        color: inherit;
    }

    nav .main-nav .mega-menu ul .sub-menu {
        position: static;
        display: block;
        opacity: 1;
        visibility: visible;
        width: 100%;
        box-shadow: 0 0 0;
        left: 0;
        height: auto;
        pointer-events: auto;
        transform: scale(1);
    }

    nav .main-nav .mega-menu ul.toggled-on .sub-menu {
        pointer-events: auto;
    }

    nav .main-nav .mega-menu .sub-menu .menu-item-has-children .dropdown-menu-toggle {
        display: none;
    }
}
You have the foundation ready. That means the CSS for the mega menu is prepared, and now we’ll demonstrate what adjustments you need to make to your menu to create columns.
How to modify the main website menu to create a mega menu
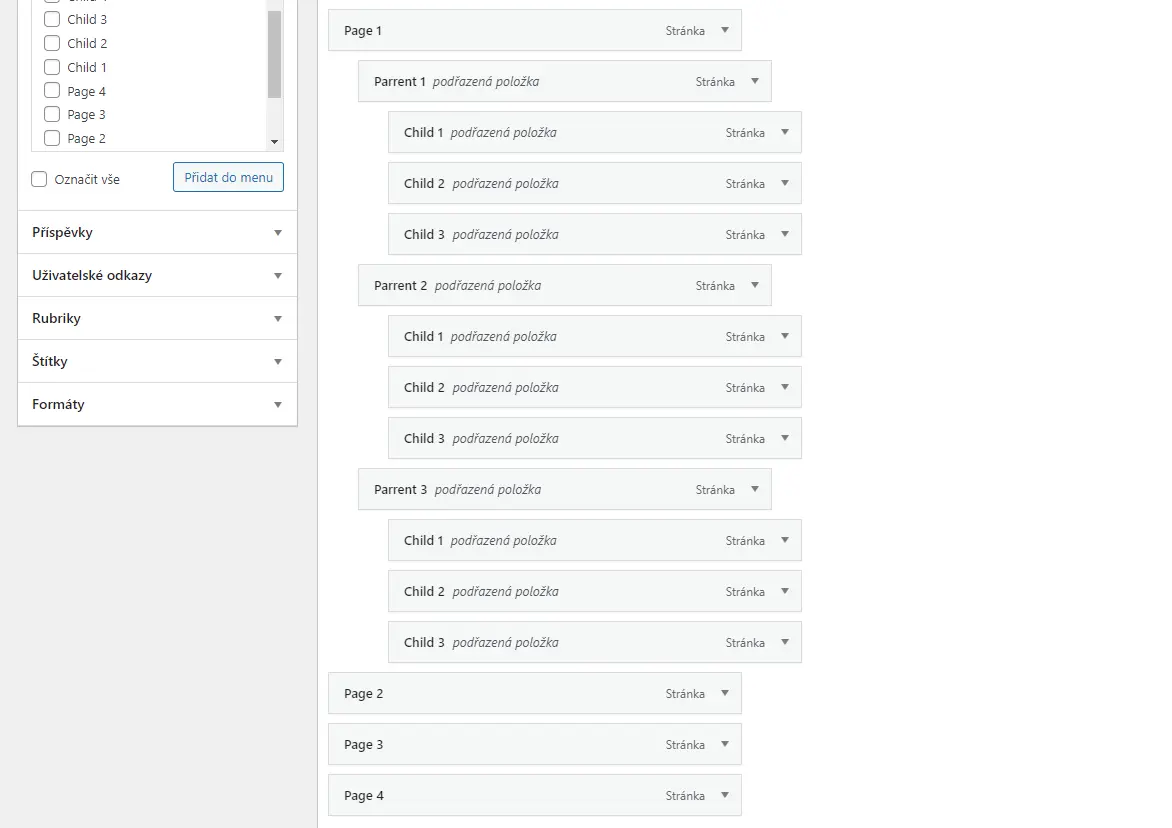
Let’s illustrate the structure of the mega menu. In the main menu, there will be links for Page 1, Page 2, Page 3, and Page 4. Within the Page 1 link, there will be 3 columns: Parent 1 to Parent 3. Each Parent column will contain the final menu links. Does it sound terribly complex? Yes, it does. An image will make this much easier for you.

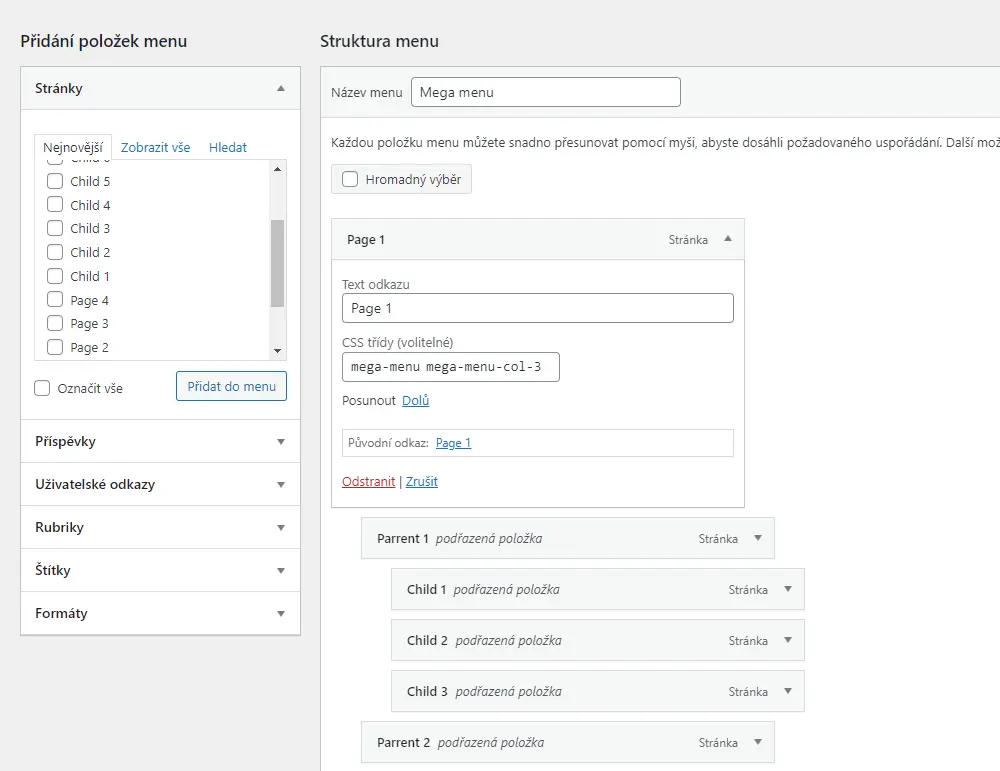
That’s not all yet. We already have the menu structure set up. Now, we’ll assign CSS classes to items Page 1 through Page 4. By default, WordPress doesn’t display CSS classes in the menu. Enable them through the top menu by selecting ‘Screen Options.’ Here, enable the display of CSS classes.
Every link that will be part of the mega menu and will have columns must have the class:
mega-menu
For this class, you’ll define the number of columns the mega menu will contain. In our case, it’s three columns:
mega-menu mega-menu-col-3
If you want a different number of columns, simply adjust the number in the CSS class:
					mega-menu-col-2
mega-menu-col-3
mega-menu-col-4
mega-menu-col-5

What does the mega menu look like?
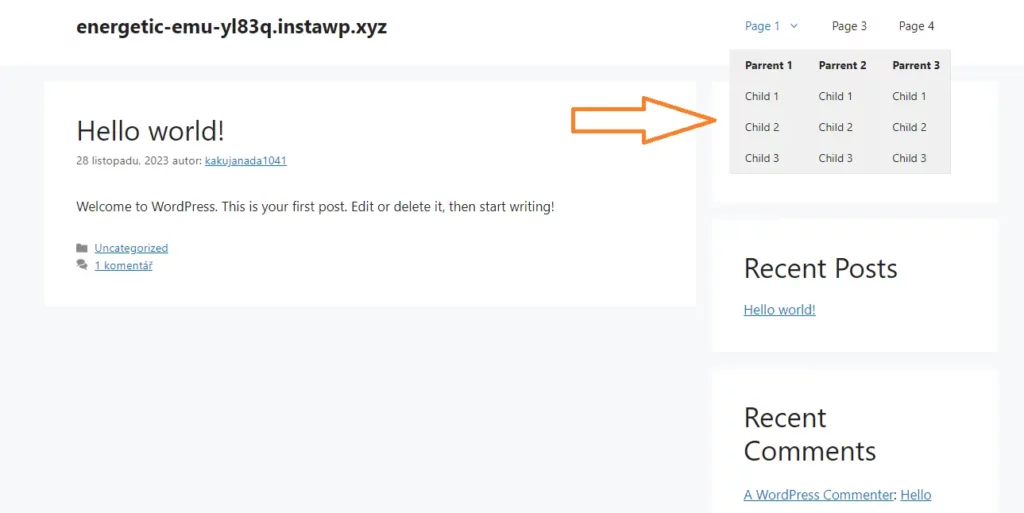
And that’s it. You’ve got the menu structure ready, applied the CSS, and defined the number of columns. So, how does such a menu actually look on the website? Like this:

Video Guide
How easily can you create a Mega Menu in the GeneratePress?
Conclusion
Even though the guide might seem complex, creating a mega menu in the GeneratePress template will actually take just a few minutes of your time. You already have the complete solution, including the CSS code, right here. The longest part will be organizing the menu in the correct order, and after that, everything works as intended. Definitely give it a try. There’s nothing to be afraid of.
The website is created with care for the included information. I strive to provide high-quality and useful content that helps or inspires others. If you are satisfied with my work and would like to support me, you can do so through simple options.
Byl pro Vás tento článek užitečný?
Klikni na počet hvězd pro hlasování.
Průměrné hodnocení. 5 / 5. Počet hlasování: 1
Zatím nehodnoceno! Buďte první
Je mi líto, že pro Vás nebyl článek užitečný.
Jak mohu vylepšit článek?
Řekněte mi, jak jej mohu zlepšit.

Subscribe to the Newsletter
Stay informed! Join our newsletter subscription and be the first to receive the latest information directly to your email inbox. Follow updates, exclusive events, and inspiring content, all delivered straight to your email.
Are you interested in the WordPress content management system? Then you’ll definitely be interested in its security as well. Below, you’ll find a complete WordPress security guide available for free.

