Table of Contents:
- How to protect WordPress with a password
- Locking individual articles
- How to protect WordPress with a password
- Locking the entire website
- The plugin setup is simple and as follows:
- More content about WordPress
Last updated December 20th, 2023 22:05
Not every website or individual article on it necessarily has to be visible to all users who view the website or its articles. On the contrary, you may often find yourself in a situation where you want to lock an article or, conversely, allow only “premium users” to access it. You can also address this situation when you want to display the entire website only to people who know the password. There are several ways to solve this situation. Let’s take a look at how to protect WordPress with a password. It’s simple.
How to protect WordPress with a password
Locking individual articles
The easiest way to lock content is to set a password on individual articles. This is useful when you need to have the content of the website publicly visible, but want to hide only certain articles (and display them only if the user knows the password). Locking an individual article can be easily done directly in its settings.
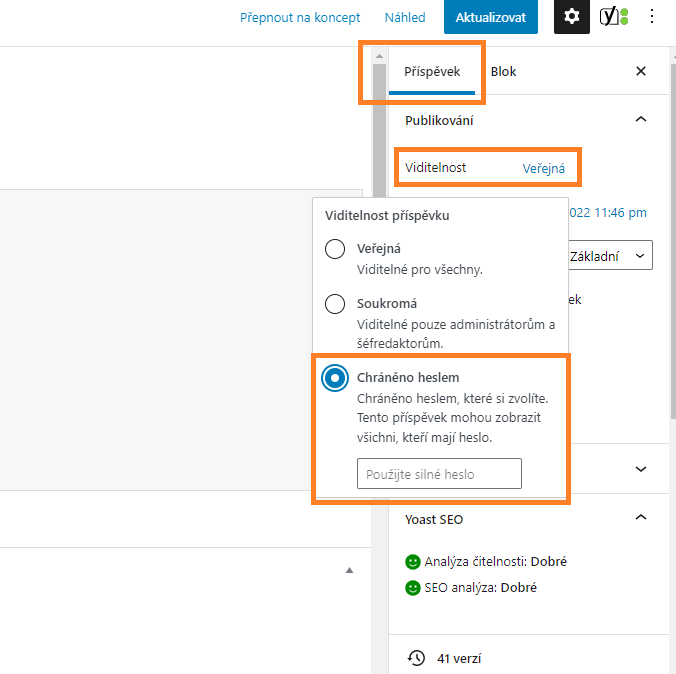
- Open the WordPress administration panel and open the post you want to protect with a password.
- In the right-hand column of the post settings, click on the “Post” option and select “Visibility“.
- The default state is “Public“.
- Change this state by clicking on the value and selecting “Password protected“.
- Set a password and save the changes to the post.

How to protect WordPress with a password
Locking the entire website
If you need to lock the entire website because you want to display its content only to users who know the password, or for example because the website should not be visible publicly for a temporary period, this can be solved by using a plugin. Go to the “Plugins” section in the left menu and click on “Add New“. In the search bar, type the phrase “password protected“. Install and activate the plugin with the same name (official plugin page). An icon of a lock will appear in the top bar, which you can click to activate or deactivate the plugin. When you first turn it on, you will also set a password for accessing the website.
The plugin setup is simple and as follows:
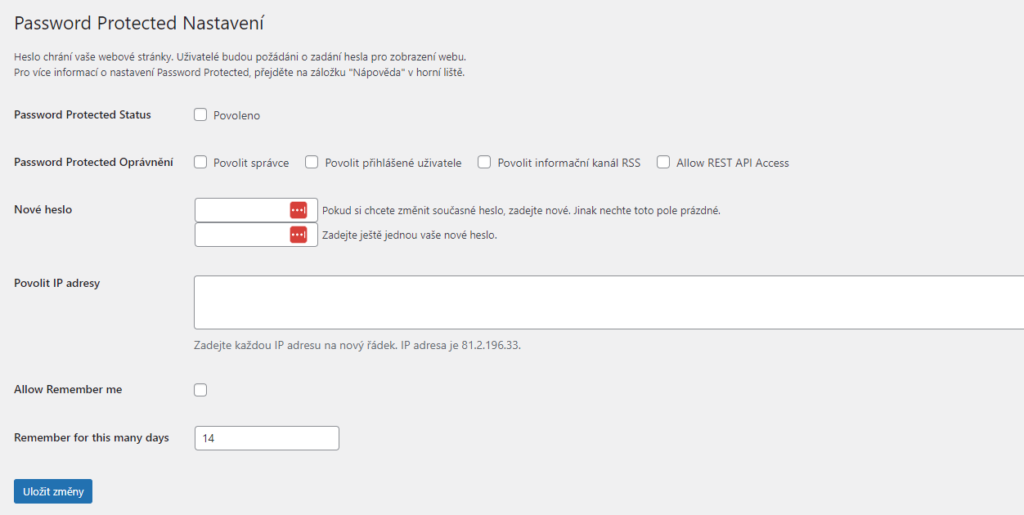
Password Protected Status – enabled – by checking this box, the plugin will be turned on and it will require the set password to display the website.
Password Protected Permissions – here you can set who will not be required to enter the password after logging in to WordPress (administrator, logged-in user, etc.).
Allow IP addresses – a list of IP addresses that will not require a password. I recommend setting at least your own IP address, which is visible below the field where you enter the whitelist IP addresses.

The website is created with care for the included information. I strive to provide high-quality and useful content that helps or inspires others. If you are satisfied with my work and would like to support me, you can do so through simple options.
Byl pro Vás tento článek užitečný?
Klikni na počet hvězd pro hlasování.
Průměrné hodnocení. 0 / 5. Počet hlasování: 0
Zatím nehodnoceno! Buďte první
Je mi líto, že pro Vás nebyl článek užitečný.
Jak mohu vylepšit článek?
Řekněte mi, jak jej mohu zlepšit.

Subscribe to the Newsletter
Stay informed! Join our newsletter subscription and be the first to receive the latest information directly to your email inbox. Follow updates, exclusive events, and inspiring content, all delivered straight to your email.
Are you interested in the WordPress content management system? Then you’ll definitely be interested in its security as well. Below, you’ll find a complete WordPress security guide available for free.

