
Table of Contents:
- Basic administration address: yourdomain.tld/wp-admin
- Easy WordPress Administration – Watch This Guide
- What can be controlled and performed in administration?
- Dashboard
- Posts
- Difference between a post and a page:
- Example in practice:
- Key differences in brief:
- What items are available in the posts menu and what are they used for:
- Categories and tags
- Media
- Image settings
- Which types of images to upload and which to avoid?
- Pages
- Comments
- Items included in the comments section:
- Appearance
- What is a theme template?
- How can I preview a template before installation?
- Template Installation
- Customizing a Template
- What are Widgets?
- Menu
- Template File Editor
- Plugins
- Why should you be cautious about using a large number of plugins?
- Updating plugins
- Installing plugins
- Users
- WordPress Roles:
- WooCommerce Roles:
- WordPress Multisite (Super Administrator Role):
- How to create a new user
- User Permissions – What Each User Can and Cannot Do
- Is it possible to modify user permissions for individual user groups?
- Tools
- Import
- Export
- Settings
- Publishing
- Display
- Comment Settings
- Media
- Permalinks
- Easy WordPress Administration – Watch This Guide
- Conclusion
Last updated December 6th, 2023 00:10
WordPress administration is the fundamental tool available to website administrators immediately after installing the WordPress content management system. Through administration, the entire system is configured and managed. It is therefore a crucial and essential part of WordPress. In this guide, we will explore the individual menu items, what you can find in them, and what specific settings or management tasks can be done through them. So take a look on article “Easy WordPress Administration – Watch This Guide”.
Basic administration address: yourdomain.tld/wp-admin
Basic administration address: yourdomain.tld/wp-admin
Table of content
Easy WordPress Administration – Watch This Guide
What can be controlled and performed in administration?
- Adding textual content (pages and articles)
- Uploading images and videos
- Modifying the appearance
- Installing, uninstalling, activating, and deactivating plugins
- Configuring URL formats (permalinks)
- Enabling, disabling, or moderating comments
- Performing data import and export (importing data from another website or exporting data from the current website while logged in)
- Performing updates for WordPress, theme templates, and plugins
- Managing website users (adding, removing, assigning roles, or changing passwords)
What does administration look like after installation?
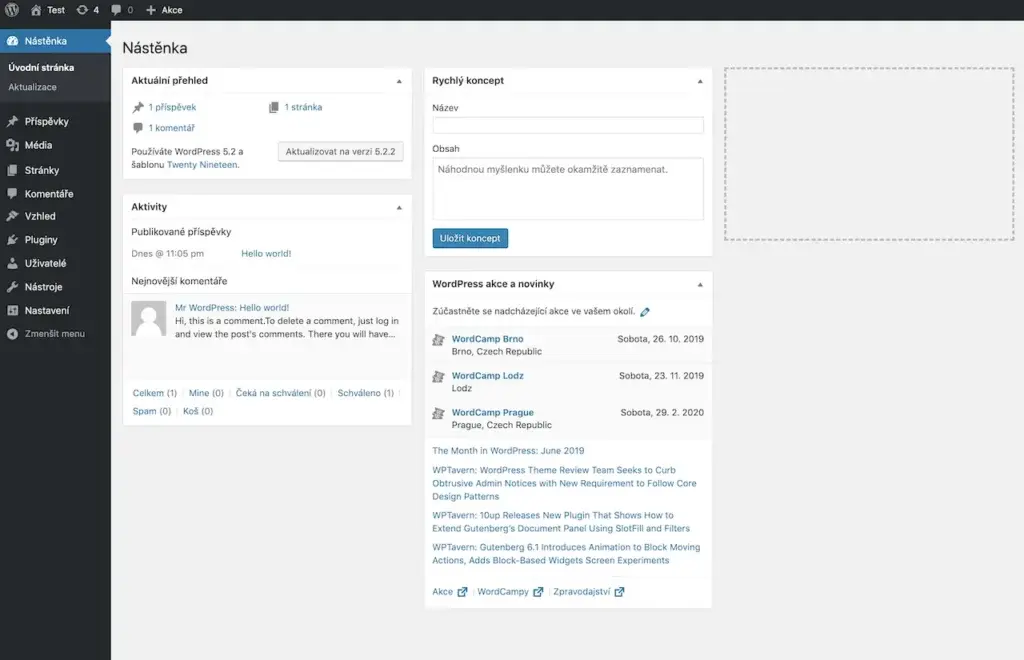
Dashboard
The dashboard contains basic information about your website. This includes information about the number of posts on your site, available updates, or activities.
The current overview provides information about the number of comments and articles.
In the activity block, you can see the latest actions you have performed (such as editing or publishing articles, and more).
Quick Draft is a feature for quickly creating drafts (unpublished articles) directly from the WordPress administration dashboard, without the need to open the entire posts section and create a new draft post (the conventional process of adding a post). The Quick Draft feature instantly adds a draft article and is especially useful when you need to create a new article, jot down a current idea that you’ll revisit, edit, and publish later.
The WordPress News and Events widget is nothing but a calendar of events directly or indirectly related to WordPress. Over time, as you install your own plugins, there will be more blocks on the dashboard. Installed plugins will add them to inform you about the status of the aspects they manage (statistics, forms, surveys, etc.).
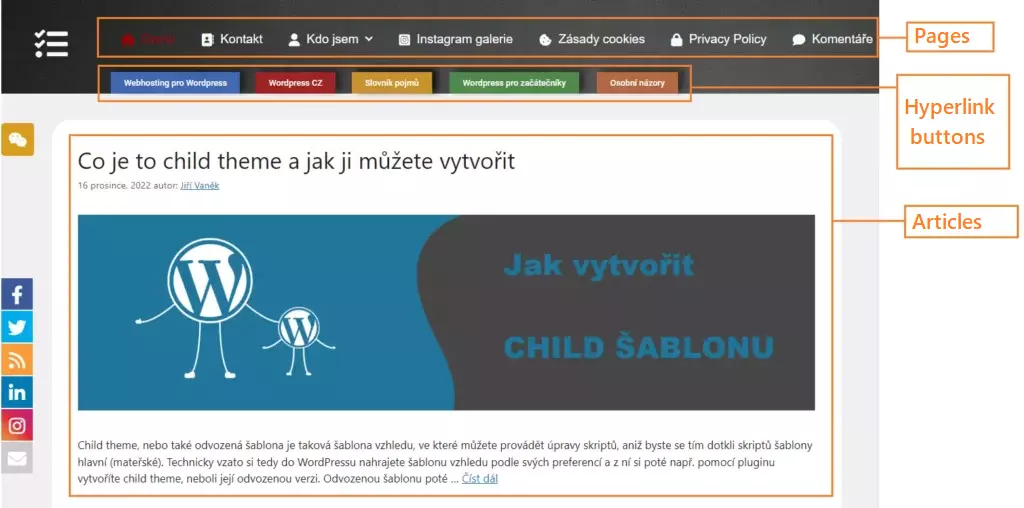
Posts
Posts in WordPress are used for adding textual content to a website. However, let’s first discuss the difference between a post and a page, which we will cover in the menu later. Both are used for slightly different content and purposes.
Difference between a post and a page:
A post is typically associated with a specific time period during which it is published. It is commonly used for blogs, where posts are arranged chronologically based on their publication dates. Over time, posts may contain information that becomes outdated and may not be relevant to the time when a reader comes across the post.
On the other hand, a page in WordPress does not have such time-specific attributes and is used for content that should be static, relevant to the present time, and relatively unchanging (or changes very minimally through manual intervention).
Example in practice:
Let’s consider an example. Suppose I have a blog where I write content on political topics. I would use a post whenever I want to express my thoughts on a current event taking place at the time of writing the post. However, if someone reads this post a year later, the situation in the world will likely be different. The post may not have the same informational value that is relevant to the time when the reader encounters its content.
At the same time, on my blog, I may have links in the top menu that lead to information about me, my contact details, or my education. For example, I may have menu items like “About Me,” “Contact,” and “My Education.” This information is of a static nature and is likely to change very minimally over time. For this purpose, I wouldn’t use a post but rather publish such content in the form of pages.
Another distinguishing element between a post and a page is the presence of comments. Posts, if enabled, can have the option for visitors to the website to leave comments. This is not a default feature for pages. Therefore, posts are more open to user (website visitor) interaction and expression regarding their content.
Key differences in brief:
Posts:
- Are dynamic
- Have a specified publication date
- Can have various formats (video, gallery, audio, etc.)
- Can be sorted (e.g., using categories or tags)
Pages:
- Are static
- Do not have a specified publication date
- Follow templates (templates are based on the chosen theme, such as a template with a sidebar on the left or right, with or without a header, etc.)
- Have a hierarchical structure (for use, for example, in the main menu in the website header)
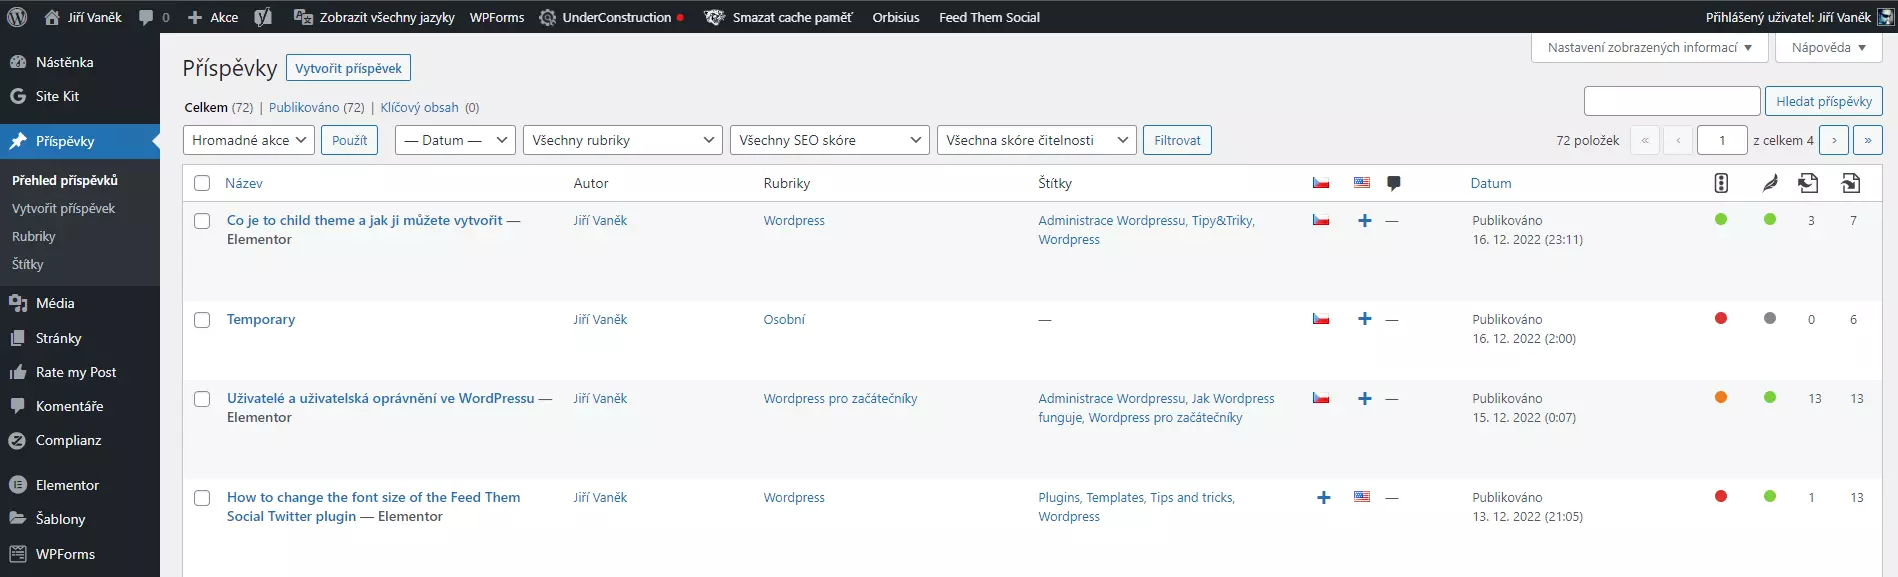
What items are available in the posts menu and what are they used for:
Posts Overview: It displays a list of all available posts, including those in various stages of completion. You can see both published articles and draft versions.
Create Post: This option allows you to create new content in the form of a post. You can either publish it immediately or save it as a draft for further editing. WordPress also provides the option to schedule the publication date of a post. Learn more here.
Categories: Categories are one way to categorize the content of posts. You can create a predefined set of topics that your published articles will be related to. For example, topics like cars, motorcycles, trains, and airplanes. If you write a new post about electric cars, you can assign it to the “cars” category.
Tags: Tags offer another way to categorize content. They are usually used to provide more specific descriptions that cut across categories. For example, if you write about electric cars, you can assign tags like “electric vehicles,” “Tesla,” “emission-free,” “battery-powered,” or “EV.” You have the freedom to be creative with tags.
Categories and tags
By utilizing categories and tags, you can easily organize and classify your content. Categories have an additional feature that is often essential for a blog. They can be inserted as widgets into the sidebar menu, making it easier for website visitors to navigate and find specific topics of interest without having to go through each article one by one.
If someone clicks on the “cars” category, they will see all articles related to cars. Similarly, if someone clicks on the “emission-free” tag, they will see every article with that tag. This allows readers to access content not only about cars but also about battery-powered motorcycles. Thus, two distinct categories but with the same tag used because readers are interested in everything powered by electricity without emissions.
Media
The media section is used for managing media content. This primarily includes videos, music, or images. In this section, you can not only manage and edit media but also upload new content.
What items are available in the Media section and what are they used for?
There are a total of two items available in the Media section, namely:
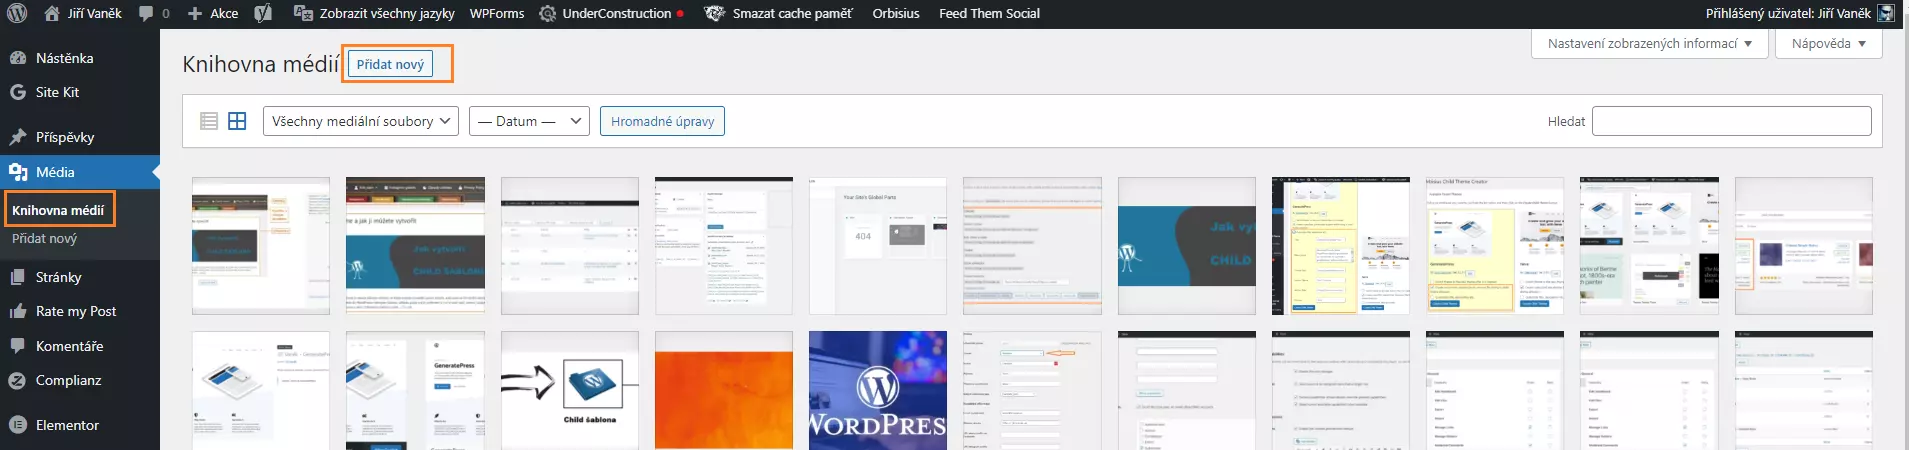
- Media Library
- Add New
The Media Library is used for managing the media content of your website. It provides access to all uploaded files that can be subsequently edited. The part that should interest you the most in this category is where you can add captions to each media file. In this section, if you click on any image or other file type, you will see the following window.
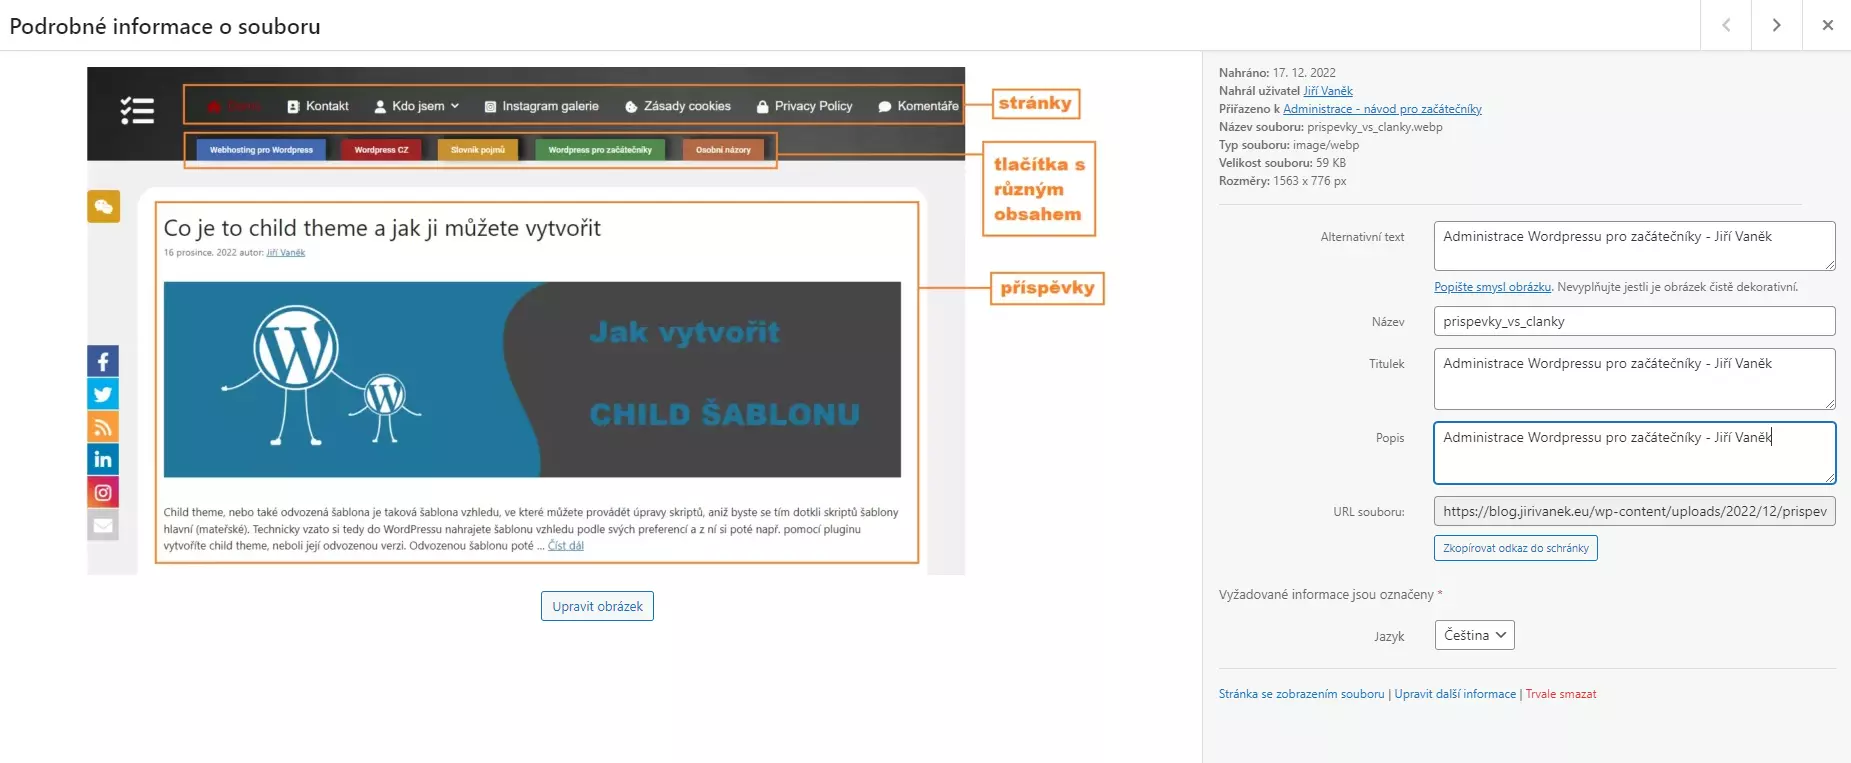
Image settings
This window, although it may not seem so at first glance, is very important for search engines. Search engines like Google, and others, cannot perceive what an image actually is or isn’t, like a human can. They index images based on their captions.
As seen in the example above, Google will index my image for the search phrase “WordPress Administration for Beginners – Jiří Vaněk”.
If someone searches for images of administration for beginners through a search engine, it is likely that Google will offer one of my images and lead them to this article. Therefore, I recommend always filling in captions if you want to increase the likelihood of Google showing your content to people searching for the topics you write about.
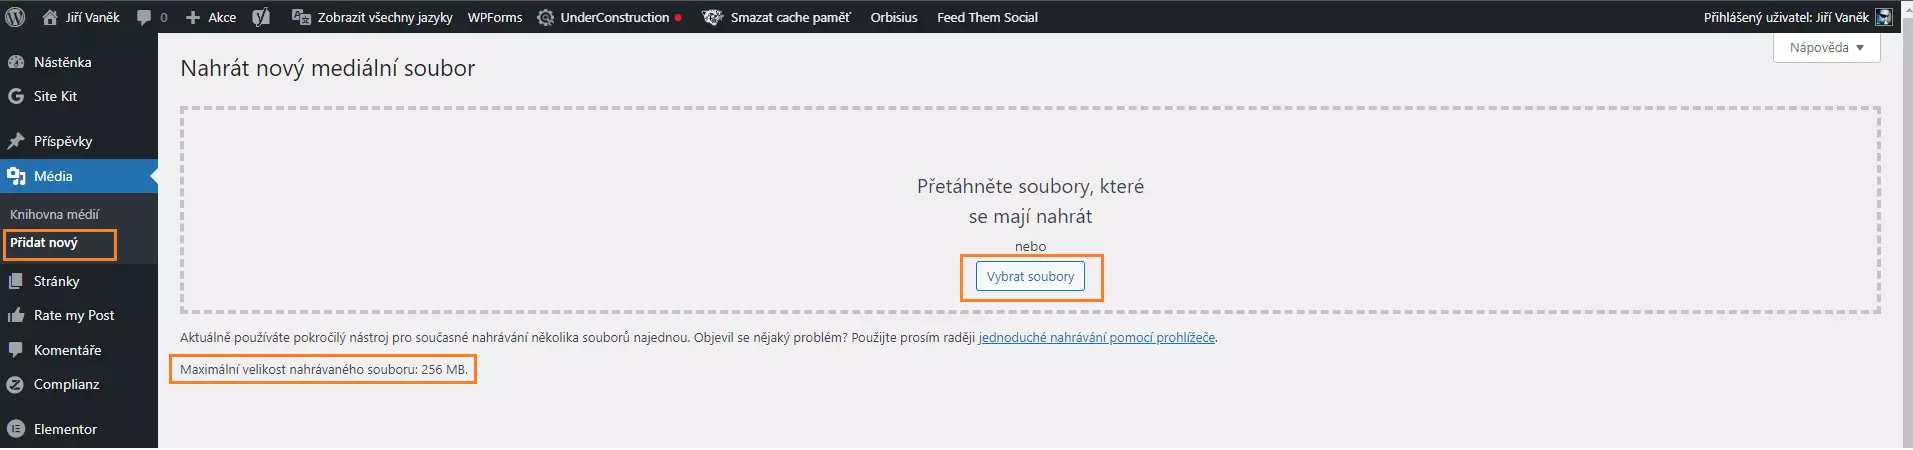
“Add New” is an item used to add media content to your website. Here, you can use PHP to upload a media file from your computer to the website. It is important to note that the PHP configuration of your web hosting provider may have a limit on file upload size. Therefore, larger files may not always be uploadable. If that happens, you will need to use FTP to upload larger files to the website. As a side note, the button for uploading new content is also hidden in the top left corner of the media library. This means you can upload new content in either of these two sections.
Which types of images to upload and which to avoid?
For modern websites, it is advisable to upload media content in new formats. If we are specifically talking about images, I recommend avoiding formats from the classic Windows Paint. Specifically, steer clear of formats such as .PNG or .JPEG. Why? These are older formats that use outdated compression methods. As a result, their file size can be up to ten times larger compared to modern formats like .WEBP.
When it comes to website content, always consider mobile device owners who may not have fast connections and try to save their data usage by not including unnecessarily large images on your website. This will ensure faster loading times. If you place several images on a page, each only a few KB in size, you reduce the risk of mobile visitors leaving your website because they don’t want to wait for content to load on a slower connection.
For a smaller number of images, you can convert them to .WEBP format online using the following tools:
For a larger number of images, I recommend installing software that can handle bulk format conversion for multiple files at once.
Pages
This section is used to add new content in the form of pages or edit existing content. I have already explained the difference between a page and a post, so there is no need to repeat practically the same information. This section is practically identical to the Posts section. However, unlike posts, there are no categories and tags for pages. Pages cannot be categorized in the same way. When creating a new page, you can only change the page template, which is derived from the main template settings.

Comments
The WordPress content management system allows you to enable or disable the comments section. This means that if comments are enabled and active, website visitors can actively respond to post content (not pages). Each visitor can add their own opinion below the post. In addition to the comment content itself, the website administrator can see other information about the commenter, such as their IP address, email address, and the name they provided.
In the left menu, in the comments section, you can moderate such comments. You can delete or approve comments, and you can also see the comment queue (comments awaiting approval) as well as your own comments, which are usually replies to visitors.
Items included in the comments section:
- Total: The overall number of all comments.
- My Comments: Your own comments.
- Pending: If comment moderation is enabled, all new comments are placed in this pending queue.
- Approved: Comments that have been approved by the website administrator.
- Spam: Comments that WordPress has marked as spam.
- Trash: Deleted comments awaiting permanent removal.

Appearance
This section in the left menu is one of the most important items in WordPress. It controls the website’s appearance using templates, which can be installed either from the administration interface itself or by downloading and uploading them via FTP to the wp-content/themes folder.
What is a theme template?
A theme template is a comprehensive package of visual design that defines how the website will look when the template is applied. It includes not only the graphical elements of the website but also PHP scripts that provide template functionality and cascading style sheets (CSS) that define the layout, size, and typography of individual elements.
WordPress has its own repository where you can choose from hundreds of templates. Each WordPress administration interface is connected to this repository, making the selection of a theme very convenient and done directly from the administrative interface.
Templates are usually completely free in their basic version, but many of them have limited features that can be unlocked for a fee.
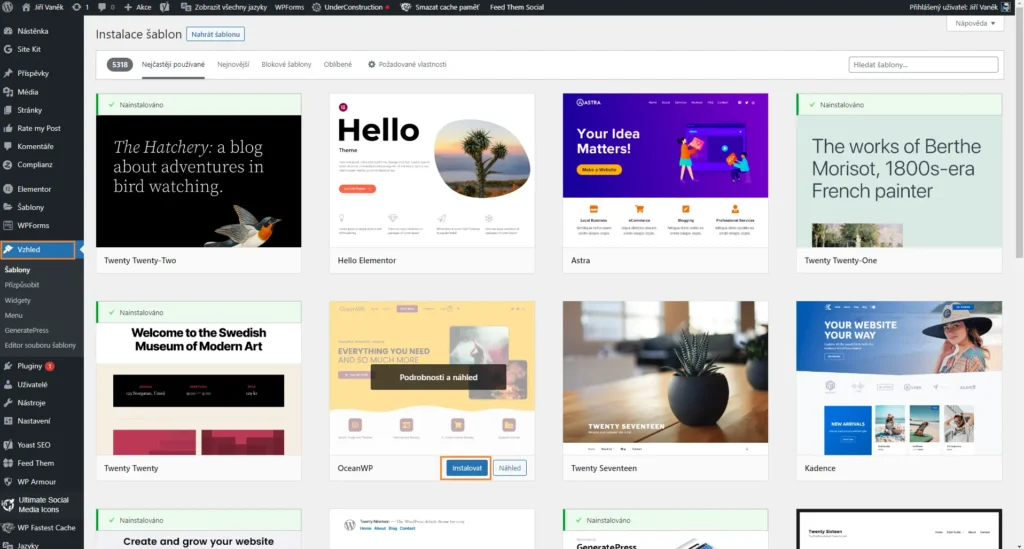
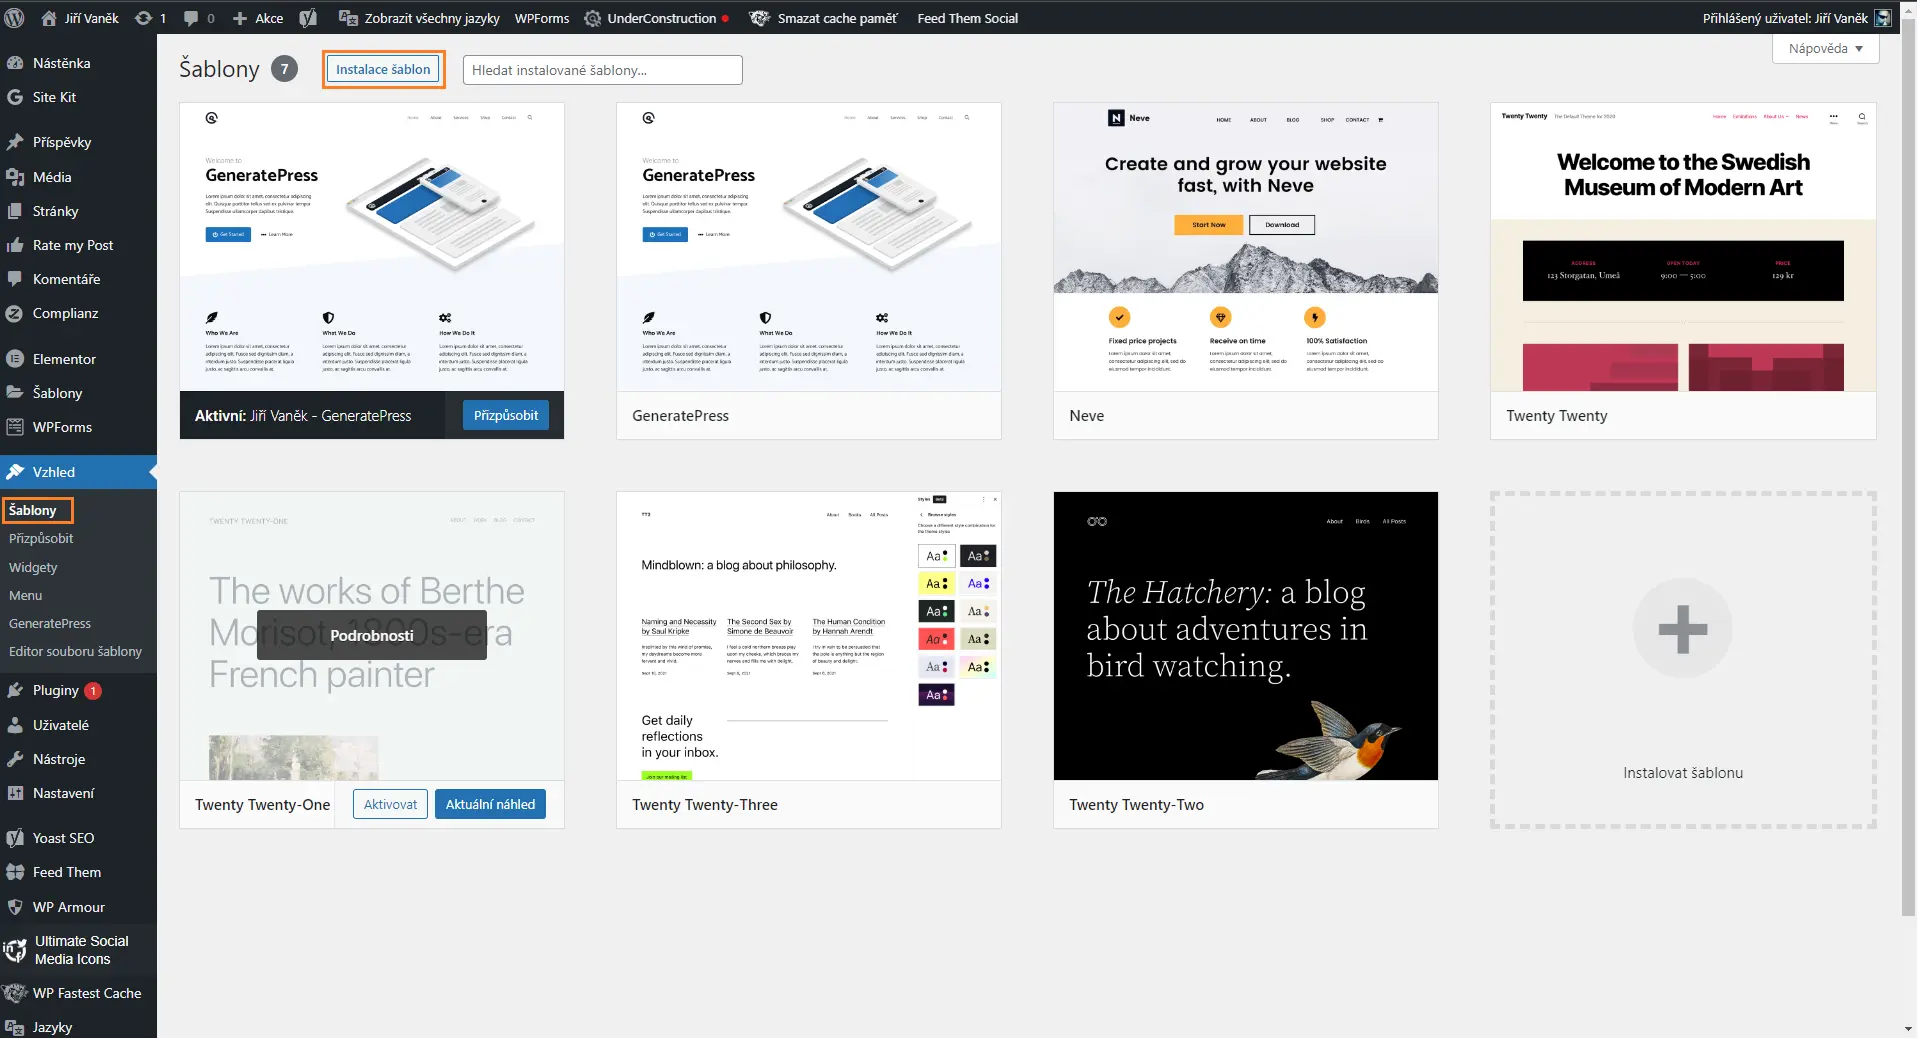
How can I preview a template before installation?
- Click on the “Appearance” item in the left menu.
- In the submenu, select the first option, “Themes.”
- Click on the “Add New” button.
- Browse and choose a template based on keywords or preview, then click on the “Preview” button.
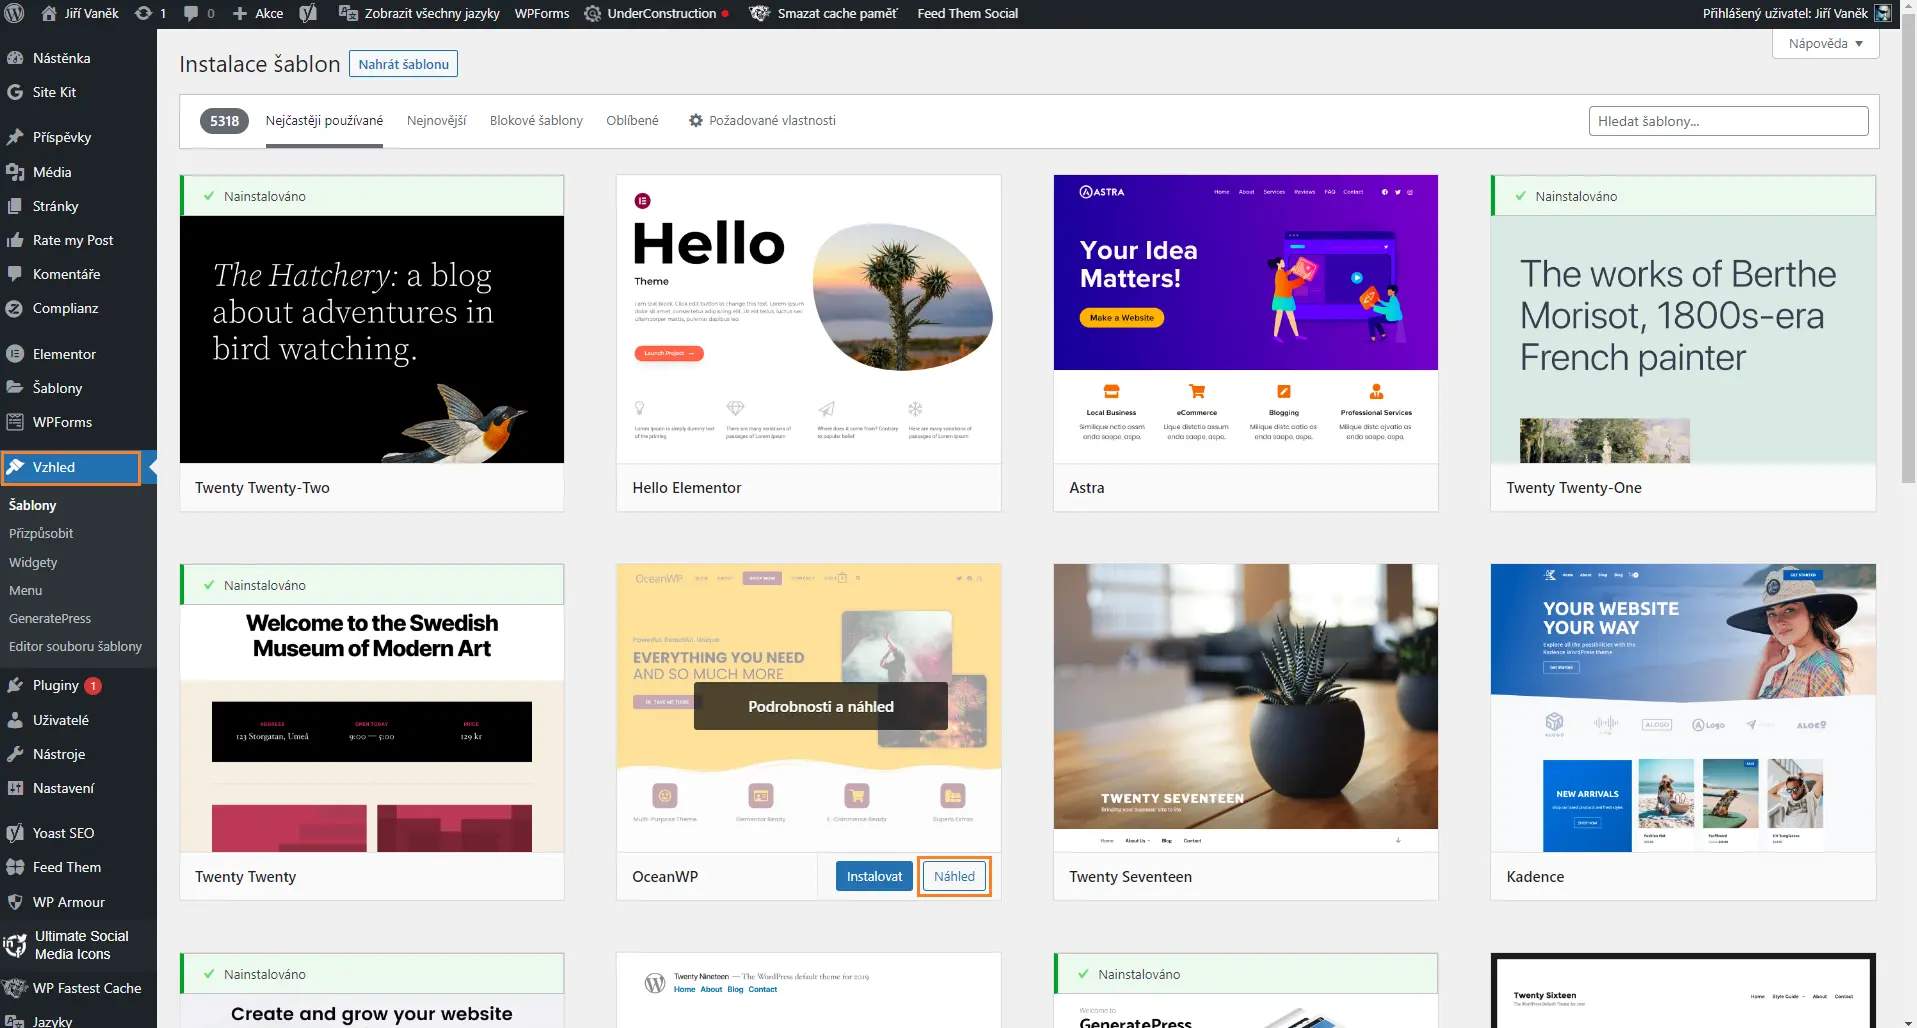
Template Installation
The installation process is again done through the Appearance section in the left menu. Here are the steps:
- Click on the “Appearance” item in the left menu.
- In the submenu, select the first option, “Themes.”
- Click on the “Add New” button.
- Browse and choose a template based on keywords or preview, then click on the “Install” button.
Customizing a Template
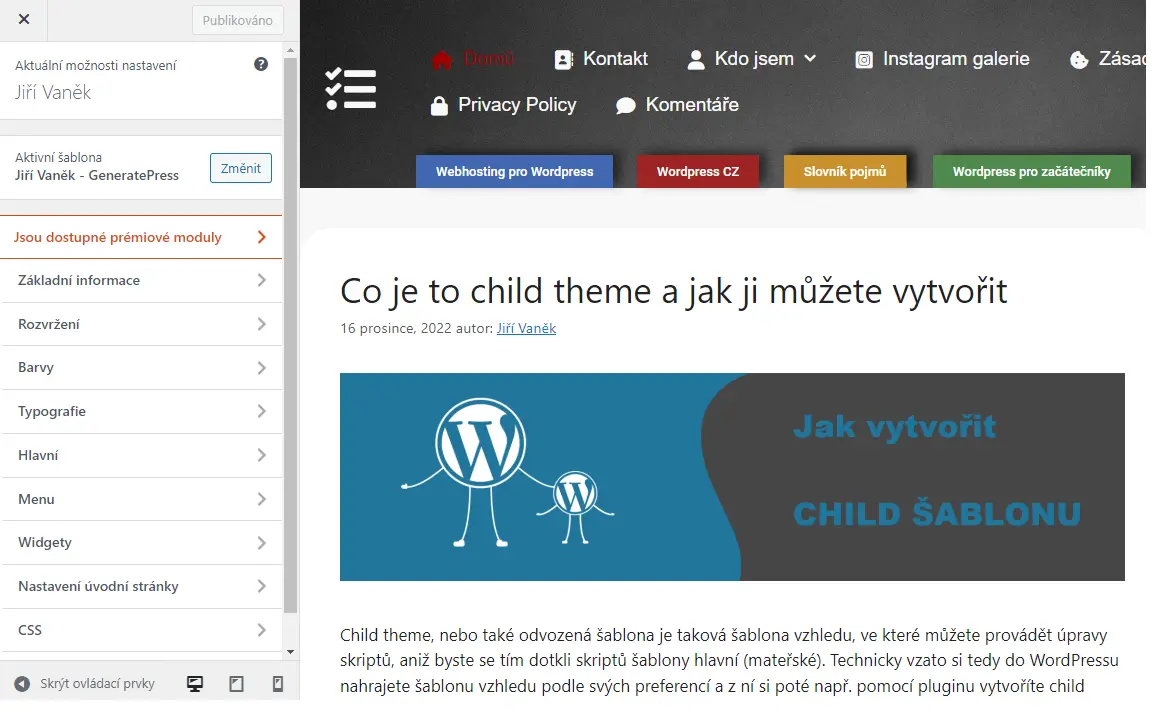
Each template has its default settings, but they can be modified in various ways. With almost every template, you can change basic parameters such as background color, font color, layout of elements like the sidebar or post area, and many others. If the available customization options provided by the template and its predefined settings are not sufficient, you can further modify the appearance using custom CSS code. Customization of a template is done as follows:
- Click on the “Appearance” link in the left menu.
- In the submenu, select “Customize.”
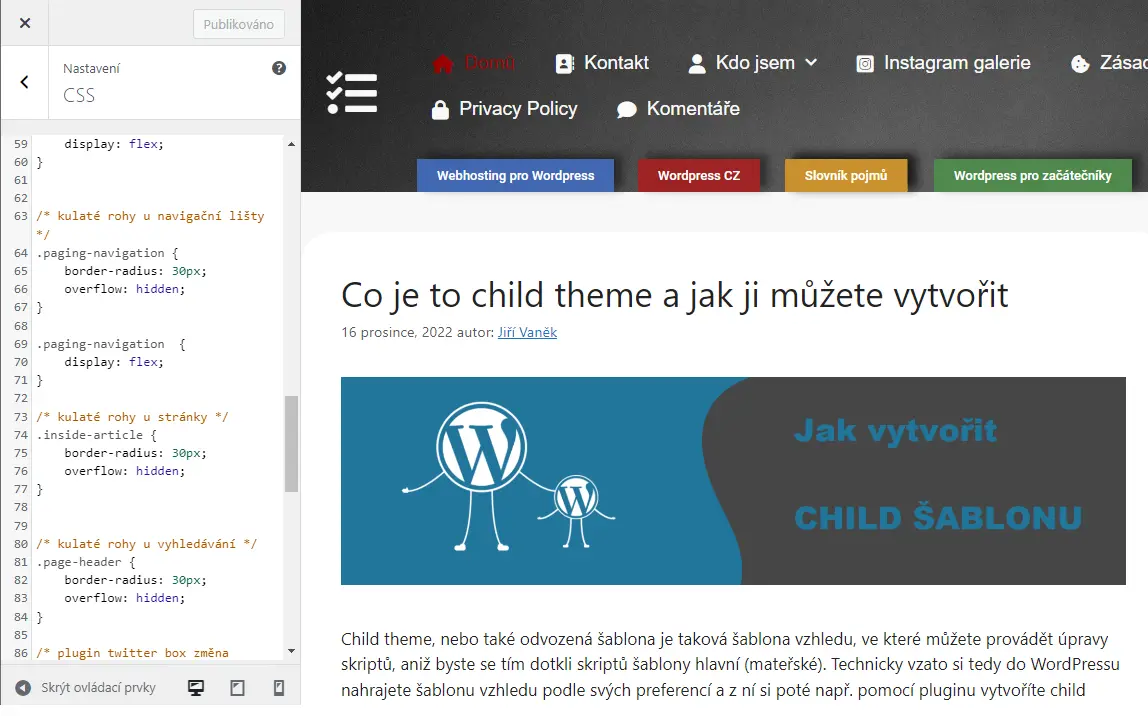
The template will display a menu with items that can be modified in its appearance. The last item, CSS, is used to insert custom CSS code that affects elements which cannot be changed through the menu. Here, you will need to write your own CSS code to modify specific elements defined in the CSS. You can learn more about working with CSS for modifying the appearance here.
What are Widgets?
Widgets can be described as small blocks with pre-selected content that can be inserted into designated areas within a template. Such areas include the sidebar, header, footer, and others. With widgets, you can create, for example, a sidebar where you can arrange various content. You can add elements such as a search field, category list, image gallery, custom HTML code, or even an entire block created using Elementor, as seen on this website. Similarly, by using a drag-and-drop system, you can insert elements into the header or footer of the website.
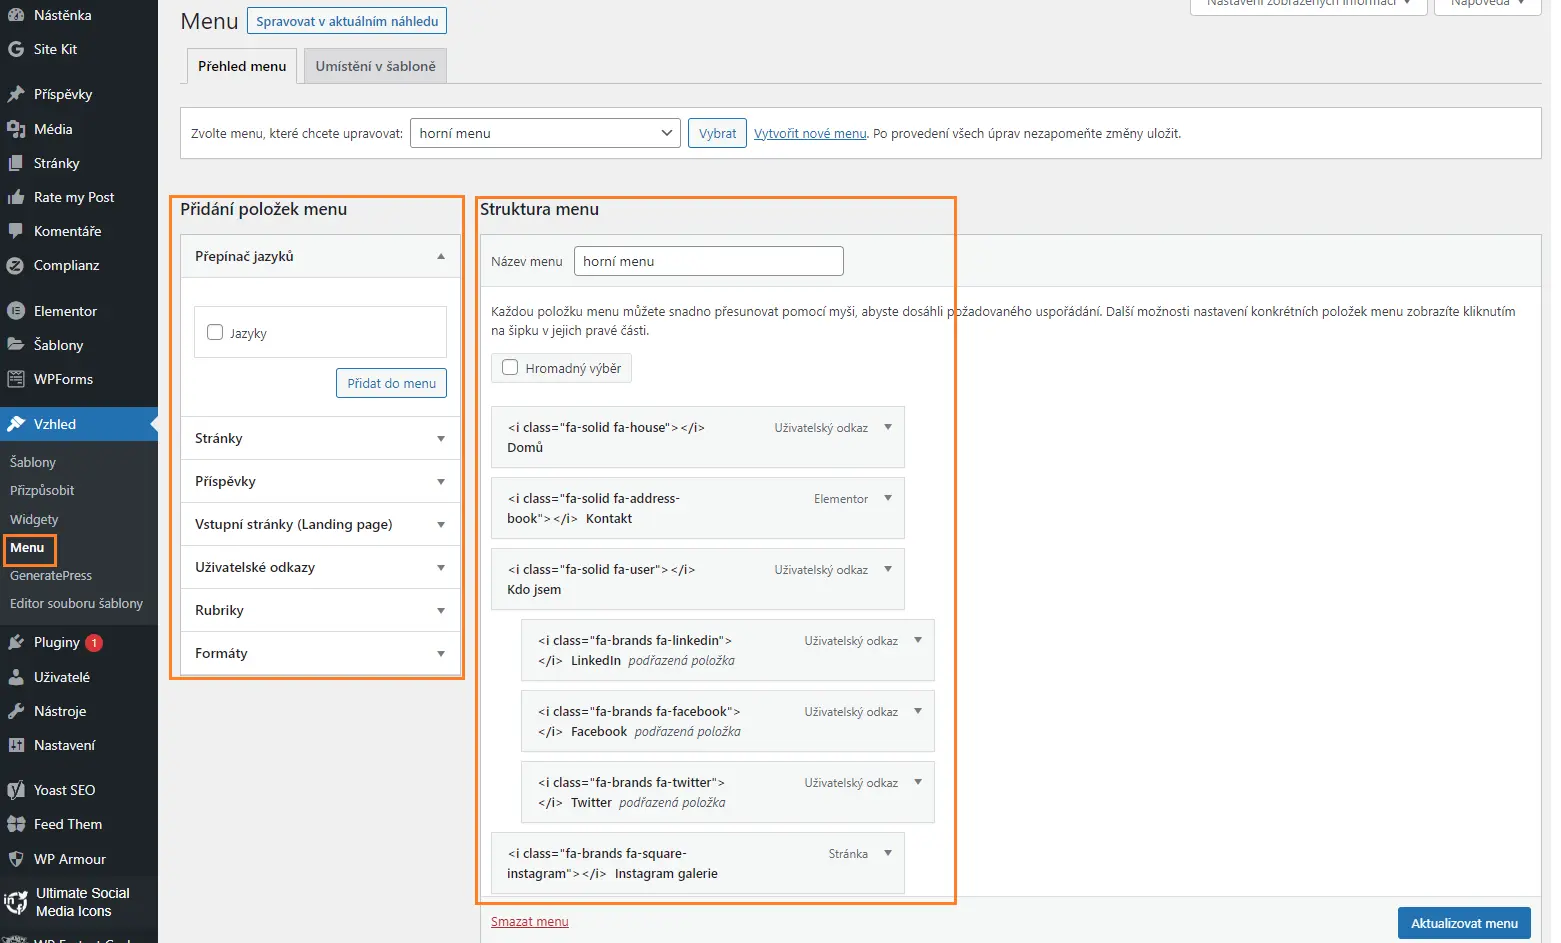
Menu
This section is intended for creating the main menu typically seen in the website header. It is the basic menu with links that guide users to the content, which can be either custom links or added pages.
Clicking on this item gives you the option to add items to the main menu, which directs website visitors to the key content elements of your page. These could include items such as About Us, Contact, Who We Are, What We Do, and so on. Through the menu, visitors can select the main categories of the website that interest them, and the links will redirect them to specific information. To add pages to the menu, you first need to create them so that they are visible to WordPress and can be added to the menu.
Template File Editor
This section is intended for advanced WordPress users, so I will only briefly mention it. This section is the editor that displays all the CSS and PHP files used by the template for its functioning. You can manually edit these files, but it means you are directly modifying the source PHP or CSS code of the template. Therefore, you should have a solid understanding of what you are doing. Needless to say, knowledge of both programming languages is necessary.
When it comes to modifying the source code, I recommend creating a child theme beforehand to ensure that your code changes are not lost in future template updates. Additionally, I would like to emphasize the importance of backing up the existing content before making any modifications to the source code.
Plugins
Plugins are designed to extend the functionality of the WordPress system. They allow you to implement features or properties that are not included by default. Plugins can range from e-commerce solutions like WooCommerce, gallery management tools, contact forms, security extensions for spam protection or GeoIP blocking, and more.
The process of integrating plugins into the system is identical to installing themes. Every installed WordPress is connected to a central repository from which plugins can be searched for and installed through the administration interface.
However, there are several factors regarding plugins that need to be considered:
- Do not try to solve every issue with a plugin.
- Keep all plugins up to date by regularly updating them.
- Remember that plugins are developed by third parties, and their security cannot be guaranteed.
Why should you be cautious about using a large number of plugins?
Each plugin in the system consumes a certain amount of memory to function correctly. The memory of a typical website on a shared web server has its limits. If you use a new plugin for every problem or imperfection, you will quickly reach the memory limit, and the website may start experiencing errors. Many WordPress issues can be resolved without using a plugin, or alternatively, a single plugin can address multiple problems. Therefore, it is important to think carefully and choose plugins wisely.
Updating plugins
Plugins are developed by third-party developers, and no one can guarantee their security. It is therefore advisable to log into the administration periodically and update all plugins that allow for updates. This way, you can avoid using a plugin with a known critical vulnerability. Additionally, exercise caution when installing plugins and check when the plugin was last updated. It is not uncommon to find plugins in the repository that have not been updated for a long time, which can pose a significant security risk.
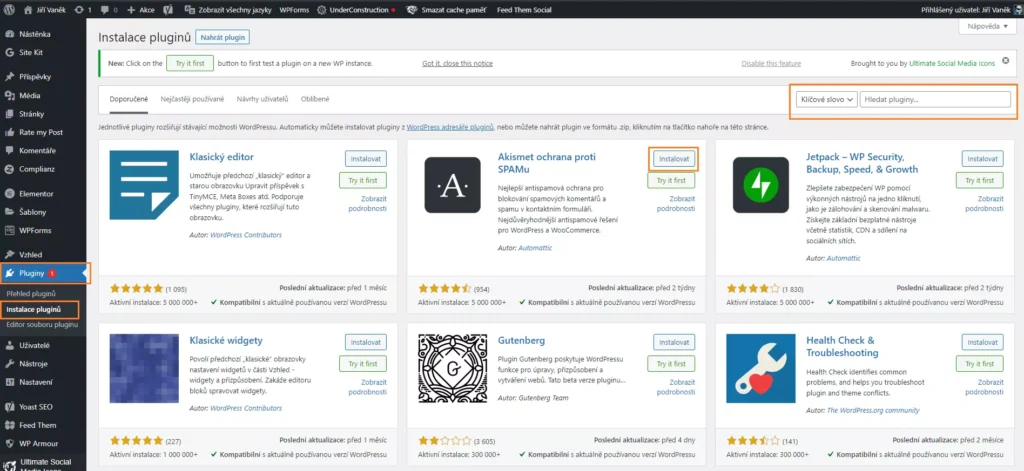
Installing plugins
Plugin installation is done through the administration interface under the “Plugins” section. In the submenu, you will find three options:
- “Installed Plugins“: Displays a list of all currently installed plugins, regardless of whether they are active or not.
- “Add New“: In this section, WordPress connects to the plugin repository, allowing you to find the desired plugin, install it, and then activate it.
- “Plugin Editor“: Similar to theme files, this option allows you to view and manually edit the source code of the plugin.
So, how you can install a plugin? It’s relatively straightforward. Follow these steps:
- In the left menu, go to “Plugins.”
- Click on “Add New” in the expanded submenu.
- Enter a keyword or the name of the plugin in the search field.
- Once the plugin is found, click on the “Install” button.
- After the installation is complete, click on the “Activate” button.
The plugin will integrate into the system and add another menu item in the left menu for its management. This menu item is often hidden under “Tools” or “Settings.” It is not a rule that every plugin has its own menu item in the left menu.
Users
In the WordPress system, it is possible to create new user accounts and define their user roles within the system. Each role has its own permissions (which we will discuss below) and determines what specific actions a user can take within the system, as well as what they can edit or modify. Let’s take a closer look at users and user permissions in WordPress.
At the top of the system is the administrator (or super administrator), who has all the rights. On the other hand, a user with very limited rights is referred to as a visitor.
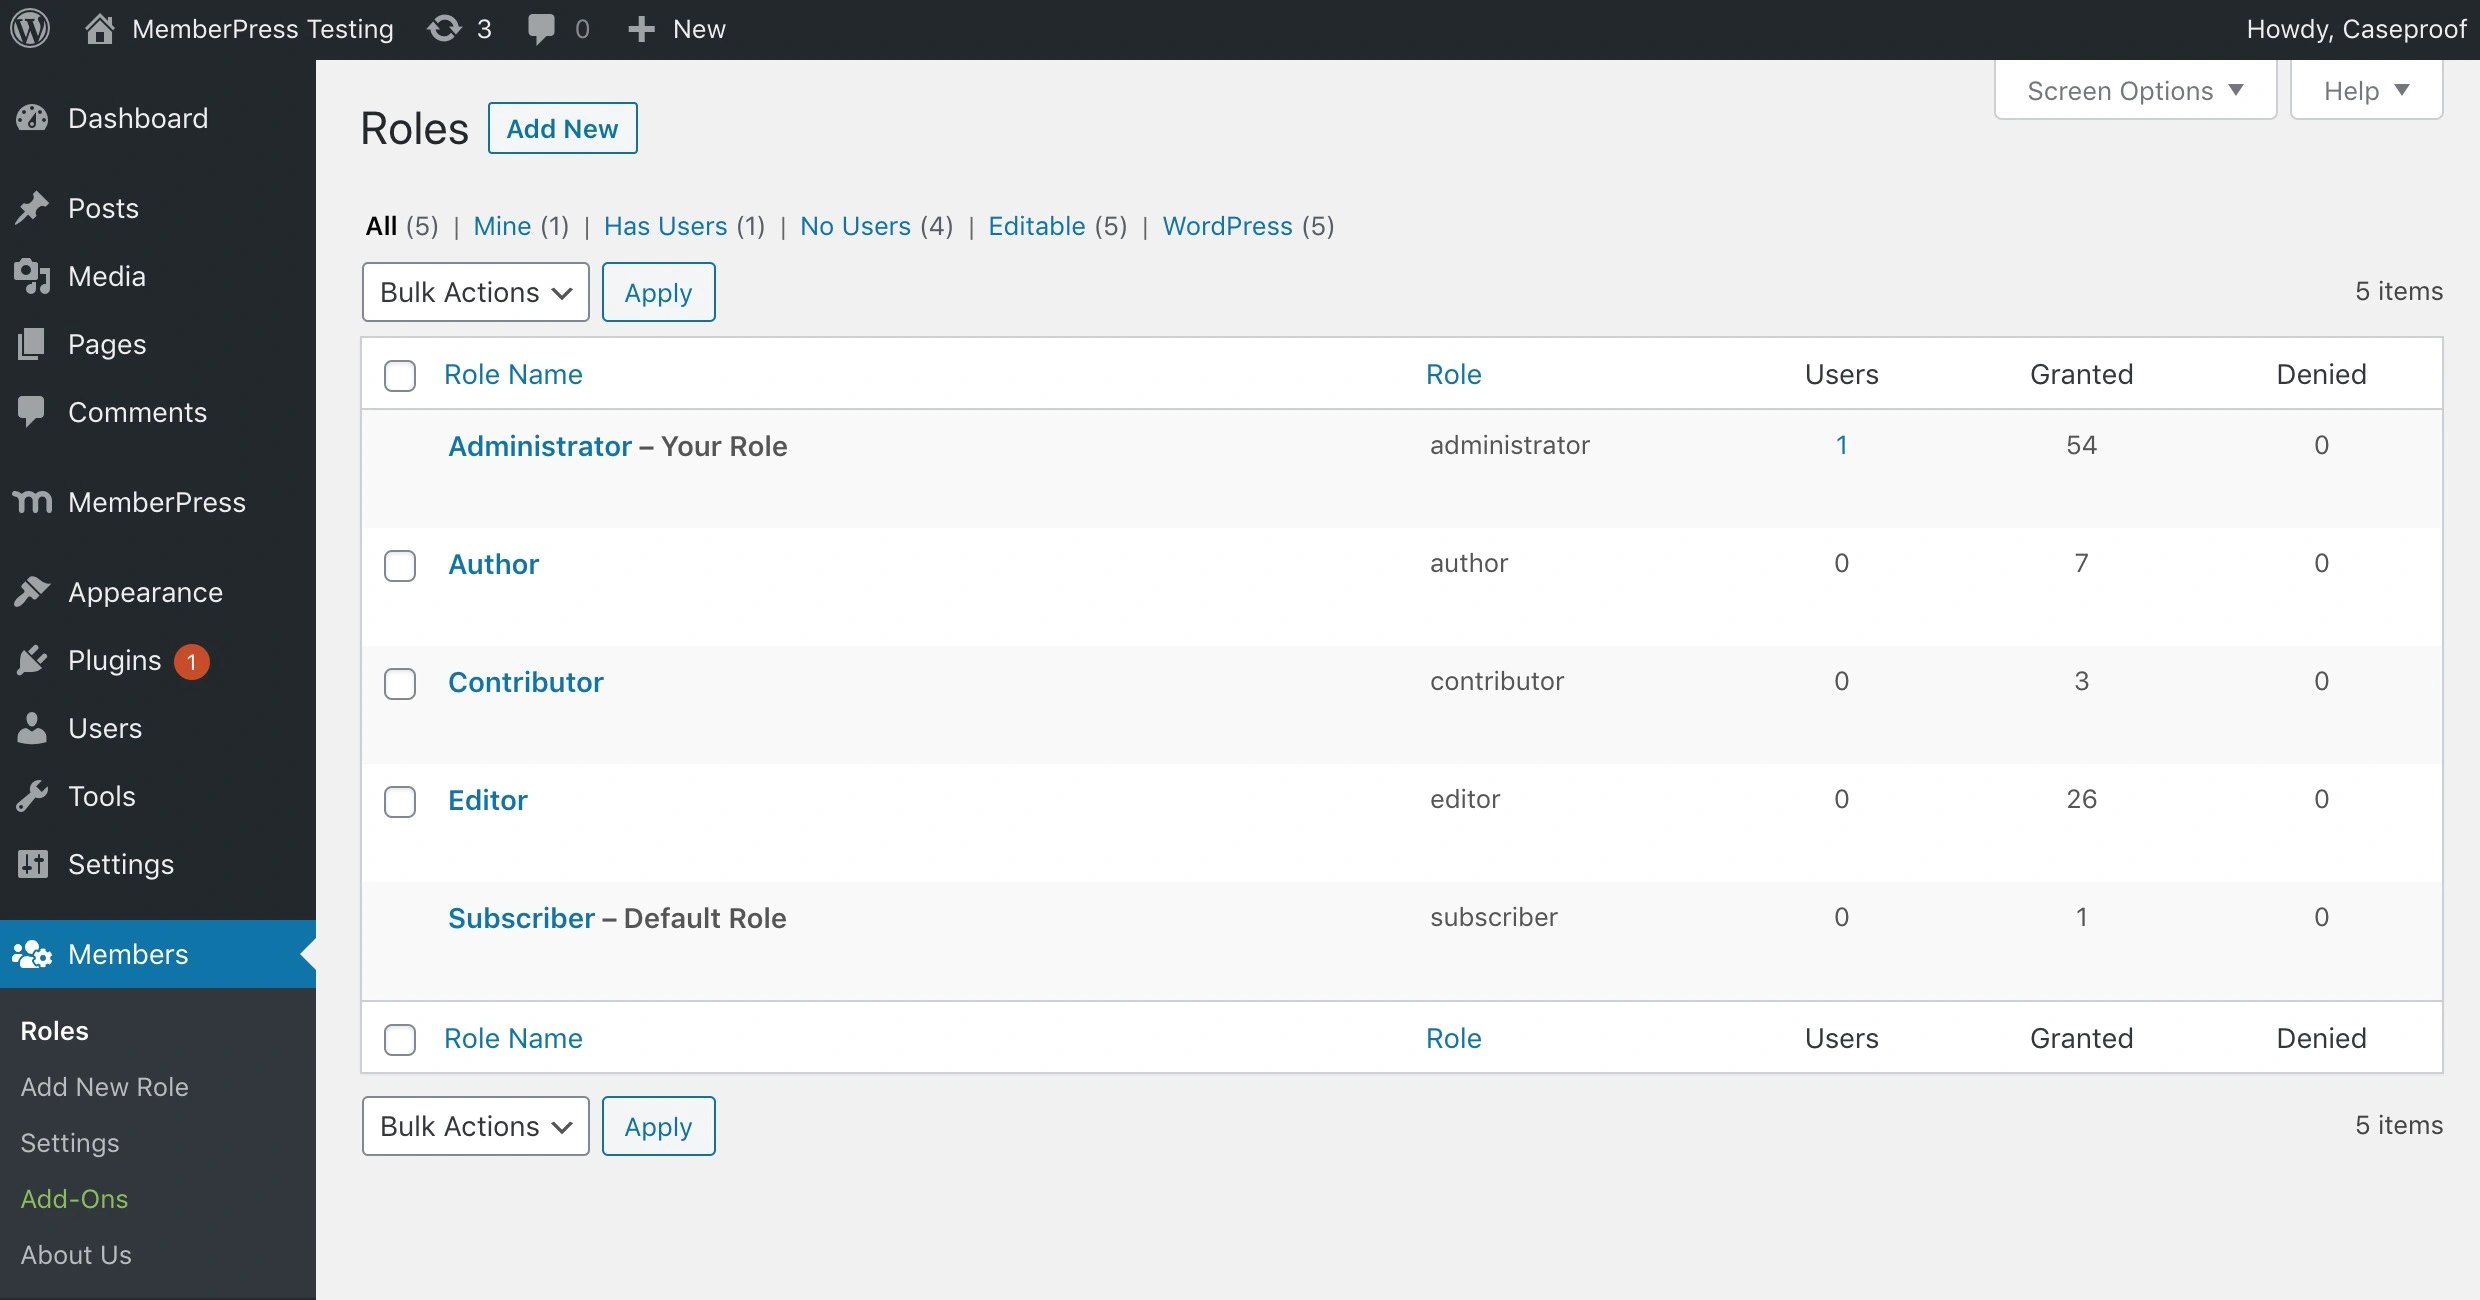
By default, WordPress defines a total of 5 roles, WooCommerce adds 2 roles, and Multisite WordPress adds one additional role compared to regular WordPress.
WordPress Roles:
- Administrator
- Editor
- Author
- Contributor
- Subscriber
WooCommerce Roles:
- Customer
- Shop Manager
WordPress Multisite (Super Administrator Role):
- Super Administrator
As mentioned above, WordPress Multisite has an additional role, the super administrator, compared to regular WordPress. A regular administrator in a multisite setup manages and has full rights only to a specific website within the platform. However, the super administrator manages all the websites created within the system. Therefore, the super administrator role in multisite has the highest level of permissions a user can have.
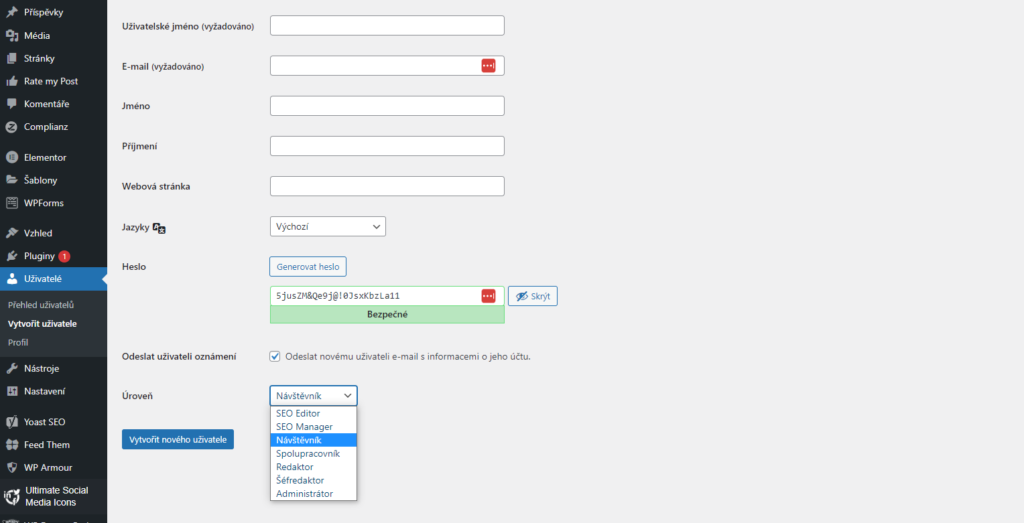
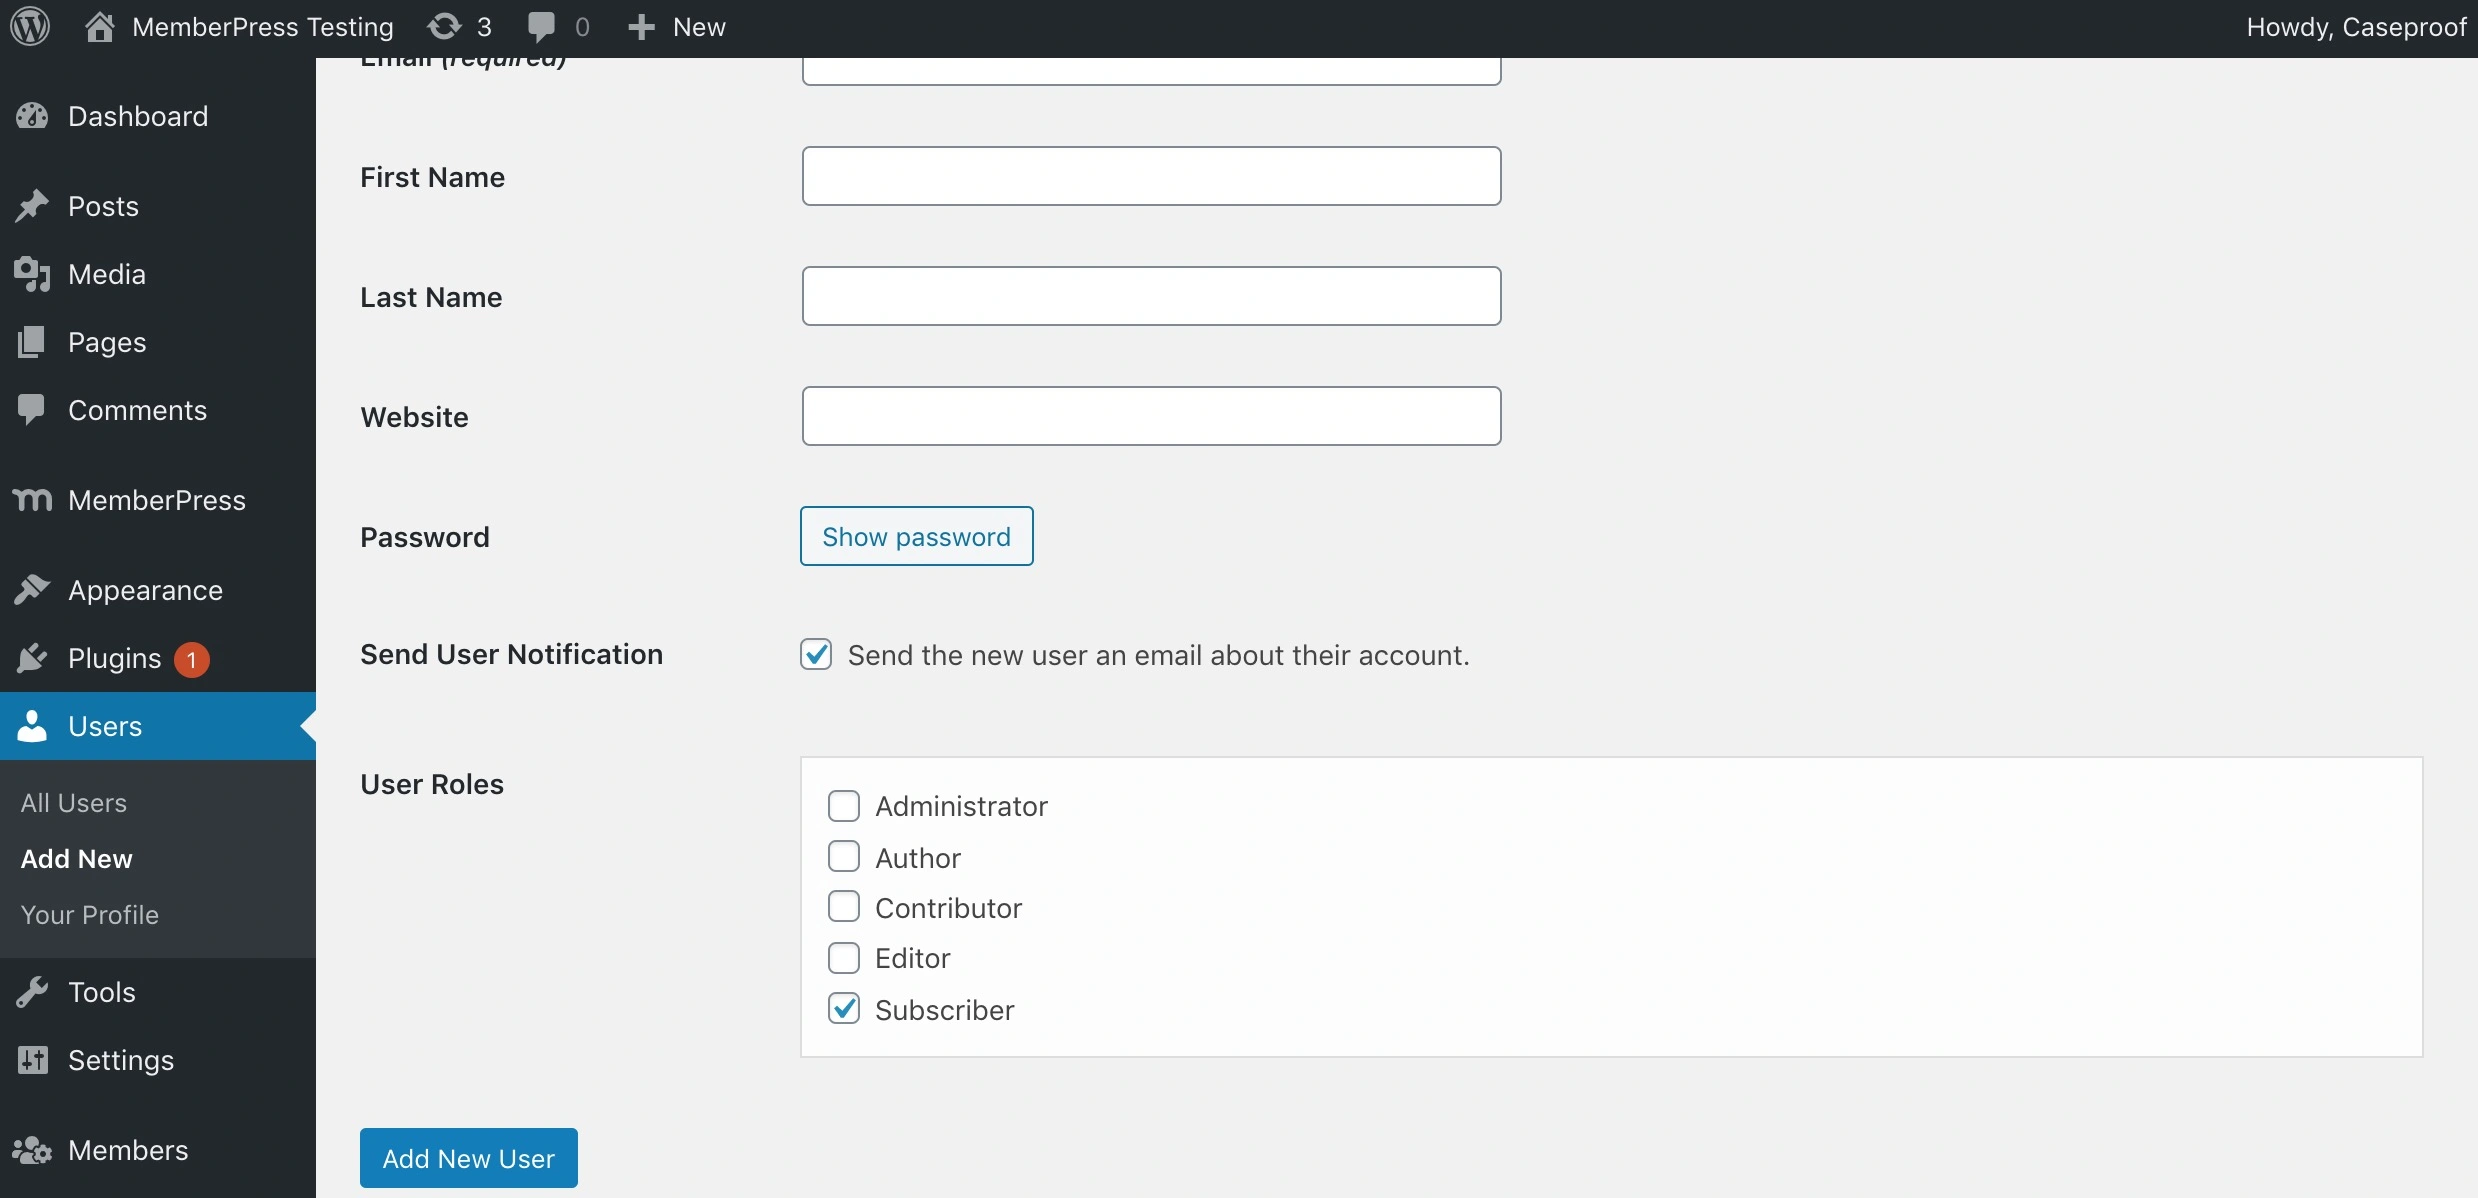
How to create a new user
A new user can be added in the administration interface by navigating to the left menu, selecting “User“, and then clicking on “Add New User“. If allowed in the system, a user can also register on the website themselves using a registration form. This is suitable, for example, for websites that involve email subscriptions or other similar scenarios.
User Permissions – What Each User Can and Cannot Do
Visitors – Visitors can log in to your WordPress website, edit their user profiles, view published content, but unfortunately, they cannot perform any other actions within the system.
Contributors – Contributors can add new posts and edit their own posts. They cannot publish posts, remove posts, or upload files.
Editors – Editors can write, edit, publish, and delete their own posts, but they cannot modify posts written by other authors. They can upload files and view comments but cannot moderate them.
Authors – Authors can write, edit, publish, and delete their own posts, including posts written by other authors. They can upload files, create new categories and tags within the system, and moderate comments.
Administrators – Administrators have complete control over the website. This is the only role that can modify website settings, install themes, and plugins. They can also add new users or delete existing ones. Along with the administrator role, additional tasks related to system management, such as updates, are also associated.
Super Administrators – Super administrators have admin access to every website created using the Multisite platform.
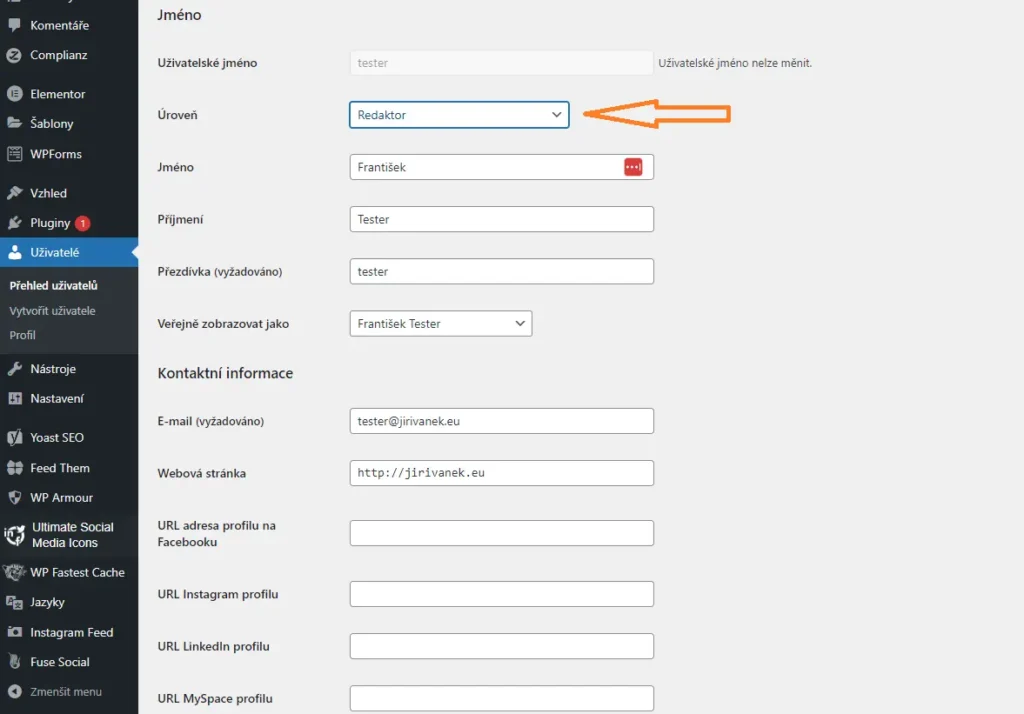
Is it possible to modify user permissions for individual user groups?
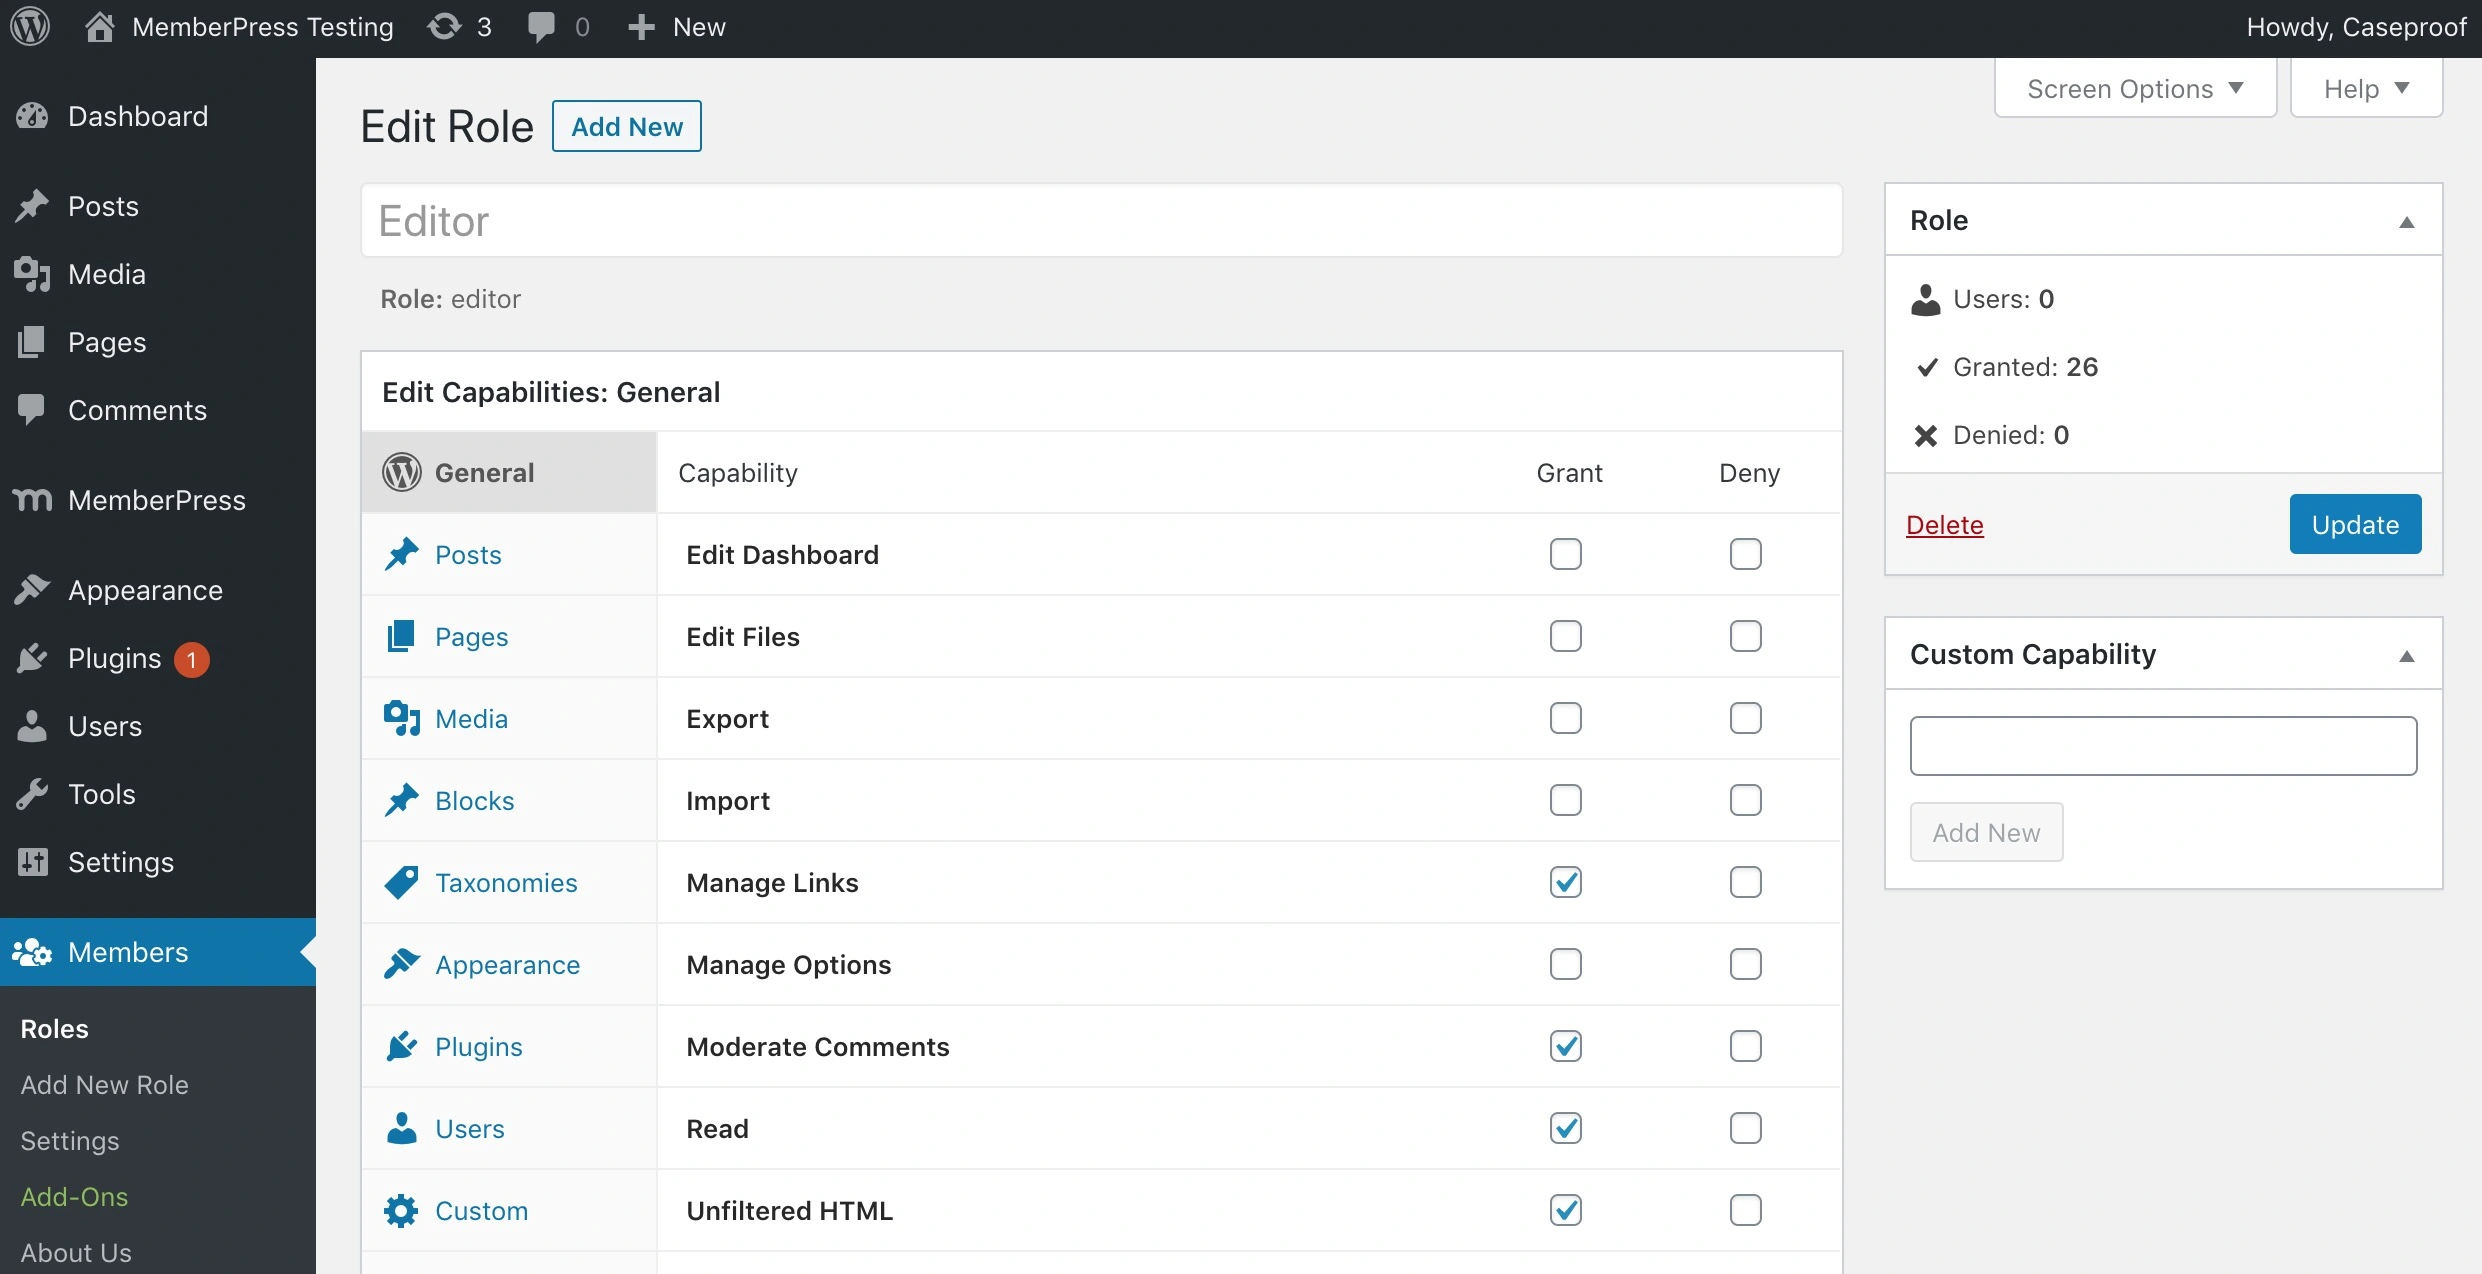
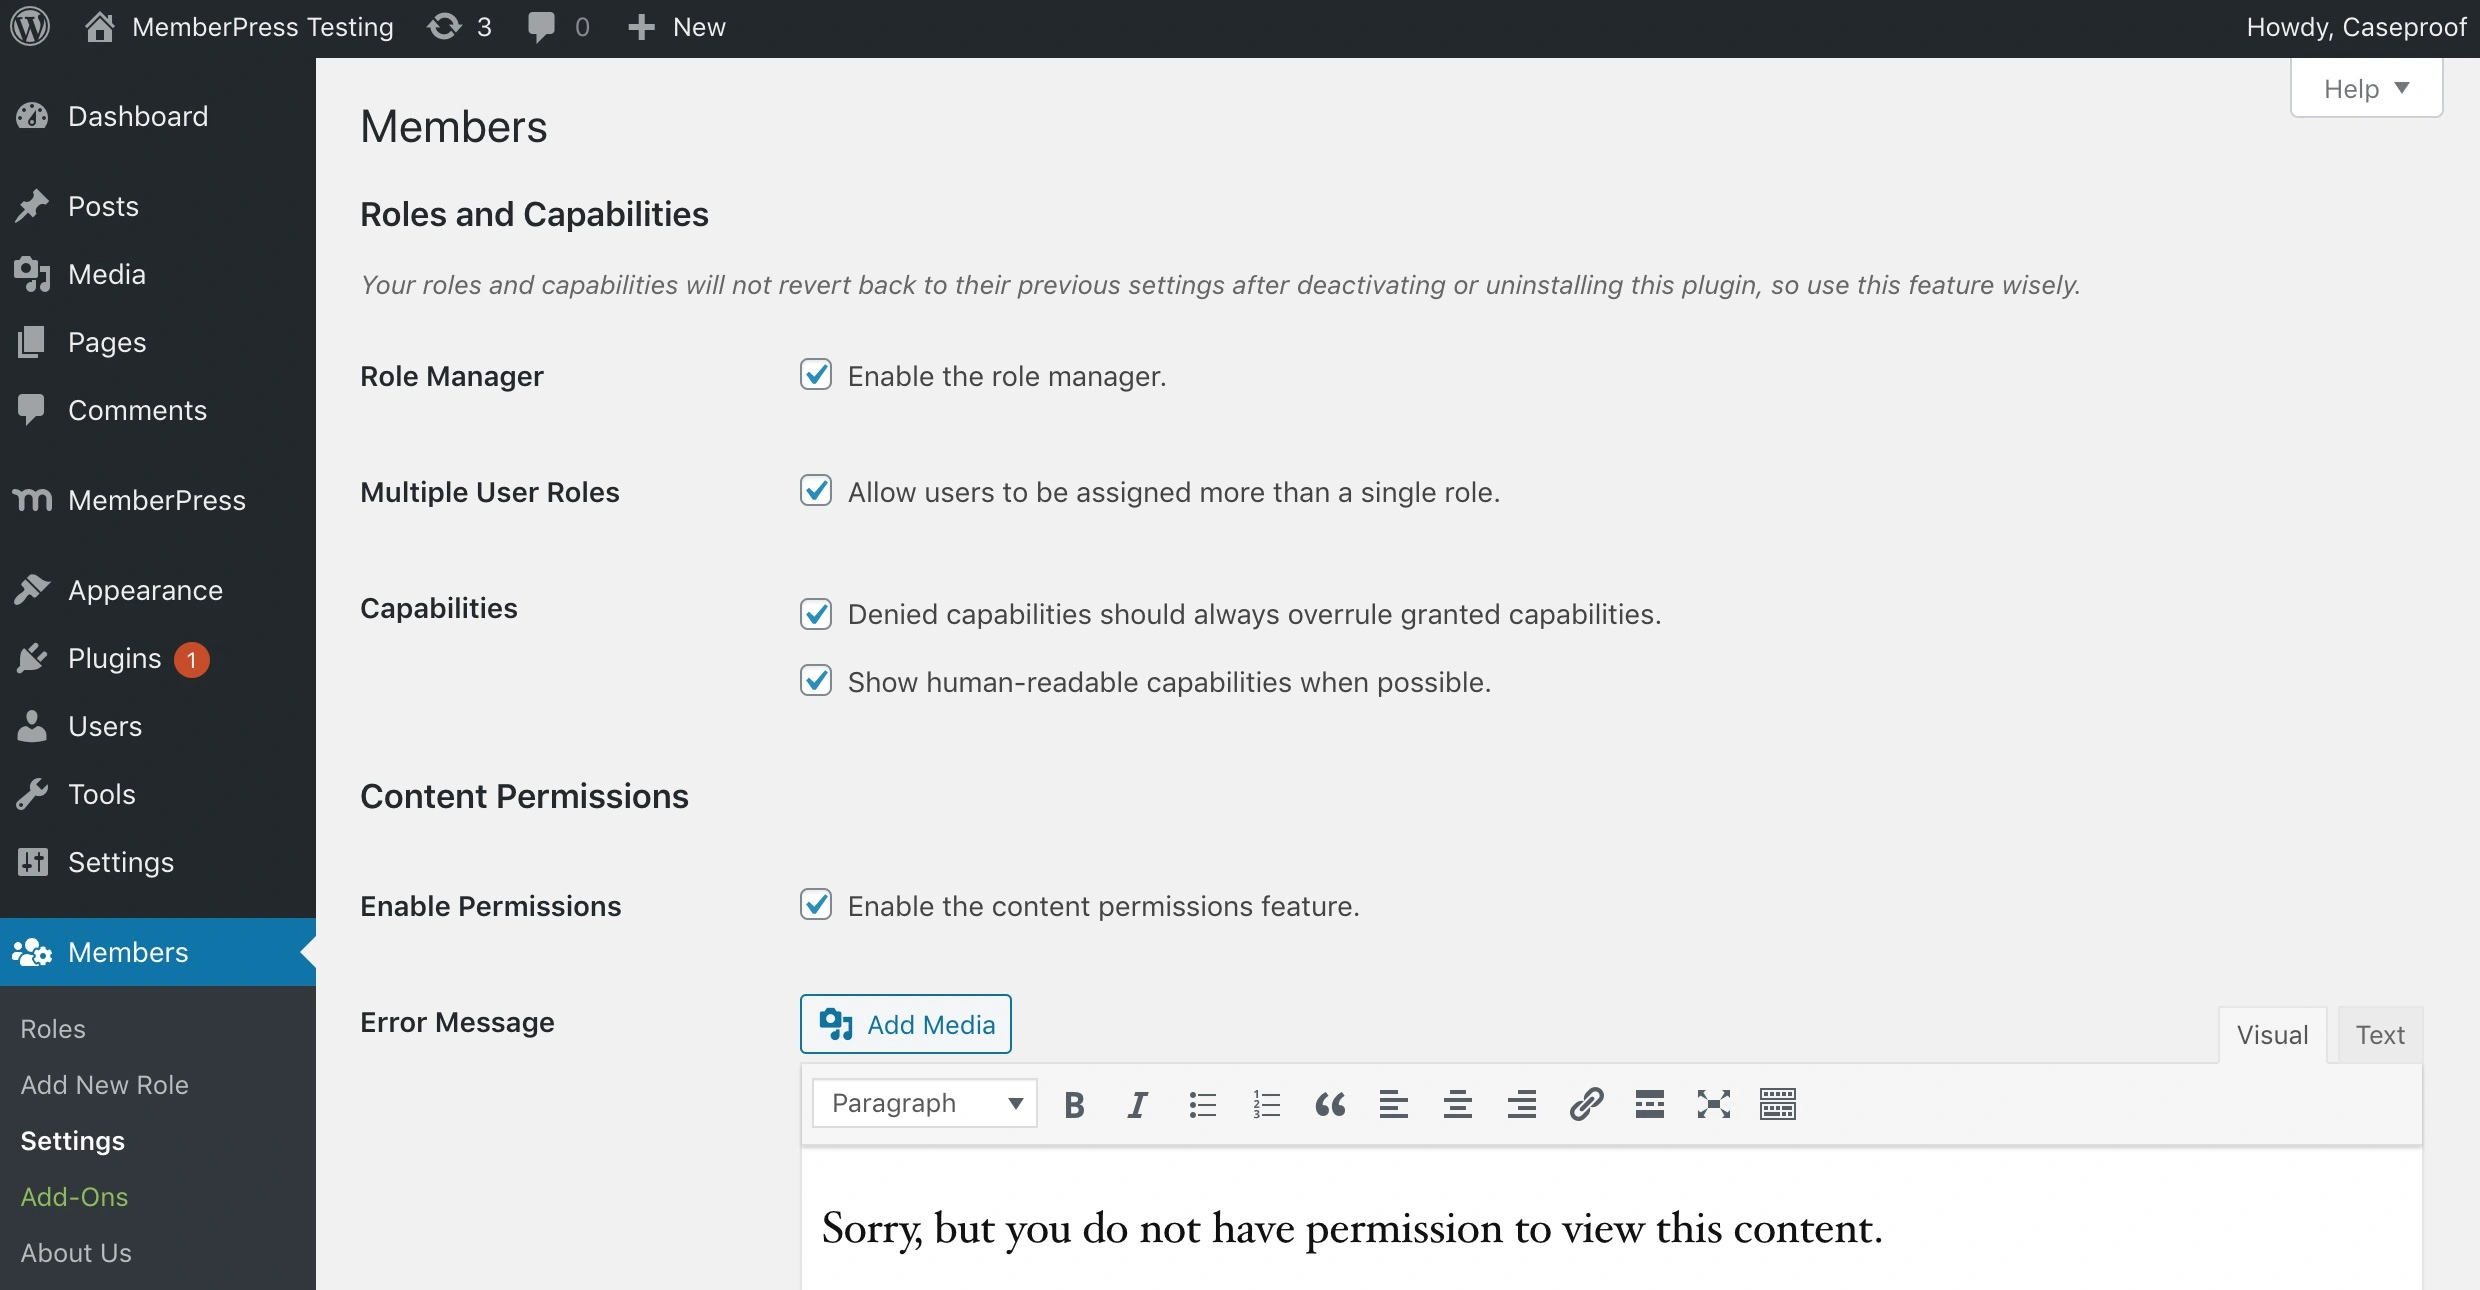
Yes and no. So how does it really work? By default, WordPress does not allow this. The permissions are clearly defined, and you can only change the category to which a user belongs. In other words, you can change a user from an editor to an administrator, or vice versa. However, you cannot modify the specific permissions they have. However, it is possible to achieve this by using a plugin that extends such capabilities. One example is the “Member” plugin.
Here is how the standard user editing looks in the default settings of WordPress without external plugins.
Tools
WordPress tools include the following items:
- Import – used to import data from another website into the current one
- Export – used to export data from the current website for possible transfer to another website
- Site Health – displays the website’s security status and provides useful information about the system, such as PHP information listing Import
Import
The import function in WordPress is used to transfer data from another system to the current one. Instead of manually transferring individual elements from the original system, you can utilize the data import feature.
In the original system, you first perform a data export, creating a data package. Then, in the new system, you use the import function to insert the data into the new system.
Export
On the other hand, the export function is specifically used to create the aforementioned data package, which will be used for importing on another website. The goal is always to achieve the simplest transfer of data, eliminating the need to manually configure the system from scratch.
Settings
The last menu item, “Settings,” pertains to the management of system functions and behavior. We will go through them quickly and discuss the most important ones.
General – Here, you define information about:
- The website’s name and its description
- The domain name for which WordPress is installed
- The email address of the website administrator
- Date and time format
- Website language
Publishing
The “Publishing” section allows you to configure various aspects, such as the main category for posts. By default, when you add new content in the form of a post, it is assigned to the “Uncategorized” category. Here you can choose a different category that will be automatically selected as the default for new posts (you can change it during or after writing the post).
Display
In the “Display” section, you define a crucial element, the homepage. This is the page that visitors will see first when they enter your domain name in their browser (unless they arrive at a specific content page through a search engine link). You have the option to set either a static page or, if it’s a blog, you can choose to display a feed of posts. This way, readers will always see the latest content added to your website in the form of posts.
Comment Settings
The “Comment Settings” section is dedicated to detailed configuration options for commenting on your website’s content. Here, you can enable or disable comments and set their moderation. This means that every comment submitted must be reviewed and approved before it can be displayed on the website. Until then, it remains hidden from all visitors. It is only visible to logged-in users with administrator roles.
Additionally, you can define words or phrases that, if included in a comment, will not be allowed. You can create a list of vulgarities or prohibited phrases that will automatically prevent comments containing those words from being published on the website.
Media
In the “Media” section, you can define the basic image sizes in pixels for small, medium, and large images. If you leave the option “Organize my uploads into month- and year-based folders” checked, a directory structure will be created on the FTP in the wp-content/uploads folder, with folders named according to the upload date, where media files will be stored.
Permalinks
The “Permalinks” setting allows you to customize the format of your URL addresses. The default setting looks like this: https://blog.jirivanek.eu/cs/?p=123
By changing the URL format, you can create addresses that are more user-friendly and search engine-friendly. For example, the URL can appear as: https://blog.jirivanek.eu/cs/administrace-pro-zacatecniky
Easy WordPress Administration – Watch This Guide
Conclusion
And that brings us to the end. In this guide, I have provided a general overview of the different menu elements and settings in the administration panel. More detailed tutorials on various topics, specifically aimed at beginners, will be added as posts here on the blog. I will cover content creation, design customization, as well as advice on security and system management. I wish you success in creating your website or blog.
Byl pro Vás tento článek užitečný?
Klikni na počet hvězd pro hlasování.
Průměrné hodnocení. 0 / 5. Počet hlasování: 0
Zatím nehodnoceno! Buďte první
Je mi líto, že pro Vás nebyl článek užitečný.
Jak mohu vylepšit článek?
Řekněte mi, jak jej mohu zlepšit.

Subscribe to the Newsletter
Stay informed! Join our newsletter subscription and be the first to receive the latest information directly to your email inbox. Follow updates, exclusive events, and inspiring content, all delivered straight to your email.
Are you interested in the WordPress content management system? Then you’ll definitely be interested in its security as well. Below, you’ll find a complete WordPress security guide available for free.
