
Last updated December 6th, 2023 00:21
If you manage web hosting on the popular WordPress platform, then you’re probably familiar with the following situation like the back of your hand. You have a live version of the website that receives dozens, maybe hundreds, of visitors every day. You need to implement a new feature on the website, but you’re afraid that it might cause damage or function incorrectly. What can you do about it? The answer is simple: staging the website. Today’s topic is staging a website on WordPress, or how to safely test websites. And don’t worry, it will be convenient, easy, and manageable even for those who are just starting out with WordPress.
Staging a website on WordPress, or how to safely test websites
Let’s first talk about how staging a website actually works. It’s fundamentally simple. On one side, you have a functional and live website (the live web) that users visit and that needs to remain functional. On the other side, you have an exact copy of it that is not public and where you can test everything you need to change on the website. Whether it’s the design, a complete redesign, or new features, staging allows you to transfer and implement the changes made on the staging side to the live version of the website.
And this is exactly what the WP Staging plugin (https://wordpress.org/plugins/wp-staging/) does. Let’s take a closer look at it and also see an example of how to create a website copy and then implement the changes from the copy to the live version of the functional website.
WP Staging Plugin
To begin with, I should mention that this is a paid plugin. However, if you need to perform tasks such as redesigning a website, which can take several days to months of work, the price for the plugin license is reasonable. As of the date of this article, we’re talking about a price of around $8 per month, which is more than acceptable.
You can easily install the plugin by following these steps:
- In the left administration menu, click on “Plugins“
- In the submenu, select “Add New“
- In the search field in the upper right corner, type the plugin name “WP Staging“
- Install and activate the plugin.
- Purchase and activate the plugin license.
Creating a website copy
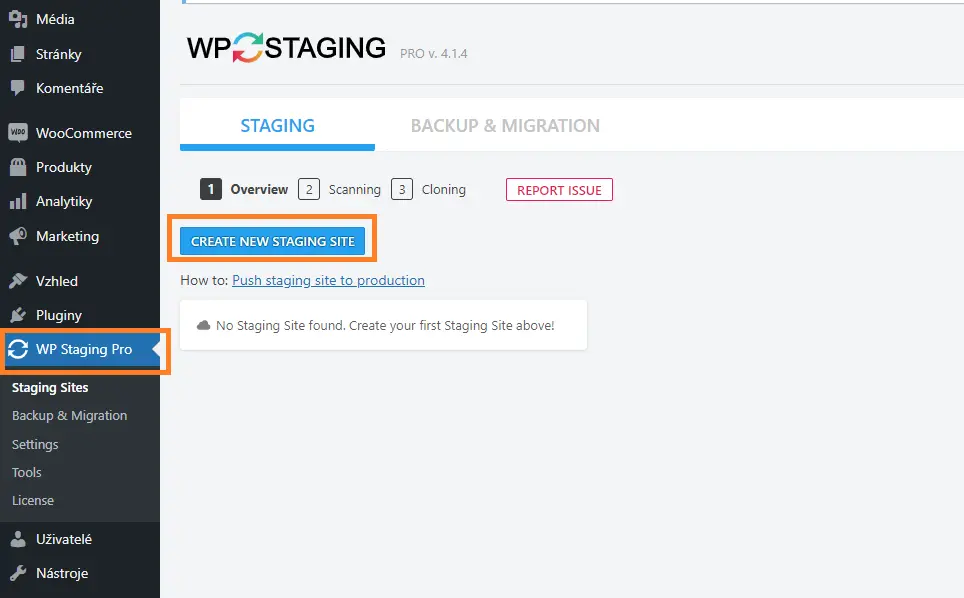
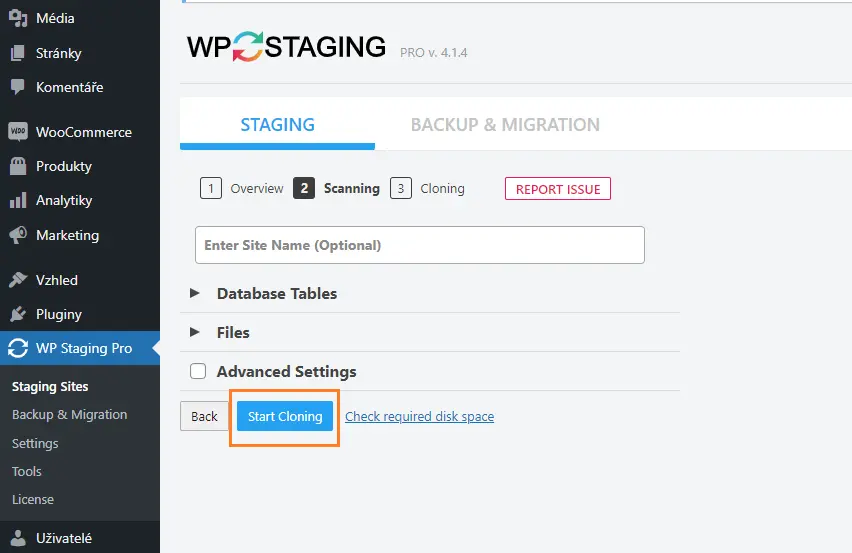
After activating the plugin, you will see a new item in the left menu called “WP Staging Pro“. Click on it, and on the plugin screen, create a website copy using the “CREATE NEW STAGING SITE” button. On the following screen, initiate the website cloning process by clicking “Start Cloning“. If you only need to clone specific tables or certain data on the FTP, you can modify the cloning process using the “Database Tables” and “Files” options.
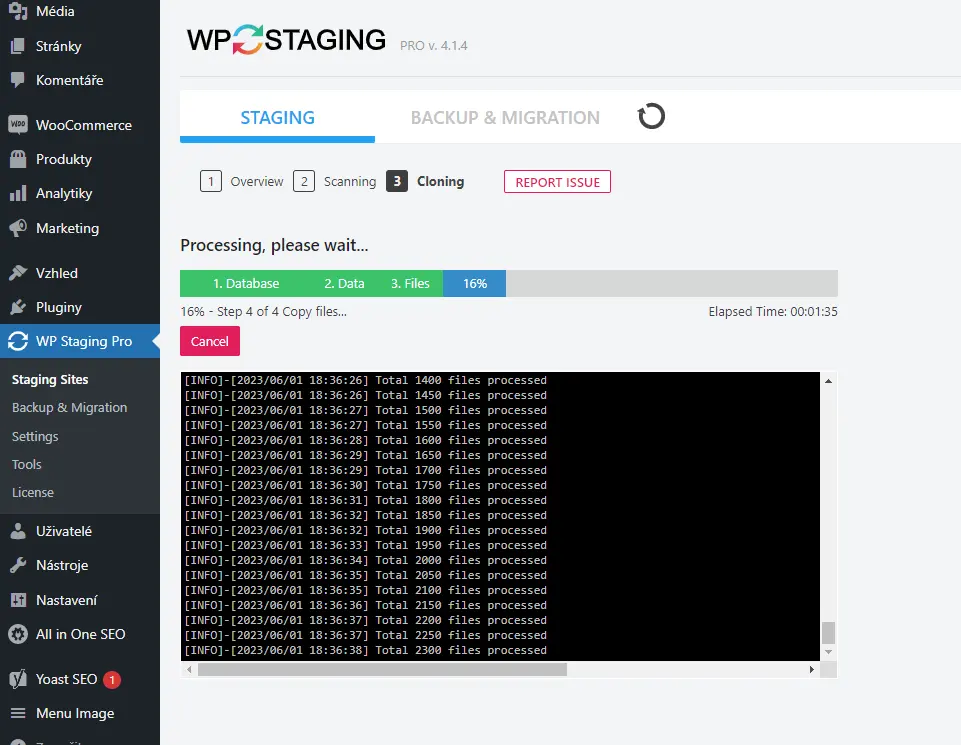
The plugin will then create a randomly named folder on the FTP, where it will make a copy of the WordPress data. It will also duplicate the tables in the database, creating the same tables with a new prefix. Technically speaking, a full-fledged copy of the website will be created, including both FTP data and MySQL database tables.
Once the copy is created, you can log in to the cloned website. The login credentials are the same as those used for the original live version of the website. Therefore, you can use the same username and password.

Staging a website on WordPress, or how to safely test websites
Getting started with modifications and testing
I assume that you are now logged into the administration of the cloned website. You can easily recognize it by the orange admin panel, which distinguishes the clone from the live version. Now you have free reign to test. You can install a new theme, make modifications to it, install and fine-tune new plugins or features – basically, anything you currently need or have to do in order to make the changes you intend to deploy on the live version of the website later on.

Testing is complete. How can you migrate the changes to the live website?
Now you are at the stage where the new website on the staging version is finalized and fully optimized. It is necessary to migrate the changes to the live version of the website. I recommend performing two crucial steps. First, using a plugin, create a backup copy of the current state of the website so that you have a fallback option in case of any issues. Second, I suggest conducting the migration during evening or nighttime hours when there is minimal or zero traffic on the website.
The actual migration of changes is also straightforward. Follow these steps:
- Log in to the live version of the website.
- In the left menu, click on “WP Staging Pro“.
- Under the cloned version of the website, click on the “Actions” button.
- Select the option “Push Changes“

The plugin will now perform a reverse clone. It will take all the changes you made on the staging version of the website and implement them on the live site. Essentially, it will create a reverse copy. Once the process is complete, everything will be fully done, and the changes you made on the staging version of the website should be reflected on the live site.
CAUTION: If you are using any caching plugin, it is necessary to clear the cache completely to avoid any inconsistencies between the new version of the website and the original cached version. Now you can perform thorough testing of the website, and if everything is fine, your production site will be modified according to your needs. And all of this is done in a completely safe manner.
Staging a website on WordPress, or how to safely test websites
Conclusion
If you have read the guide up to this point, you probably see that safely making modifications to a website using live staging is not that complicated. This plugin works well on both self-hosted servers and traditional shared hosting. So, if you are hesitant to make changes to your live website out of fear of causing any damage, this plugin provides you with complete flexibility. And for the price of $8, which is approximately less than 200 CZK, it is definitely worth it.
The website is created with care for the included information. I strive to provide high-quality and useful content that helps or inspires others. If you are satisfied with my work and would like to support me, you can do so through simple options.
Byl pro Vás tento článek užitečný?
Klikni na počet hvězd pro hlasování.
Průměrné hodnocení. 0 / 5. Počet hlasování: 0
Zatím nehodnoceno! Buďte první
Je mi líto, že pro Vás nebyl článek užitečný.
Jak mohu vylepšit článek?
Řekněte mi, jak jej mohu zlepšit.

Subscribe to the Newsletter
Stay informed! Join our newsletter subscription and be the first to receive the latest information directly to your email inbox. Follow updates, exclusive events, and inspiring content, all delivered straight to your email.
