
Table of Contents:
- How to set up a firewall on Ubuntu
- Configuring the basic behavior
- Allow SSH connections
- Enable the firewall
- How to set up a firewall on Ubuntu
- How to allow other connections
- Restricting connections to IP addresses
- Allowing the entire range of IP addresses
- How to allow rules only for a specific network interface
- How to set up a firewall on Ubuntu
- How to block different connections
- What to do if you need to delete rules?
- How to set up a firewall on Ubuntu
- Conclusion
Last updated December 6th, 2023 00:23
One of the fundamental elements of server security is a firewall. Specifically on Ubuntu, the firewall is implemented as UFW (Uncomplicated Firewall). Knowing how to set up a firewall on Ubuntu is crucial for server security and the proper functioning of services. UFW (Uncomplicated Firewall) is a software tool for managing the firewall on the Ubuntu operating system. The purpose of the firewall is to secure the computer against unauthorized access, monitor and control network traffic.
UFW operates based on a set of rules that determine which network traffic is allowed or blocked. These rules can be set to filter traffic based on source or destination IP address, port, and protocol. When managing UFW, you can define basic rules such as allowing access to specific ports for particular services (e.g., web servers or email servers) and blocking unknown or unwanted traffic. UFW also allows the creation of more complex rules that enable defining specific conditions for allowing or blocking access.
UFW is designed to be user-friendly, even for users without prior firewall knowledge. It provides simple and intuitive commands for enabling, disabling, and configuring the firewall. UFW also offers an easy way to monitor the firewall’s status and fine-tune the settings.
How to set up a firewall on Ubuntu
Configuring the basic behavior
					sudo ufw default deny incoming
sudo ufw default allow outgoing
sudo ufw default deny incoming: This rule defines the default behavior of the firewall for incoming network traffic. Specifically, it means that all incoming connections to your server will be blocked by default unless explicitly allowed by rules defined by you as the root user. This minimizes the risk of unauthorized access to your computer and reduces potential threats.
sudo ufw default allow outgoing: This rule defines the default behavior of the firewall for outgoing network traffic. This rule allows all outgoing connections from your computer, allowing users to request information from remote servers and communicate with them without restrictions. This ensures that regular activities such as browsing websites or sending emails are not disrupted.
Allow SSH connections
To avoid blocking SSH connections after enabling the firewall, it is important to allow port 22 before activating UFW. Port 22 is specifically used for SSH communication (or SFTP). You can allow SSH access to the server by using the following command:
sudo ufw allow ssh
If you want to make SSH access a bit more secure, you can restrict access to port 22 to a specific IP address or multiple IP addresses. This ensures that only users connected from the allowed IP address(es) can access the server via SSH. You can modify the command above as follows (replace xxx.xxx.xxx.xxx with your actual connection IP address, which you can find, for example, at mojeip.cz):
sudo ufw allow from xxx.xxx.xxx.xxx to any port 22
Enable the firewall
Now that you have defined the basic rules, you can enable the firewall to make it active. To turn on the firewall in Ubuntu, use the following command:
sudo ufw enable
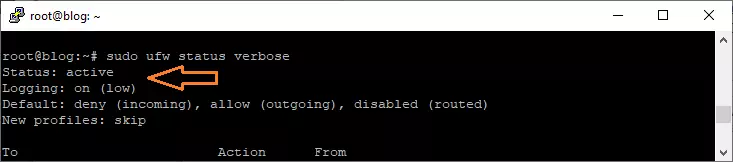
If you want to verify whether the firewall is active and obtain a listing of the currently configured rules, use the following command for verification:
sudo ufw status verbose
How to set up a firewall on Ubuntu
How to allow other connections
If you want to allow a specific service or port on the firewall, you can use two types of syntax for such a rule. You can allow a service or specify a protocol. Let’s demonstrate this specifically with ports 80 and 443. The first port is used for HTTP web traffic, and the second one is used for HTTPS traffic.
					sudo ufw allow http
sudo ufw allow 80
sudo ufw allow https
sudo ufw allow 443
As you can see above, for HTTP, you can use either the command sudo ufw allow http or sudo ufw allow 80. The same applies to HTTPS. Both commands achieve the same result, allowing port 80 or 443. You can choose either syntax and execute it on the firewall.
Sometimes, there may be situations where you need to allow an entire range of ports, such as all ports from 6000 to 6007. In such cases, it is not necessary to add a separate rule for each port, as it could be time-consuming and unnecessary. You can allow the entire range with a single command (specifying the range and the TCP or UDP protocol):
					sudo ufw allow 6000:6007/tcp
sudo ufw allow 6000:6007/udp
Restricting connections to IP addresses
As mentioned earlier for SSH connections, it is possible to restrict each connection to user IP addresses. By doing so, you instruct the firewall to allow only those connections on specific ports and exclusively from the user’s IP address.
					sudo ufw allow from xxx.xxx.xxx.xxx
sudo ufw allow from xxx.xxx.xxx.xxx to any port 22
sudo ufw allow from xxx.xxx.xxx.xxx to any port 10000
Allowing the entire range of IP addresses
If you want to allow the entire range of IP addresses (subnet), you can define the command as follows:
					sudo ufw allow from xxx.xxx.xxx.xxx/24
sudo ufw allow from xxx.xxx.xxx.xxx/24 to any port 22
How to allow rules only for a specific network interface
If you want to allow specific firewall rules only for one of multiple network interfaces on the server, you can add the parameter “allow in on” to the rules. Let me provide an example. Let’s say you have public web traffic on the network interface eth0, and you want to allow port 80 for HTTP traffic on it. In that case, you would modify the command as follows:
sudo ufw allow in on eth0 to any port 80
How to set up a firewall on Ubuntu
How to block different connections
Just like you can allow connections in the cases mentioned above, you can also block them. This is useful, for example, when you detect an attack on your server from a specific network or IP address. The server will not accept requests from that IP address or range, preventing unnecessary overload or service disruption.
					sudo ufw deny http
sudo ufw deny from xxx.xxx.xxx.xxx
From the above two rules, you can, for example, disable access to HTTP traffic or block access to the server from a specific predefined IP address.
What to do if you need to delete rules?
If a rule is no longer relevant or there was a typo, you can, of course, delete such a rule. First, you should list all the rules applied on the firewall. You can do this with the following command:
sudo ufw status numbered
This command will display a list of rules and assign a sequential number to each rule. To delete a rule, you will use the command “ufw delete” followed by the rule number you want to remove.
sudo ufw delete 3
This command will delete the rule that is third in the list.
How to set up a firewall on Ubuntu
Conclusion
This is a list of commonly used commands for configuring a firewall on Ubuntu. With these commands, you will be able to modify the access behavior to your server, allow or block various applications installed on the server. As an additional reference, I will provide below the commands for listing firewall rules, disabling the firewall, and resetting the firewall.
					sudo ufw status verbose
sudo ufw disable
sudo ufw reset
The website is created with care for the included information. I strive to provide high-quality and useful content that helps or inspires others. If you are satisfied with my work and would like to support me, you can do so through simple options.
Byl pro Vás tento článek užitečný?
Klikni na počet hvězd pro hlasování.
Průměrné hodnocení. 0 / 5. Počet hlasování: 0
Zatím nehodnoceno! Buďte první
Je mi líto, že pro Vás nebyl článek užitečný.
Jak mohu vylepšit článek?
Řekněte mi, jak jej mohu zlepšit.

Subscribe to the Newsletter
Stay informed! Join our newsletter subscription and be the first to receive the latest information directly to your email inbox. Follow updates, exclusive events, and inspiring content, all delivered straight to your email.
Are you interested in the WordPress content management system? Then you’ll definitely be interested in its security as well. Below, you’ll find a complete WordPress security guide available for free.