Table of Contents:
- It All Starts with Web Hosting
- You should primarily be interested in these parameters:
- Why It’s Safer to Use HTTPS
- Installation – User, Password, and Prefix (How to Secure WordPress Right from the Start)
- The ideal security state after installation looks like this:
- Protect Administration Access by Changing URL
- Set a Limit on Login Attempts to Administration
- Two-Factor Authentication for Administration Access
- Disable XML-RPC
- Automatic User Logout
- You can install the plugin as follows:
- Password Manager – Safer Storage of Sensitive Data
- DNS and Protection Against DDoS Attacks
- How to secure WordPress against spam
- This plugin will protect you against spam robots specifically for:
- Update – it will significantly strengthen WordPress security
- Why are updates important in the context of securing WordPress?
- Do you have multiple users? Consider dividing user roles. It will significantly strengthen WordPress security.
- Security Plugins (Securing WordPress with Sucuri or WordFence)
- Sucuri
- How to Secure WordPress – Conclusion
- FAQ – Frequently Asked Questions – How to Secure WordPress
- Interesting videos on the topic: How to Secure WordPress
Last updated March 12th, 2025 21:35
WordPress is one of the most popular and widely used platforms for building websites in the world. Currently, it powers more than 40% of all websites worldwide. Its simple interface and rich customization options make it a popular choice for individuals and businesses. However, the popularity of WordPress also brings challenges, especially in the area of security. How to secure WordPress is a question many website creators ask, and there is no simple answer. Website security is a complex matter that requires time and effort.
In today’s world, websites are frequent targets of hackers and malware attacks. That’s why it’s important for website owners to be cautious and take steps to secure their sites. This article will focus on key aspects of WordPress security and provide you with practical tips and recommendations on how to protect your website from potential threats. These 16 tips and pieces of advice will help you secure WordPress to a level where it will be very difficult, perhaps even impossible, for anyone to breach such a site.
Security of WordPress should be a priority for every website administrator. In this article, I’ll help you understand how to achieve it and how you can make your WordPress site impregnable.
It All Starts with Web Hosting
Choosing web hosting is an important first step in securing WordPress right from the start. Many providers of traditional shared web hosting now view WordPress as an integral part of the internet ecosystem and have their Linux operating systems partially secured against various types of attacks. You may encounter hosting providers that have already implemented protection against multiple attempts to break into the administration password or have also implemented protection using Geo-IP.
Hosting is a fundamental and crucial component for your website. Not only will the speed of your website depend on its quality, but also its security. Therefore, don’t hesitate to ask the provider about the parameters of the service before making a purchase.
You should primarily be interested in these parameters:
- Whether the web host provides a free SSL certificate for your website.
- The PHP version on the website (ideally as of the date of this article, 8.2. and 8.3.).
- Memory limit size (memory allocated to your website -> ideally starting at 256 MB as a base, preferably 512 MB).
- Max execution time (the time a script runs before the server forcefully terminates it – important for tasks like website migration using plugins).
- Whether you can change any directives using .htaccess files or .user.ini files.
- What basic security features the web host provides (Geo-IP protection, protection against brute force attacks, protection against DDOS attacks, etc.).
As you can see, the web hosting provider alone can do a lot for WordPress security, and even the Linux system on which your website runs can have basic security measures resolved natively. Ask questions. The price of web hosting may not be decisive because the rule that the cheapest web hosting is the best choice does not always apply. By also asking customer support for key details regarding the operation of your new website, you can easily determine how quickly such support responds to your inquiries and any future problems you may encounter. Quality customer support is essential for the successful operation and security of your web presence.
Why It’s Safer to Use HTTPS
SSL and the HTTPS protocol are essential in today’s world, for many reasons. First, let’s talk about what SSL and HTTPS are used for. The HTTPS protocol ensures encrypted communication between your website and the user’s computer viewing this website. In simple terms, it means that these two machines exchange data encryptedly. If someone were to intercept the data between these machines, they would only receive it in encrypted form and would not be able to determine what data these machines are exchanging.
From a security perspective, this is important, for example, when logging into the WordPress administration panel. Thanks to HTTPS, data such as login and password are sent to the server in an unreadable form, which no one in the middle can decrypt. This is crucial for securing WordPress and your website. You don’t want to send your password and login to the server in plain text, which anyone could easily uncover.
Last but not least, Google also looks at HTTPS. If your website doesn’t use HTTPS, Google will likely penalize you, and your search results won’t be good. Google itself checks the security of the WordPress you’re using, and HTTPS is a key parameter for it. Therefore, make sure that the HTTPS protocol is part of your website, and choose a web hosting provider accordingly (see above).
Installation – User, Password, and Prefix (How to Secure WordPress Right from the Start)
To secure WordPress, many basic steps can be taken during the installation of this content management system itself. As a fundamental security rule, I can immediately mention using a very strong password for the MySQL database. Avoid using dictionary passwords, as they can be easily guessed. Use a password that is at least eight characters long. Utilize both lowercase and uppercase letters, numbers, and also include a special character (? ! #, etc.). By following this practice, you significantly increase the number of attempts a potential attacker would have to make to uncover such a password. This makes a brute force attack on MySQL practically impossible.
Three other elements that you can influence in terms of security during installation are table prefixes, username, and password. WordPress uses the wp_ table prefix by default during basic installation. Change it to your own. Any attacker automatically assumes that your table prefix will be the default, wp_. Don’t make it easy for them; change the table prefix to any of your own (abc_, my_, blog_…).
Regarding WordPress security, especially in administration, the key is the username and its password. Again, I refer to default values, where many users leave WordPress with the pre-filled admin user during installation. Modify your login and avoid using the admin user. For example, use your own name. The admin user will be the first user an attacker tries when attempting to break the password. As for the password, use the same practice described above for MySQL. At least eight characters and a combination of numbers, lowercase and uppercase letters, and special characters.
The ideal security state after installation looks like this:
- Custom table prefix
- Unique username (definitely not admin or administrator)
- High-quality password of at least eight characters
Protect Administration Access by Changing URL
WordPress has two possible paths for accessing the administration panel. One is domain.tld/wp-admin and the other is domain.tld/login.php. An attacker attempting to breach your website using a brute force attack will typically try one of these two addresses first. Therefore, if you’re considering how to secure WordPress and its administration, it’s wise to address this and change the URL. You can use the WPS Hide Login plugin to change the URL address. It’s very straightforward; after activation, it adds an item to the WordPress settings and general tab where you can define your own administration URL address. Additionally, you can set a second address where users attempting to access the administration panel via the traditional path will be redirected. This could be, for example, a 404 page or any other informative page.

Again, from the perspective of securing WordPress and its administration, you make it more difficult for potential attackers. They won’t know the address of your administration panel, making it challenging for them to attempt brute force attacks and guess passwords to gain access.
Set a Limit on Login Attempts to Administration
Another method to make it harder to reveal your password involves limiting the number of login attempts. You can achieve this conveniently using the Limit Login Attempts Reloaded plugin. Among other features, it allows you to set the following:
- Login Limitation: Restricts the number of login attempts (for each IP address).
- Adjustable Lockout Time: Modifies the duration a user or IP address must wait after being locked out.
- Remaining Attempts: Informs users about the remaining attempts or lockout time on the login page.
- Email Notification on Lockout: Notifies administrators via email about lockouts.
- Records of Failed Attempts: Displays records of all rejected attempts and lockouts.
- Whitelist/Blacklist IP Addresses and Usernames: Controls access to usernames and IP addresses.
- XML-RPC Gateway Security.
- WooCommerce Login Page Security.
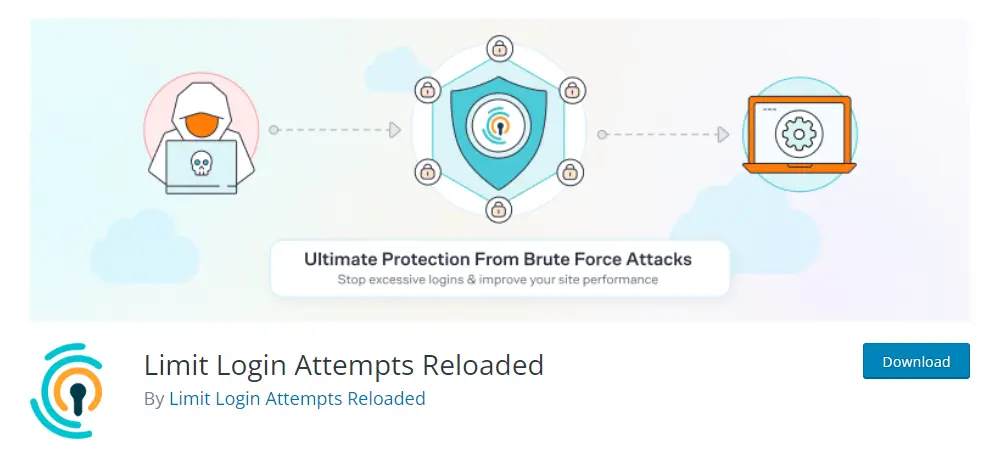
As you can see, with this plugin, you can configure a lot. If it doesn’t suit you, there are also other plugins available in the WordPress repository that have similar functions. It’s important to block users who will attempt an excessive number of login requests right from the start. This way, you won’t give attackers a chance to break your password because the plugin will block them much earlier.
Two-Factor Authentication for Administration Access
The question of how to secure WordPress often revolves significantly around the administration interface right from the start. Therefore, if you wish, you can implement an additional layer of protection on your website in case someone manages to bypass all the security measures described above. This additional layer is two-factor authentication. Two-factor authentication adds an extra step to the login process and eliminates the risk of unauthorized access by someone who may know your login credentials for some reason.
This method adds an additional field to the login screen where you must enter a code generated by an application on your mobile phone. You may already be familiar with this process, such as when verifying payments in your bank, where you need to approve the payment with an additional method of authentication. It works the same way here. You connect your WordPress administration to the Google Authenticator app, which generates access codes for you. If someone were to somehow uncover your login and password, they still wouldn’t be able to access the administration without your mobile phone. This is because they would be missing the second verification factor – the code from your mobile device.
If you want to take the security of your WordPress to the next level with this two-factor authentication, I have written a separate article on it, where you will find a detailed guide on both installation and activation of this second layer of security: How to Set Up Two-Factor Authentication for WordPress Administration.
Disable XML-RPC
XML-RPC is one of the basic WordPress APIs that has been enabled by default since version 3.5, released in 2012. Therefore, every new WordPress installation has XML-RPC automatically activated. This WordPress functionality simplifies connecting to your website and interacting with it. For example, using mobile applications for WordPress management or various automation services. If you don’t use XML-RPC on your website, it’s better for WordPress security to disable it.
Disabling XML-RPC is very simple and can be done using this short snippet:
					#How to Secure WordPress - Disabling XML-RPC
add_filter('xmlrpc_enabled', '__return_false');
If you’re not sure how to insert this snippet into your website, I’ve written a separate, relatively short article for this purpose, where you’ll learn how to use the WPCode plugin. Be sure to check it out here: How to Easily Disable XML-RPC in WordPress.
Automatic User Logout
Securing WordPress often involves paying attention to small details that may seem insignificant to some but contribute to the overall stability and security of the website. One such detail is automatic user logout from the administration panel. This is particularly important in the case of multi-user websites, where multiple users in various roles besides the administrator work on the site.
You can imagine a scenario where a user walks away from their laptop while still logged into the WordPress administration panel. Such a laptop or desktop with open access to sensitive data can lead to significant problems. WordPress does not address automatic user logout natively, so we’ll give it a little help.
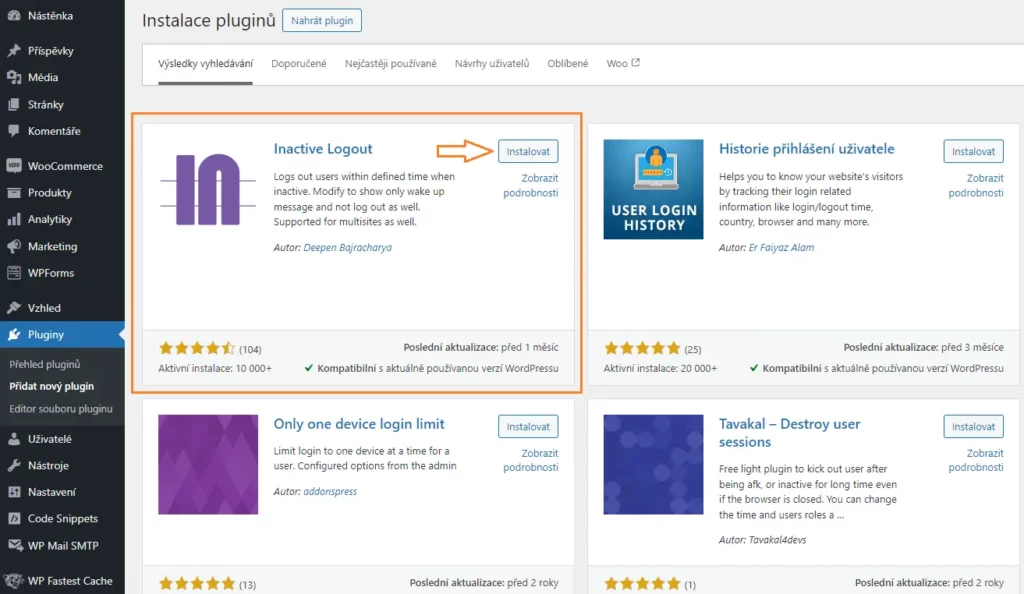
All you need for this is the Inactive Logout plugin, which is available in the official WordPress repository.
You can install the plugin as follows:
- In the WordPress left menu, click on the “Plugins” button.
- In the new menu, click on “Add New Plugin.”
- Now, in the upper right corner, type the key phrase “Inactive Logout” into the search field.
- WordPress will search for the plugin.
- Install and then activate the plugin.
Once you activate the plugin, go to its settings. This plugin’s settings are hidden in the menu under Settings -> Inactive Logout. This plugin offers several options for securing WordPress. The first option is to set a time limit for all users (recommended), and the second security option is based on user roles. This means that you can set a shorter time limit for the administrator than, for example, a colleague with the contributor role. Additionally, you can always set custom notifications for users approaching the limit or those who have already been logged out. If you are setting logouts based on user roles, you can set up a redirect to the page where those users should be redirected after logout.
Password Manager – Safer Storage of Sensitive Data
Now let’s deviate a bit from WordPress security to the security of user behavior, specifically regarding passwords and logins. This pertains to the general handling of sensitive data. A common practice for many people is to save passwords and logins in their browser for the sake of convenience. The browser auto-fills the login and password fields, making it quicker and more convenient, but also very risky. It doesn’t make much sense to come up with long, complex, and hard-to-remember passwords when anyone with access to your browser can log in. Consider such behavior as highly risky in general.
For securing WordPress and your overall online account portfolio, the best practice is to abandon this habit and start using a password manager. It’s just as convenient and fast, but dramatically more secure. All your passwords and logins are stored in the password manager, which is additionally protected by another layer of security.
How does it work exactly? You install a password management program on your computer and then add its extension to your browser. The browser extension continues to fill in passwords for you. However, the condition is that you must first launch the password manager program and log in to it. And what huge advantage does it actually offer? You only need to remember one single password – the one for your password manager. The program remembers the rest. This way, you can effortlessly use very complex passwords for all your online applications, and you’ll never forget them thanks to the password manager.
Among the best and thoroughly tested password managers, I recommend KeePassXC. You can download it from here: KeePassXC.
How to Secure WordPress with Automatic Data Backup
Data backup is a timeless topic that very few people actually adhere to. The security of your website begins where you have the assurance that your data is safe. This means that the best situation arises when you have backups of your website data stored in a place that attackers cannot easily access. It could be encrypted cloud storage like OneDrive or Google Drive, or it could be your private offline SSD disk stored at home in a desk drawer.
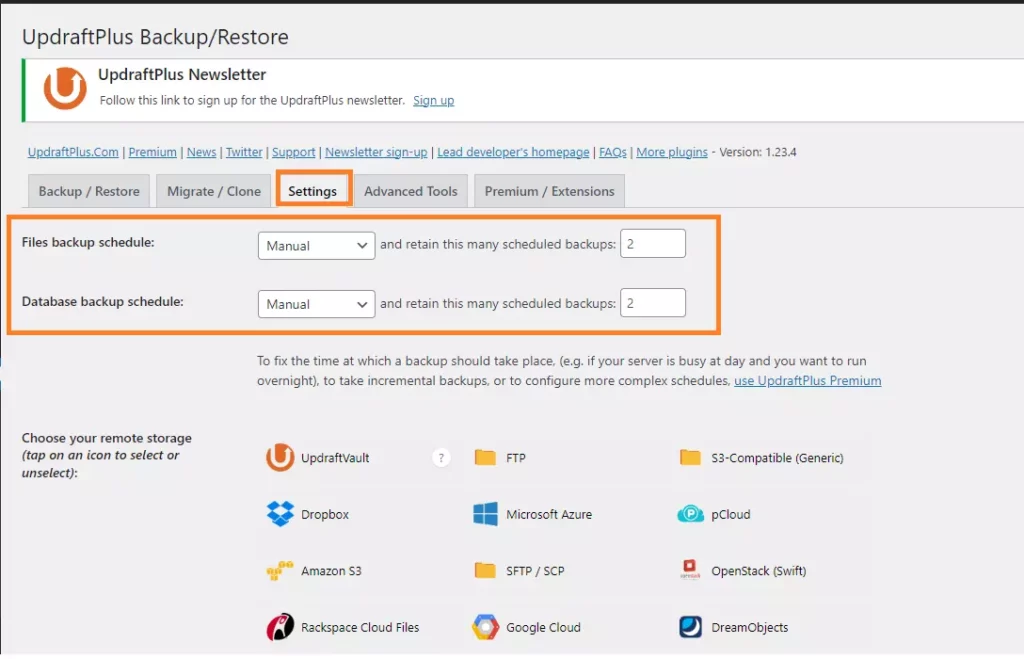
Regarding WordPress security, the best method of backup is one that happens automatically on its own. For this purpose, there are many plugins available, and among the best, I can recommend Updraft. With Updraft, you can set up periodic backups and also send the created backups directly to remote cloud drives. Never store website backups on FTP. Firstly, it will eventually become an issue for your web hosting provider, as it will fill up your quota. Secondly, storing backups in the same place as your website is foolish. Backups must be separated from the website both geographically and server-wise. This means that the backup must be on a different location, machine, and preferably in a different data center.
If you’re interested in how you can activate the Updraft plugin and set up scheduled backups to Google Drive, I’ve written a separate article on this topic: How to keep your WordPress data safe: best backup plugin. Believe me, for securing WordPress, backups are a crucial element, and you should definitely not underestimate them. Never rely on backups from your web hosting provider. They are usually no more than 14 days old, and you could find out that your website has been compromised even after a month. Then, the backup from your web hosting provider will be useless.
DNS and Protection Against DDoS Attacks
Now let’s talk about DDoS attacks. It’s an attack where someone uses a large number of computers in a network to send a huge amount of requests to your website or server. This causes the website or server to become overloaded and the service becomes unavailable. How to defend against it? Often, web hosting providers already have their own solutions, but you can’t rely solely on them. If they can’t handle the situation, your web hosting may be shut down due to server overload. This is critical when your web hosting is making you money (e.g., an e-commerce site).
That’s why I always recommend transferring domain DNS servers to CloudFlare and using their services. Both the paid and free versions. CloudFlare’s free tier already has a fairly well-developed defense against DDoS attacks. And how does it all work?
CloudFlare hides your target web server’s IP address behind a proxy server. This means that if someone tries to find out the IP address of the machine hosting your web hosting, they will receive the IP address of CloudFlare’s proxy server as a response. The DDoS attack will thus be aimed at this IP address instead of your server. And CloudFlare is very good at handling such attacks and filtering them out. The attack won’t even reach your server or your web hosting provider’s server.
If you’re interested in how well CloudFlare can handle large DDoS attacks, check out this article: Google, Amazon and Cloudflare report largest DDoS attacks in history.
A similar service is currently offered by the Czech company WEDOS. It’s called WEDOS Global Protection and it’s a paid service. Unfortunately, I don’t have any experience with it at the moment because I’ve been using CloudFlare’s services all along. However, it’s good to mention it here as an alternative.
Protect Your Data Against Theft
The question of intellectual property protection is quite fundamental today. Therefore, if you own a website or a blog, safeguarding your ownership should be a priority. Regarding your web presentation, it’s quite common for other entities to copy text or visual content. Hence, it’s advisable, if you wish, to implement certain methods to secure your website content against theft. Let’s face it, anyone who wants to steal content from a website will find a way, but why make it easy for thieves?
There are two things you should protect on your website: text and images. As for protecting text on the web, I have written a detailed article on this topic here: How To Prevent Text Copying From A WordPress Website.
When it comes to images, it’s necessary to disable so-called hotlinking. This means that the image is not physically stolen from the website, but other websites link to it and display it from your location. Simply put, they input the URL address of your image into their code and display it directly from your website or server. Not only do they steal your copyrighted content this way, but they also burden the performance of your website or server. You can prevent hotlinking to images by inserting the following code into your .htaccess file on FTP:
					#How to secure WordPress against image hotlinking
RewriteEngine on
RewriteCond %{HTTP_REFERER} !^$
RewriteCond %{HTTP_REFERER} !^http(s)?://(www\.)?your-domain.tld [NC]
RewriteCond %{HTTP_REFERER} !^http(s)?://(www\.)?google.com [NC]
RewriteCond %{HTTP_REFERER} !^http(s)?://(www\.)?bing.com [NC]
RewriteCond %{HTTP_REFERER} !^http(s)?://(www\.)?yandex.com [NC]
RewriteCond %{HTTP_REFERER} !^http(s)?://(www\.)?seznam.cz [NC]
RewriteRule \.(jpg|jpeg|png|gif|webp)$ – [NC,F,L]
In the rules, replace the item your-domain.tld with the name of your domain. This code prohibits linking to images on your website by everyone except your domain and the search engines Google, Bing, Yandex, and Seznam. This way, you won’t prevent search engines from linking to your images. Thieves, however, will be out of luck.
How to secure WordPress against spam
If you have a WordPress website, you probably use forms as well. There can be several types of forms, such as a comment form under a post, a contact form, or a login form. And all these forms need to be secured against spam robots. There are many solutions to avoid spam robots. Personally, I use a solution that includes protection for all these forms in one plugin. It’s called WP Armour – Honeypot Anti Spam. I’ve been using this plugin for more than two years on all the websites I’ve created, and so far, I haven’t encountered a single spam on any of the websites.
So, I can rightfully consider this plugin to be very high-quality. Moreover, beginners will appreciate it because it doesn’t require any configuration. This plugin is simply installed and activated. You can install the plugin like this:
- In the WordPress dashboard, click on the “Plugins” button in the left menu.
- In the new menu, click on the “Add New” option.
- Now, in the top right corner, type the key phrase “honeypot” or “WP Armour” into the search field.
- WordPress will search for the plugin.
- Install the plugin and then activate it.
This plugin will protect you against spam robots specifically for:
- WordPress comments
- WordPress registration form
- BBPress forum (bbpress.org)
- Contact Form 7 plugin (wordpress.org/plugins/contact-form-7)
- Gravity Forms plugin
- best comment plugin WPForms (wpforms.com)
- Formidable Forms (formidableforms.com)
- Caldera Forms (calderaforms.com)
- Toolset forms (toolset.com)
- Elementor forms (elementor.com)
- Fluent Forms (fluentforms.com)
- Divi Theme contact form (elegantthemes.com)
- Theme My Login (https://wordpress.org/plugins/theme-my-login/)
- WooCommerce Reviews Pro
I also see it as a great advantage that WP Armour is fully GDPR compliant. It doesn’t contain any tracking, cookie storage, or calls to an external server. So, if you want to secure WordPress against unwanted spam, I recommend this plugin as the first choice. It does more work and is much more effective than Google reCAPTCHA.
Update – it will significantly strengthen WordPress security

WordPress is a modular system. You get it in some basic state and with the help of modules, called plugins in WordPress, you further expand the system with features that are not native to the system. The same usually happens with the theme template. If you don’t want the default set of templates, you usually reach for an external one from the official or unofficial WordPress repository and install it on your website.
Updates are released for all these WordPress add-ons. And not just for them. WordPress itself occasionally releases a package for an update. Either as a minor update for minor changes (6.3.1 -> 6.3.2), or as a major update when the entire version changes (6.3 -> 6.4, etc.). So you can update:
- WordPress Core
- Plugins
- Themes
Updates are released for a simple reason. Either they bring new features to the system or addon, or they fix discovered bugs. The second reason is key for us. Bug fixes. If a security vulnerability is found in a plugin, theme, or the system core itself, the developer of that part responds by fixing such a bug. The system will alert you to a new update for that part, and by performing the update, you will also fix the bug found. If you don’t perform updates, you expose your website to a huge risk of potential security issues.
Why are updates important in the context of securing WordPress?
Let’s see how I, as a hacker, would proceed if I wanted to attack your website. Using online tools like https://builtwith.com, I would first determine what your website is built on and what plugins it uses. I would also find out which plugins you have on your website. Then, I would look at the security vulnerabilities discovered in those plugins and try to exploit them. If you don’t update, you would leave the door open to attack. However, if you perform updates, you will have the discovered vulnerabilities fixed by the update, and I will probably go looking for “luck” elsewhere.
So what does this mean? That the entire system is only as strong as its weakest part. Updates help protect your system from discovered security issues, and securing WordPress is primarily based on not ignoring updates.
Do you have multiple users? Consider dividing user roles. It will significantly strengthen WordPress security.
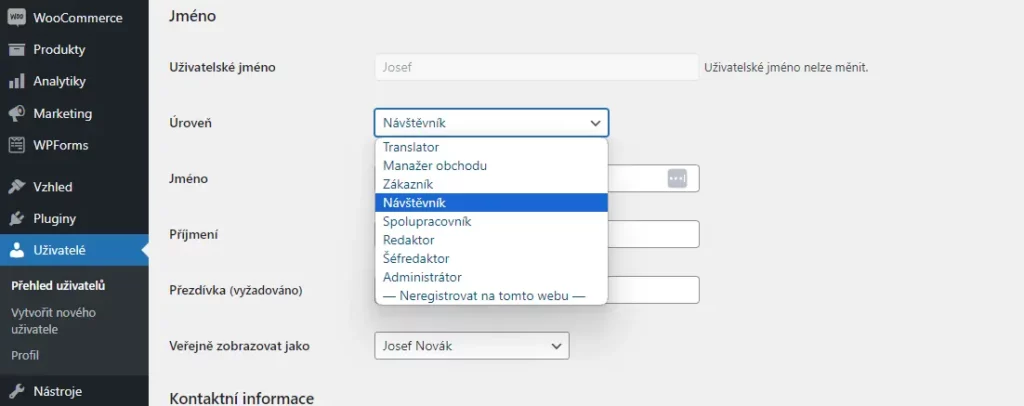
Just as I wrote a moment ago about WordPress being a modular system, it is equally a multi-user system. This means that it can have many users, and they should have properly configured roles for optimal security. Each role in the system has certain permissions. The highest role is the website administrator with all rights, while the smallest role is the visitor (who has almost no rights in the system). WordPress natively distinguishes these user roles:
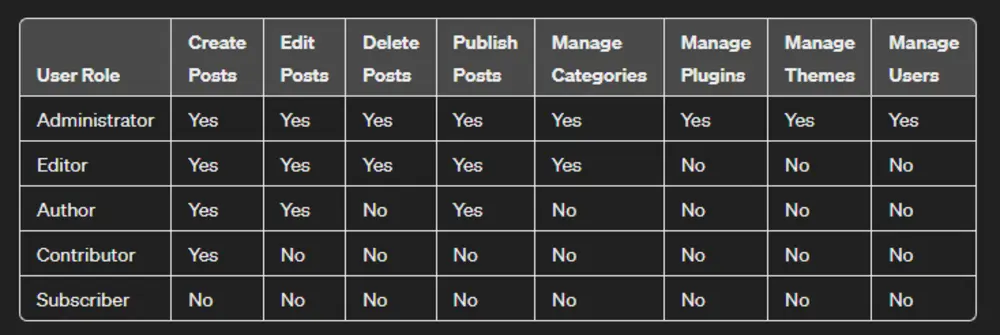
Therefore, it is exceedingly important for you to assess all users of your system and what activities they perform for the website. Based on that, assign user roles to them. From a WordPress security perspective, practice the principle of least privilege. This means always assigning the lowest possible permissions to users that still allow them to carry out their tasks. Any additional permissions beyond their work scope are unnecessary and potentially risky.
If you are interested in user roles and specific permissions that users can have in the system, take a look at this article where I describe these roles in more detail: Users and User Permissions in WordPress.
Security Plugins (Securing WordPress with Sucuri or WordFence)
As the last matter on the topic of securing WordPress, I left plugins. Why are they at the bottom of the list? Because many people, without performing the basic WordPress security described above, rely on a plugin to protect their website. Unfortunately, that’s not the case at all. Plugins like Sucuri or WordFence can indeed enhance the security of a website, but they are not self-sufficient unless you implement the steps described in this article.
Therefore, consider these plugins only as additional security measures and not as essential ones. If you follow the steps outlined above, I dare say you will never need such plugins.
Sucuri
The Sucuri Security – Auditing, Malware Scanner, and Security Hardening plugin can be found in the official repository here: Sucuri Scanner. You can install the plugin using the standard procedure from the WordPress admin area through the plugins section. This plugin specifically offers the following features:
- Security activity audit
- File integrity monitoring
- Remote malware scanning -Blocklist monitoring
- Effective hardening -Security actions after a hack -Security notifications -Website firewall (premium)
WordFence
You can get the WordFence plugin at this URL: Wordfence Security – Firewall, Malware Scan, and Login Security. This security plugin, similar to Sucuri mentioned above, can handle the following activities:
- WAF (Web Application Firewall)
- Real-time firewall (premium)
- Malware scanner
- Protection against Brute Force attacks
- Repair of files overwritten by malware
- Website content security check
- Many others
Both plugins can address a situation where a website is attacked and needs to be cleaned of malicious code. However, personally, I believe you can never trust the result as much as when you have an unaffected backup of the website available. That is always the easiest and simplest solution to the situation at hand. Additionally, many features of both plugins are paid, so you will either have to pay for these plugins or use them in their basic free version. The free version does not provide as much website protection as when you secure WordPress yourself from the beginning. Therefore, I mention both plugins at the end of the article and only as one of the options.
How to Secure WordPress – Conclusion
As you can see, securing WordPress is indeed a very complex task, involving many parameters of protection. This concerns not only administration but also users and their behavior, files on FTP, database, and the entire system. As you may have understood from the above article, it is crucial to regularly take care of your system. Updates are key. An outdated system is a huge risk, inviting many hackers to attack your website.
Today, it is very easy to find out what technology your website is running on and what components the website uses. For example, a service like https://builtwith.com can tell a potential attacker a lot about your website. They can focus on your plugins and search for potential vulnerabilities in older, outdated versions. The above rules, if applied and adhered to, will make your WordPress relatively impregnable. However, it is still possible for some damage to occur. Nothing is foolproof. Therefore, back up your data and do it regularly. A backup of an unaffected and unattacked website can solve many long nights spent searching for malicious code on your website. Restoring the website from a backup is a matter of minutes, and the problem is solved.
FAQ – Frequently Asked Questions – How to Secure WordPress

Hackers often exploit weak passwords, outdated plugins, or templates with security vulnerabilities. They also use brute-force attacks on administration login forms.
You can strengthen your website’s security by using strong passwords, regularly updating WordPress, plugins, and themes. Security can also be improved by installing security plugins, securing files and databases. Regularly back up your website content.
If your website is attacked, put your WordPress into maintenance mode to avoid harming potential users of your website. Then analyze the vulnerability and take measures to ensure that a similar incident does not occur again. If you have a backup of the unaffected website, restore the website from the backup and then secure your WordPress according to the steps outlined in this article.
Best practices include:
- using strong and unique passwords
- enabling two-factor authentication
- regularly changing passwords
- limiting login attempts
- using a password manager instead of saving passwords in the browser
Yes, regular updates of WordPress and plugins are crucial to ensure the security of your website. Updates often include fixes for security vulnerabilities.
You can protect your website from brute-force attacks by using plugins that limit the number of unsuccessful login attempts, using strong passwords, and implementing two-factor authentication.
You can use online tools such as Sucuri or WordFence to check the security of WordPress, plugins, and themes. It is also important to monitor updates and reviews from users.
Yes, regular backups are important in case your website is attacked or experiences a failure. You should back up not only files on FTP but also the database. There are many plugins that will perform regular backups for you and store them in cloud storage such as Google Drive, One Drive, etc. Among the best are plugins like Updraft.
You can protect your administrator account by using a strong password, enabling two-factor authentication, limiting login attempts, and using a secure internet connection. Also, consider changing the administration URL of your WordPress.
If you suspect malicious code, you should immediately perform a check and remove the infection. This may include scanning using security plugins like Sucuri or Wordfence. Also, manually check files on FTP and database tables using the phpMyAdmin tool. If you do not understand the security issues of WordPress, seek expert help. Prices for website disinfection currently range from 1500 CZK to 6000 CZK depending on the extent of the website damage and the expertise of the person performing the disinfection. Demand a guarantee to prevent backdoors and re-infections. If you have a clean backup of the website, restore it and secure WordPress according to the points in the article.
Interesting videos on the topic: How to Secure WordPress
The website is created with care for the included information. I strive to provide high-quality and useful content that helps or inspires others. If you are satisfied with my work and would like to support me, you can do so through simple options.
Byl pro Vás tento článek užitečný?
Klikni na počet hvězd pro hlasování.
Průměrné hodnocení. 0 / 5. Počet hlasování: 0
Zatím nehodnoceno! Buďte první
Je mi líto, že pro Vás nebyl článek užitečný.
Jak mohu vylepšit článek?
Řekněte mi, jak jej mohu zlepšit.

Subscribe to the Newsletter
Stay informed! Join our newsletter subscription and be the first to receive the latest information directly to your email inbox. Follow updates, exclusive events, and inspiring content, all delivered straight to your email.
Are you interested in the WordPress content management system? Then you’ll definitely be interested in its security as well. Below, you’ll find a complete WordPress security guide available for free.

