
Table of Contents:
- How to keep your WordPress data safe: best backup plugin – UpdraftPlus.
- Connect the plugin to your remote storage on Google Drive.
- How to keep your WordPress data safe: best backup plugin – UpdraftPlus. First website backup.
- How does the backup process work technically?
- Can I automate the backups?
- How to keep your WordPress data safe: best backup plugin
- Conclusion
- More content about WordPress
Last updated December 6th, 2023 00:11
Anyone who has ever created websites would probably agree with me that even a small website can take many hours of work. Especially when the “developer” is a perfectionist and wants to play around with every little detail. In such cases, the data on FTP and in MySQL become even more valuable. You simply don’t want to lose them. And such a situation can occur at any time. A faulty plugin, a compromised WordPress installation, or simply human error and mistake. You can easily come up with at least ten scenarios on the fingers of one hand. Therefore, protect your data and back up your WordPress website. It’s not complicated at all. So, today’s topic will be “How to keep your WordPress data safe: best backup plugin.”
In this article, we will demonstrate how to back up your website using the UpdraftPlus plugin. Since many web hosts do not appreciate users storing backups on FTP, and some even have terms of service that prohibit FTP backups, we will also show you how to save your backup to Google Drive.
Storing backups on Google Drive has two additional benefits. Firstly, you avoid any issues with your web hosting company and do not violate their terms of service for website operations. Secondly, you will have the backup stored in an entirely different location than the website itself. Therefore, the backup will be geographically and physically stored in a completely different place. To put it in extreme terms, even if one data center goes up in flames, the backup and data will still exist elsewhere.
How to keep your WordPress data safe: best backup plugin – UpdraftPlus.
To make the backup process truly easy for you, we will use a plugin. Of course, you can also manually back up your data by downloading files from FTP and exporting the MySQL database. However, not everyone is capable of handling such a backup, as it requires certain technical knowledge. Therefore, let’s stick to a method that even a true beginner can handle.
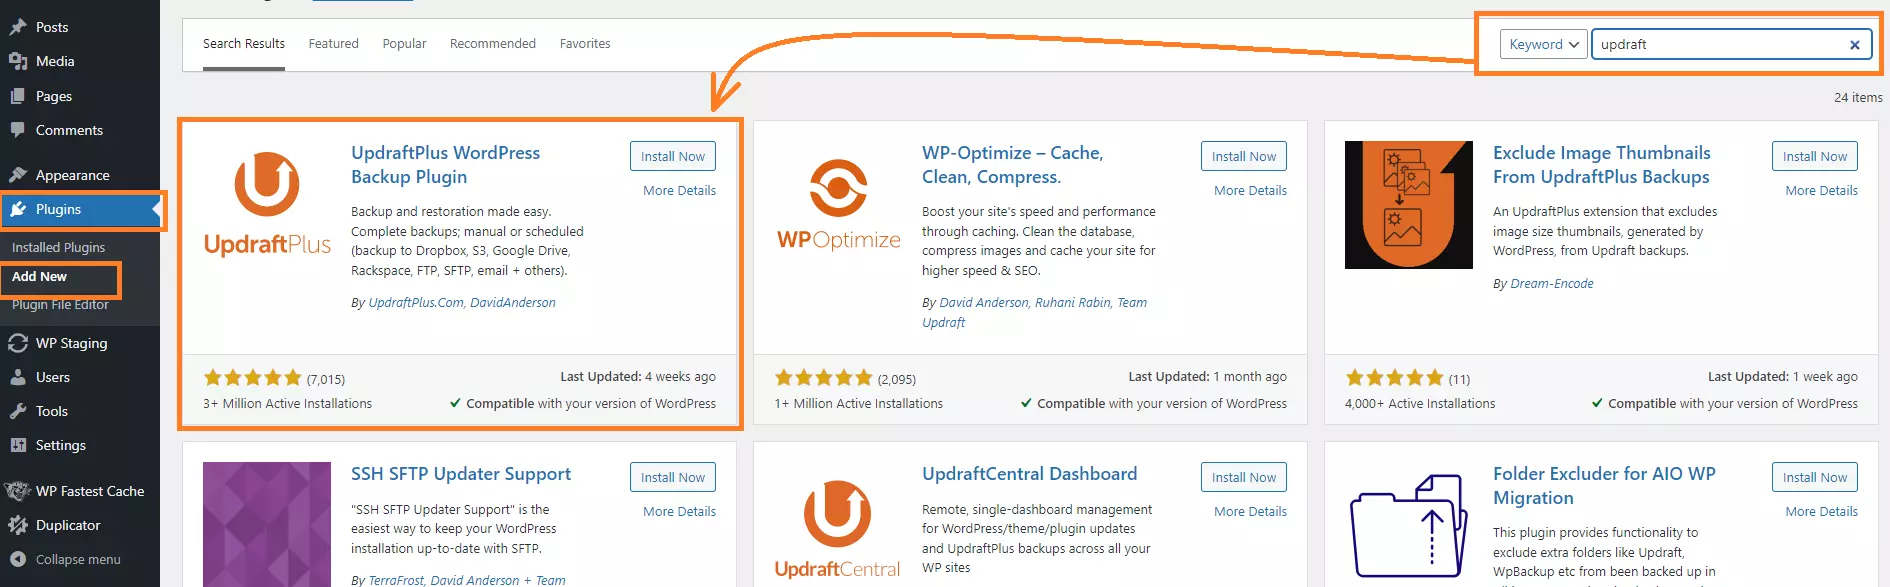
Firstly, you will need to install the plugin. You can do this directly from the WordPress administration panel since the UpdraftPlus plugin is available in the official repository on wordpress.org. Follow these steps:
- Click on the “Plugins” item in the left menu
- From the submenu, select “Add New“
- In the top right corner, you will find a search field. Type in the name of the plugin, “UpdraftPlus“
- WordPress will now search for all plugins that match the entered keyword
- Find the “UpdraftPlus” plugin (as shown in the image), install it, and activate it after installation
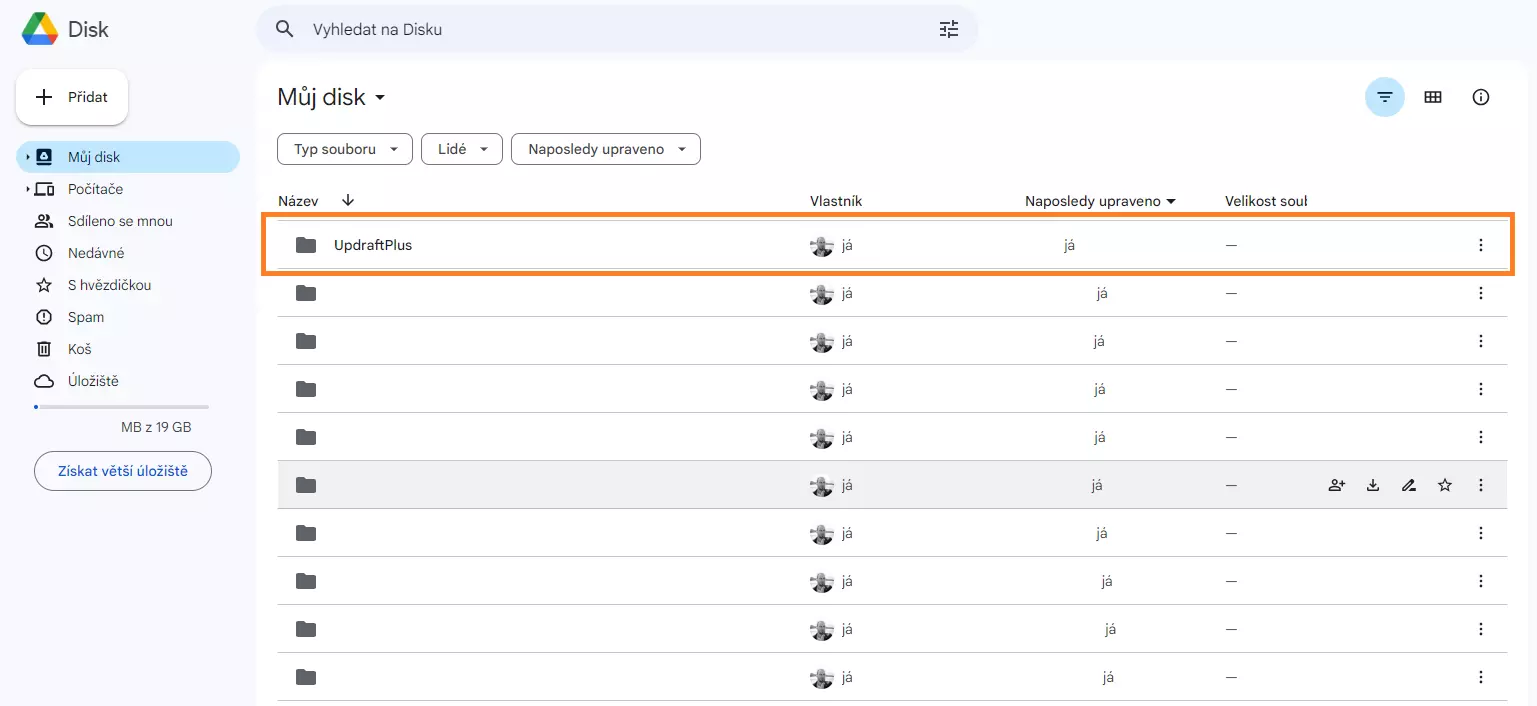
Connect the plugin to your remote storage on Google Drive.
You have the plugin installed, and now you need to connect it to Google Drive. First, I’ll explain how to do it, and below the text, you will find the entire process illustrated with images for better orientation. To connect to Google Drive, follow these steps:
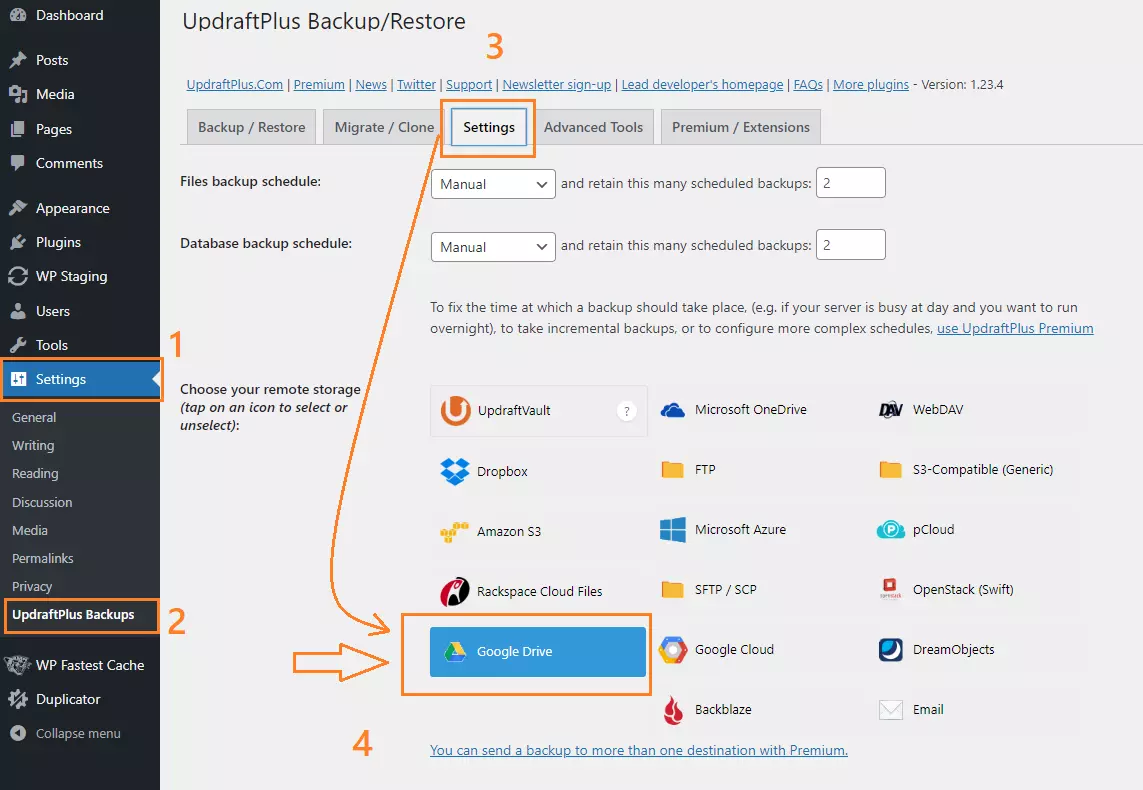
- Click on the “Settings” item in the left menu
- From the submenu, select “UpdraftPlus Backups“
- In the plugin tabs, choose the “Settings” tab
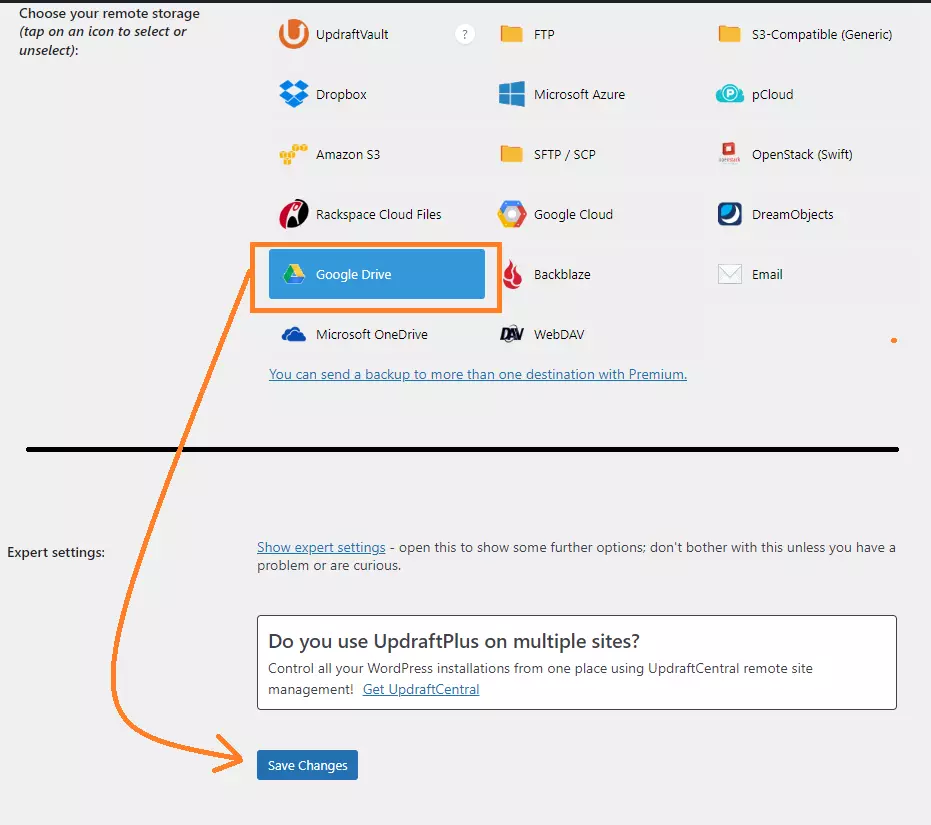
- Click on “Google Drive“
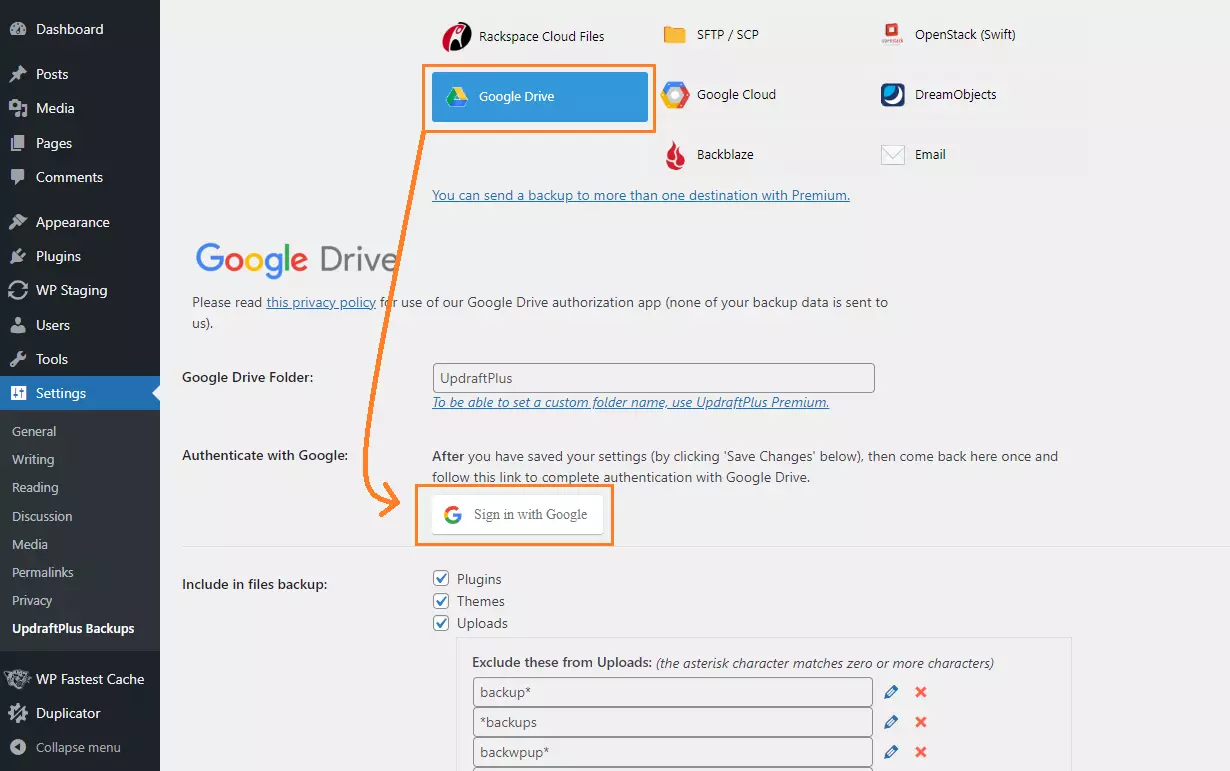
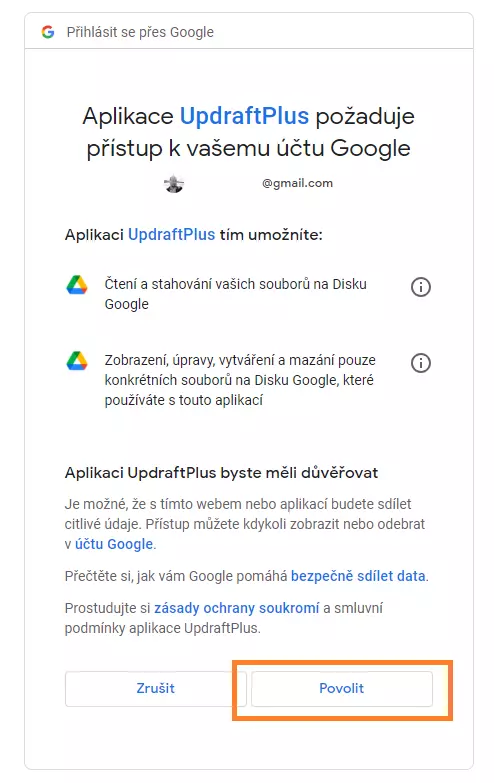
- Under the Google Drive icon, new options will appear. Choose “Sign in with Google“
- You will be asked to allow the UpdraftPlus application access to your Google Drive. Click on the option to allow it. Otherwise, the plugin wouldn’t have access to the remote storage and wouldn’t be able to write the necessary data.
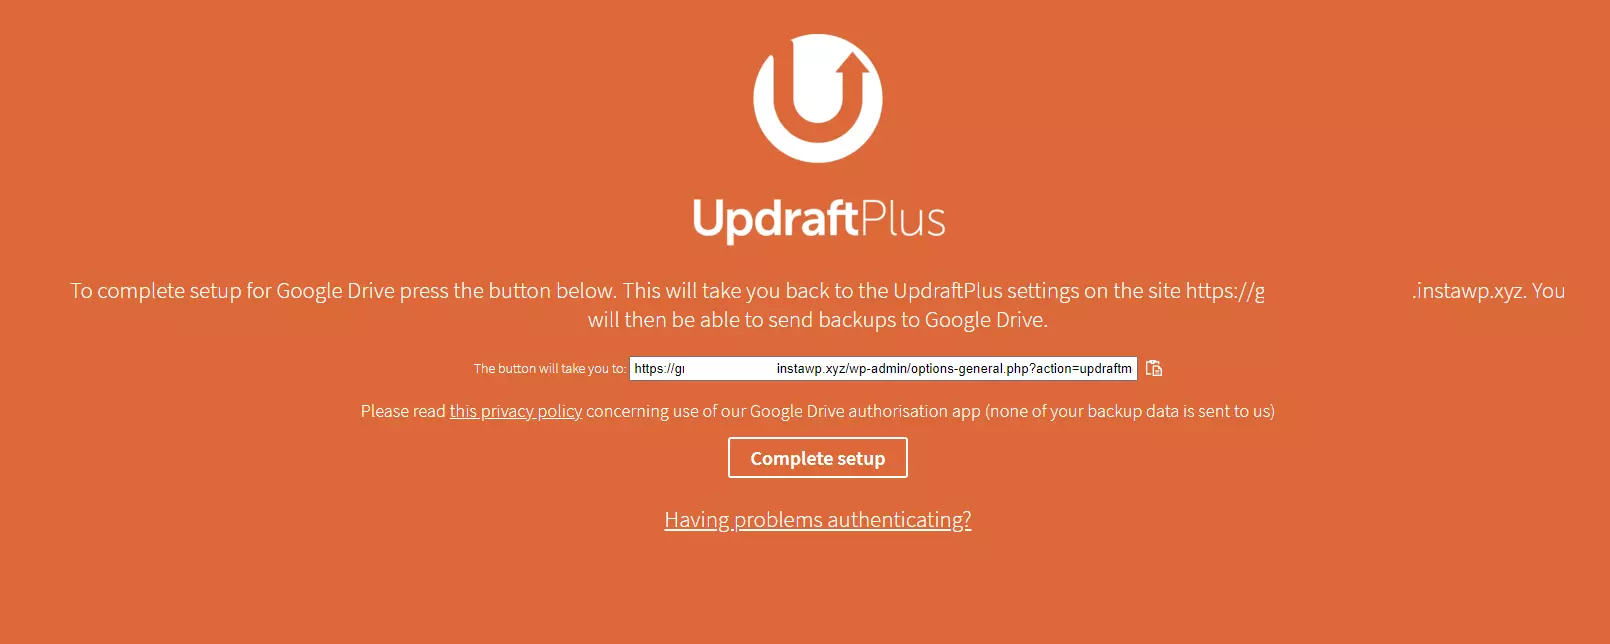
- In the final step, click on “Complete setup“
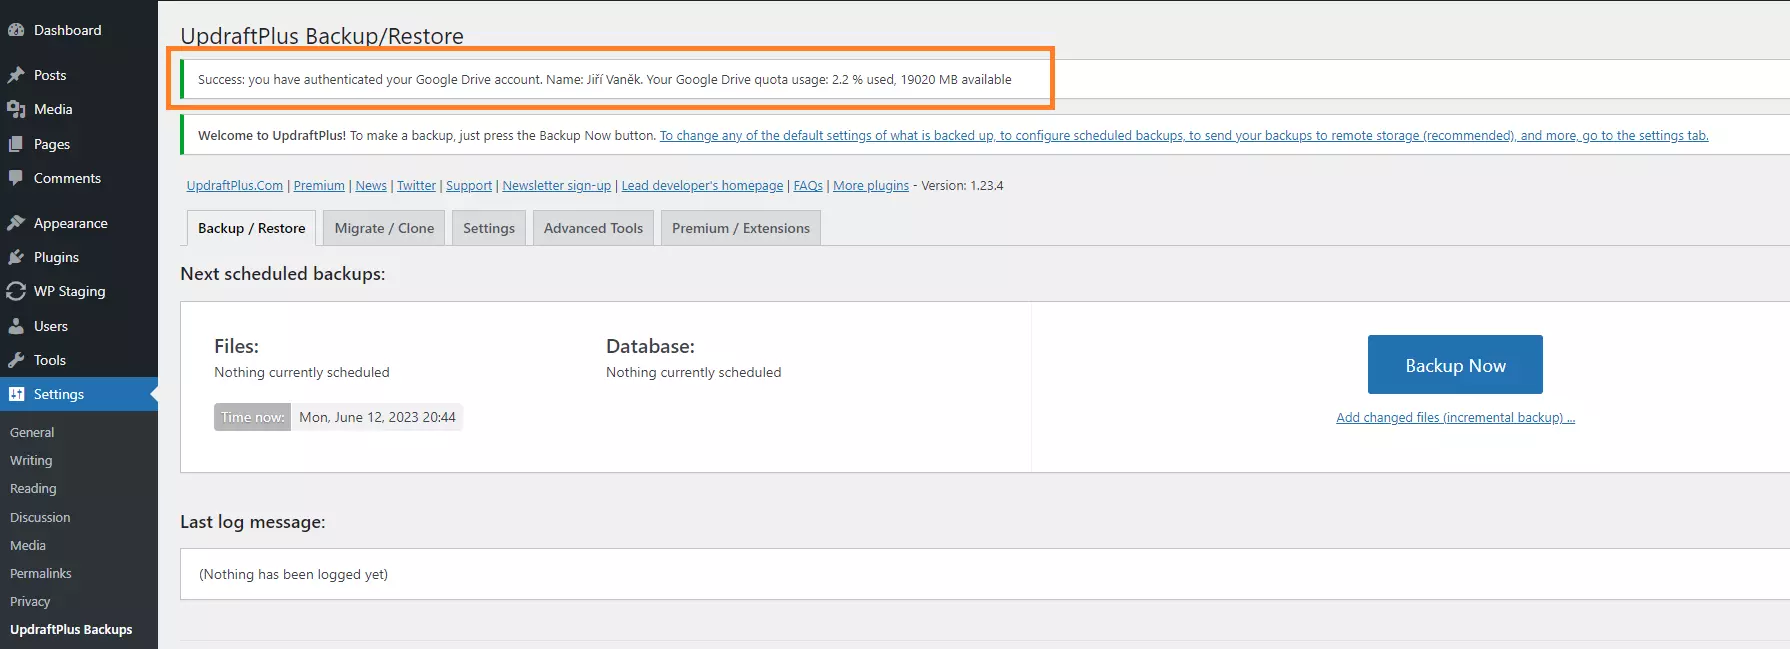
- The plugin will now connect to the remote storage, and as confirmation, it will display the message “Success: you have authenticated your Google Drive Account…“
- Once again, select “Google Drive” to activate it, scroll down slightly on the page until you find the “Save Changes” button.
- Click on the “Save Changes” button to save the active data storage on Google Drive.
I would like to add that we assume you already have Google Drive activated and are using services from Google. If not, it is necessary to activate Google Drive first. Currently, Google offers 15 GB of free storage for any type of data, which is usually more than enough for standard website backups.
How to keep your WordPress data safe: best backup plugin – UpdraftPlus. First website backup.
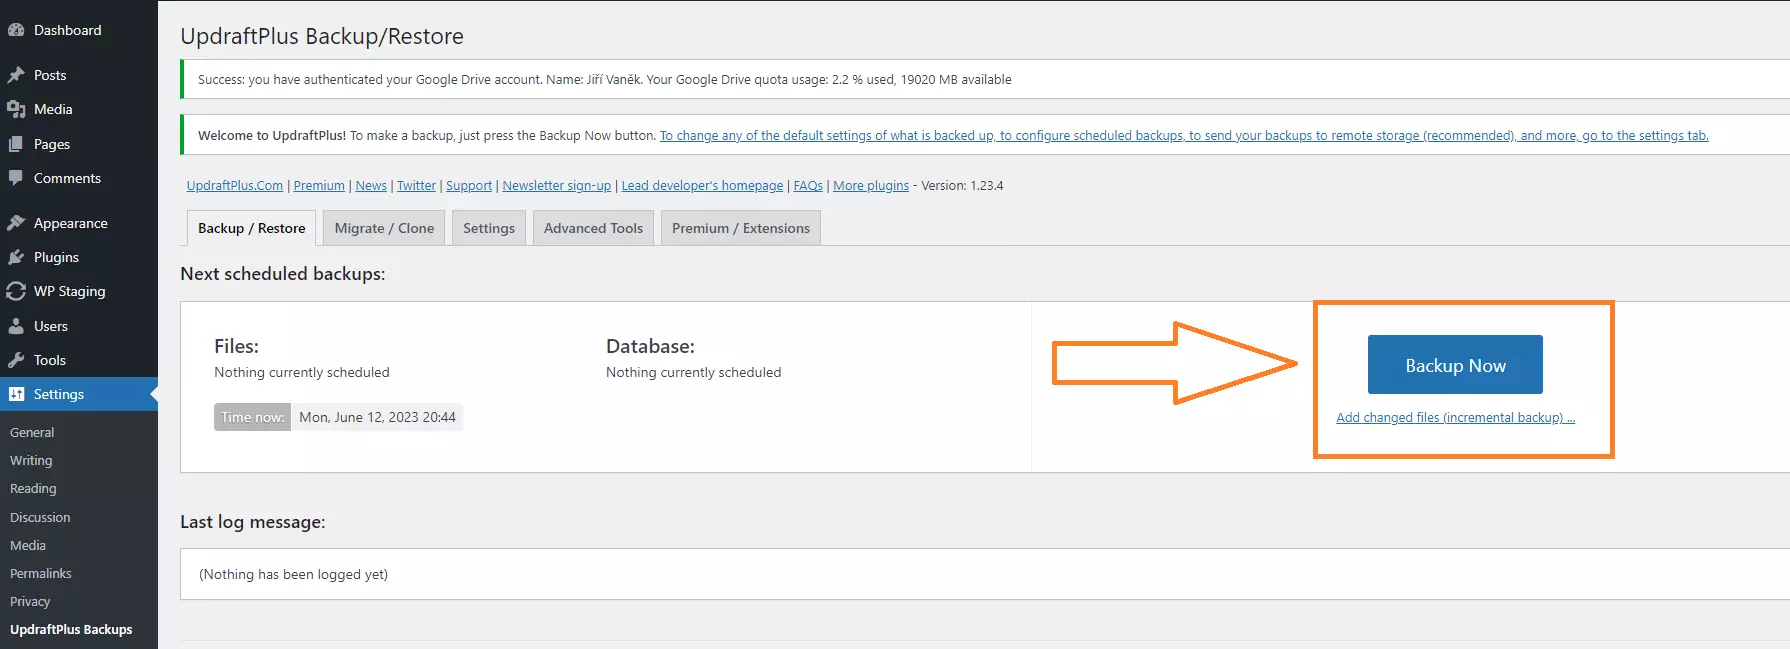
You have everything ready. The plugin is installed and active, and Google Drive is prepared and connected. Now, let’s make the first backup of your website. And again, it will be easy. First, I will provide you with a step-by-step procedure, and below, I will include a manual with images to ensure that nobody gets lost in the process. We will describe the backup creation in a way that you can refer to this guide anytime to perform it again.
- In the left menu, click on “Settings” again
- Go to the submenu and select “UpdraftPlus Backup“
- Stay on the active tab “Backup/Restore“
- Click on the large blue button “Backup Now“
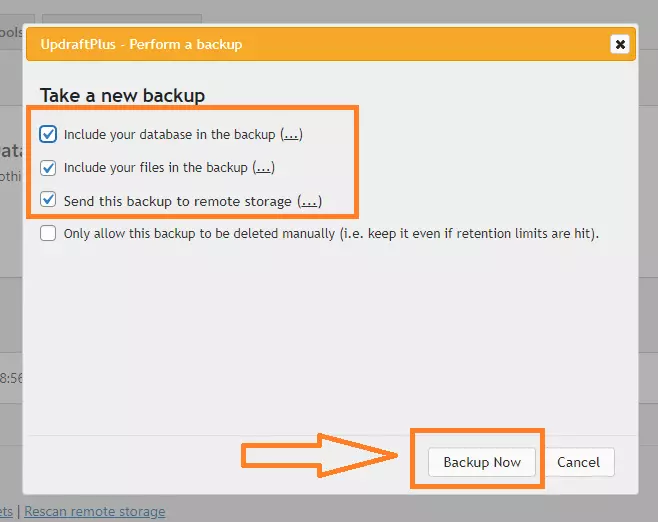
- In the new window, leave all three options checked. That means both the database and the FTP data will be included in the backup, and the backup will be sent to the remote storage as well. In this window, you should see the item “Send this backup to remote storage” as shown in the image. This item indicates that the backup will be sent to remote Google Drive. It is related to the last step of connecting the plugin to Google Drive, where you need to keep the Drive active and proceed until you reach the “Save Changes” button.
- Now, click the “Backup Now” button.
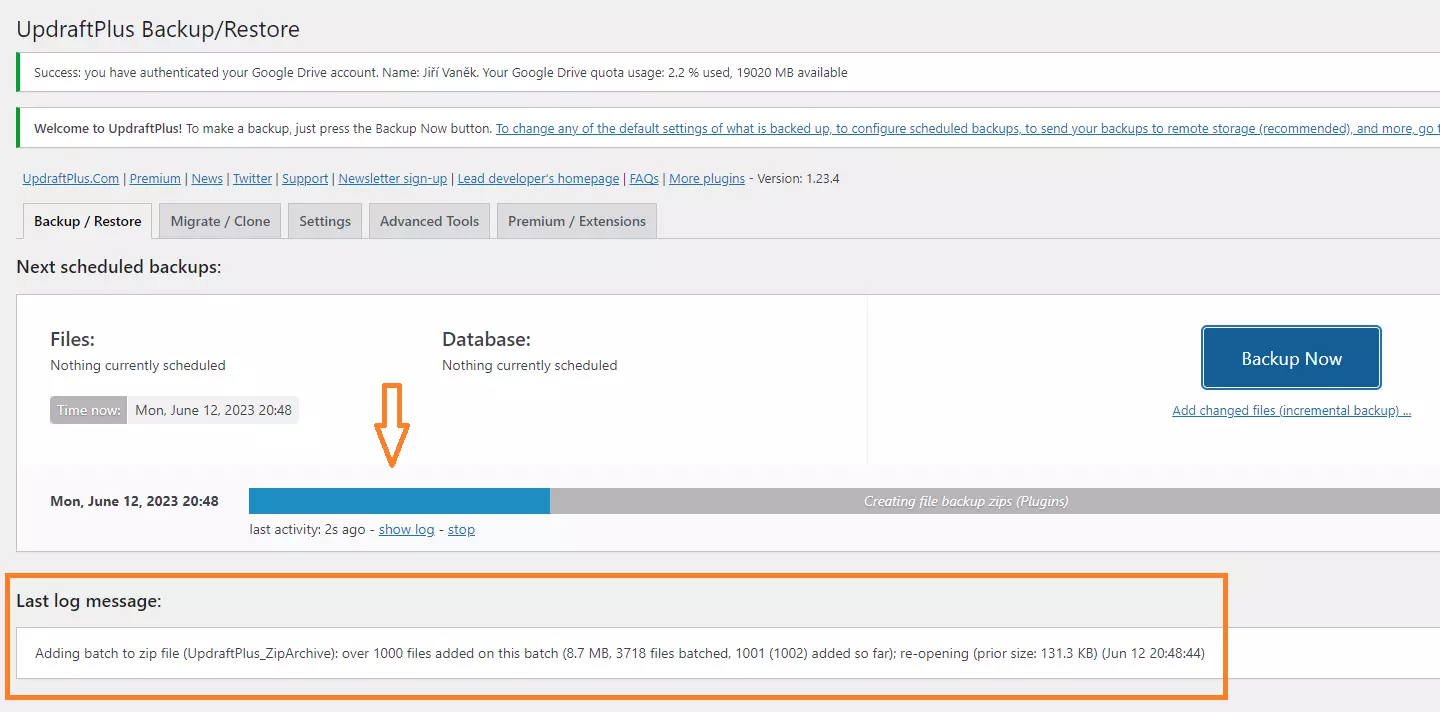
- The website backup process will start, and once the backup is completed, the data will be sent to Google Drive.
How does the backup process work technically?
The plugin takes all the important data on the FTP, compresses it into a package, and stores it in the local FTP space. It does the same with the database. It exports the database, compresses it into a package, and also stores it locally on the FTP. Only then does it take the local FTP data and send it to Google Drive, where it creates a folder and saves the backup. At the end of the process, the plugin deletes the local FTP data to prevent filling up the FTP space.
In principle, it is important for the plugin to be able to store the data first on the FTP, from where it will send it further to Google Drive. Some web hosting providers may restrict creating backups on the FTP and prohibit such folders. However, the plugin cannot function without temporarily storing the data locally. If your provider blocks the local folder on the FTP, you will need to ask them to allow the folder for you. You will not be directly saving data on the FTP, but the plugin needs the FTP as temporary storage for the created backup before sending it to Google Drive and then deleting it.
Can I automate the backups?
Yes, the UpdraftPlus plugin has this capability as well. Since everyone can forget to perform regular backups, UpdraftPlus can do this task for you at a scheduled interval. In the plugin’s tabs, click on the “Settings” tab as shown in the image.
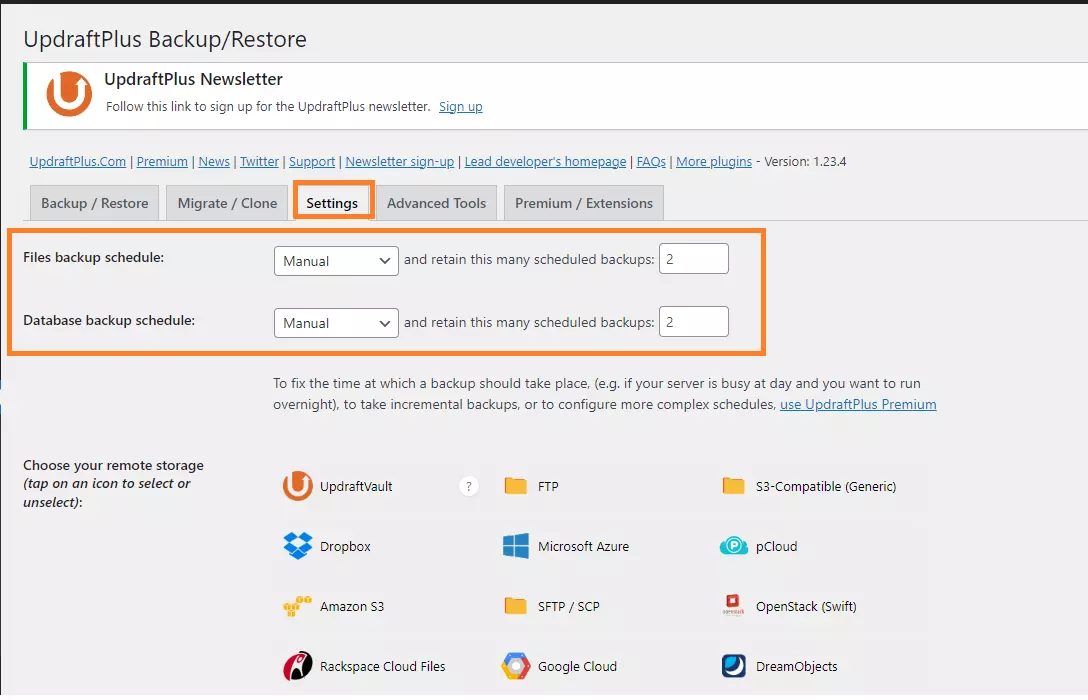
On this tab, you have two options right at the beginning: “Files backup schedule” and “Database backup schedule“. The first one is for backing up data to FTP, and the second option is for backing up MySQL. You can now change the settings from manual to any interval like hourly, daily, weekly, etc., using the dropdown menu.
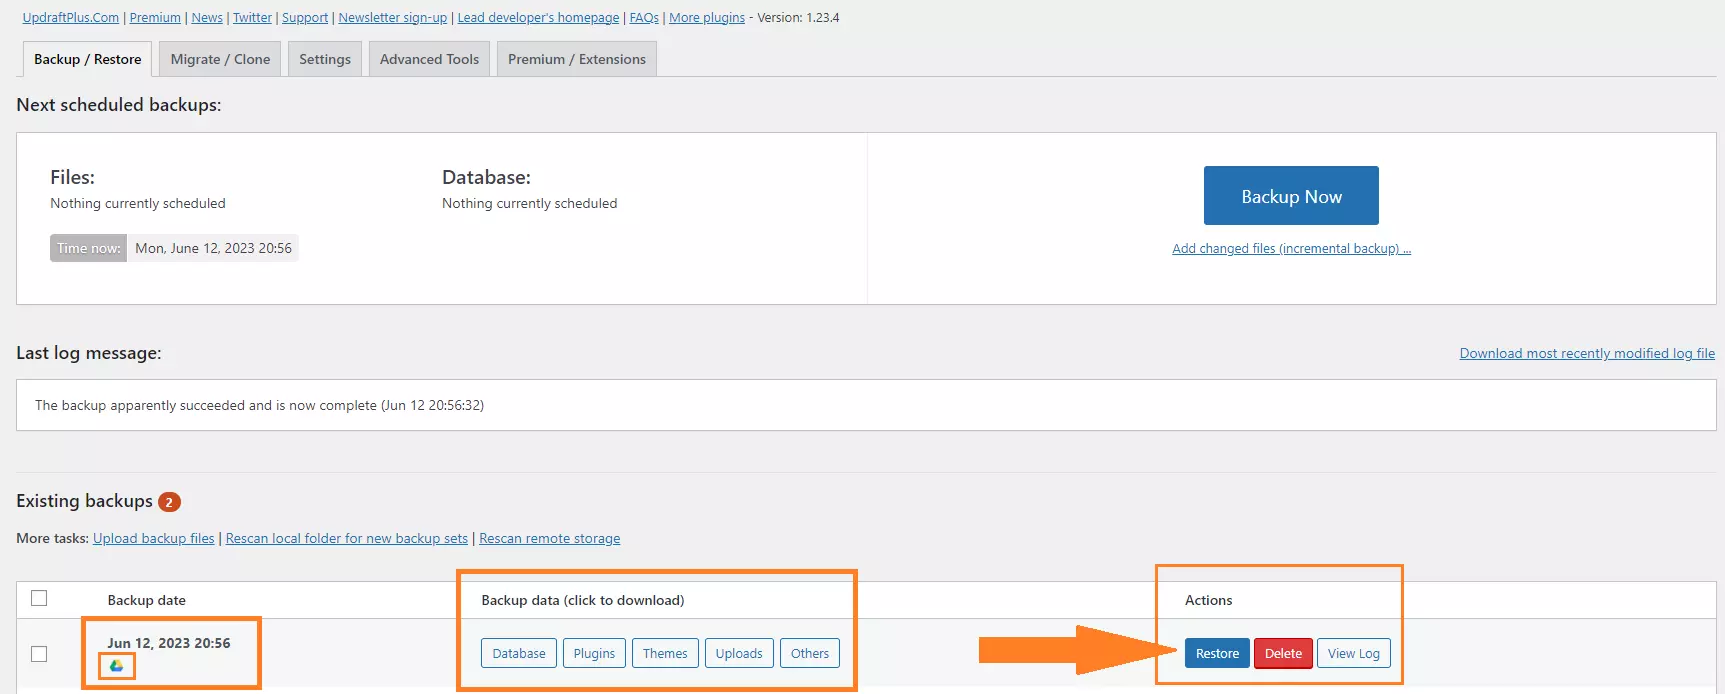
The “and retain this many scheduled backups” item indicates the number of backups that will be stored on Google Drive. If you leave the default value of two, it means that UpdraftPlus plugin will store two backups and cyclically overwrite them. The third backup will overwrite the first one, the fourth backup will overwrite the second one, and so on. Therefore, you will always have two active backups on Google Drive, and the oldest one will be gradually overwritten. I hope this explanation is clear.
Regarding automatic backups, think for yourself whether you want to have them enabled or not. There is one problem, though. As I mentioned earlier, backups are overwritten. If you have daily backups and someone hacks your website, there is a possibility that by the time you realize the system has been compromised, your backups will already be overwritten with the compromised data.
From my point of view, automatic backups are convenient but somewhat risky. Personally, I would take the effort to manually back up. Yes, you have to keep it in mind, but it eliminates more problems described above.
How to keep your WordPress data safe: best backup plugin
Conclusion
And we have reached the end of the guide. I sincerely hope that we have gone through the entire setup and backup process step by step. I have described everything important and essential, including visual instructions, and you should now have your first backup completed. If not, feel free to use the comments for any questions you may have.
The website is created with care for the included information. I strive to provide high-quality and useful content that helps or inspires others. If you are satisfied with my work and would like to support me, you can do so through simple options.
Byl pro Vás tento článek užitečný?
Klikni na počet hvězd pro hlasování.
Průměrné hodnocení. 0 / 5. Počet hlasování: 0
Zatím nehodnoceno! Buďte první
Je mi líto, že pro Vás nebyl článek užitečný.
Jak mohu vylepšit článek?
Řekněte mi, jak jej mohu zlepšit.

Subscribe to the Newsletter
Stay informed! Join our newsletter subscription and be the first to receive the latest information directly to your email inbox. Follow updates, exclusive events, and inspiring content, all delivered straight to your email.
Are you interested in the WordPress content management system? Then you’ll definitely be interested in its security as well. Below, you’ll find a complete WordPress security guide available for free.
