
Table of Contents:
- The Server I Chose
- Migration of WordPress to a Dedicated VPS: What You Need to Install.
- Firewall Configuration
- Apache server
- MySQL database
- phpMyAdmin
- Migration of WordPress to a dedicated VPS
- VSFTPD – FTP server
- PHP 8
- SSL certificate Let’s Encrypt
- Webmin
- Migration of WordPress to a dedicated VPS
- Migration of WordPress to a dedicated VPS in Conclusion.
- More content about WordPress
Last updated December 6th, 2023 00:25
Since this website has grown to a size where traditional shared web hosting is no longer sufficient for my needs, I have decided to migrate to a dedicated virtual server. It was not just about speed but also the opportunity to try out new things, which shared web hosting does not allow. The limitations of PHP versions, server modules, and settings are clearly defined in shared web hosting. In this article, I would like to provide a superficial overview of what such a migration of WordPress to a dedicated VPS entails. What needs to be installed, configured, and how to migrate WordPress without plugins.
The Server I Chose
I make no secret that the original hosting was with Forpsi, and it served me well. However, as my demands for performance and various server configurations grew over time, I decided to migrate to a VPS. It was not a flaw in the hosting; I simply wanted to have more flexibility with my website beyond what shared hosting allows. The VPS is again with Forpsi on the OpenStack hypervisor. The specific configuration is 4 vCPUs and 8GB RAM. What I find most appealing about this platform is the ability to create snapshots and a backup system.
Before making any changes to the server, I can create a snapshot to which I can immediately revert in a matter of minutes if anything goes wrong. Additionally, I have an active backup system through the Cloud Backup service, with regular backups scheduled for both the website content and the MySQL database. The backups are performed automatically on a predetermined day and time. As a result, I have access to FTP backups from about a week ago and MySQL backups from the past 30 days. I will discuss this further below. The operating system is Ubuntu Linux.
Migration of WordPress to a Dedicated VPS: What You Need to Install.
As mentioned earlier, the VPS had a bare Linux system installed, specifically Ubuntu. To comfortably use the server, I installed and configured the following:
- Apache server
- MySQL server
- VSFTP server
- phpMyAdmin
- PHP 8.26 including necessary packages
- Let’s Encrypt SSL certificate
- Webmin
Since there are numerous tutorials available online, I won’t unnecessarily describe the installation and configuration process for each item. Instead, I will provide clear instructions that I have personally tested and can vouch for their effectiveness. For connecting to the server, I use Putty, and as a file manager on the server, I use Midnight Commander.
Firewall Configuration
What I did as the first step was the configuration of the firewall and the necessary ports. For me, important ports like 20, 21, 22, and 10000 were automatically set on the firewall to be accessible only from predefined IP addresses, ensuring that these critical ports are not available from any other connection. These ports mainly include FTP, SFTP, and SSH. Apache and ports 80 and 443 are allowed on the firewall from anywhere. Proper firewall configuration is crucial for security. Therefore, it is always good to carefully consider which services you allow and from where you allow them.
You can find a complete guide on how to work with the firewall on Ubuntu here: https://www.digitalocean.com/community/tutorials/how-to-set-up-a-firewall-with-ufw-on-ubuntu-20-04
Apache server
I have chosen the Apache2 server as the web server. It is the one I have come across the most so far. Apache server is one of the most widely used web servers in the world. A web server is a computer program that handles the reception and delivery of web pages.
One of the main reasons why Apache is so popular is its open-source nature. This means that anyone can access the source code of the Apache server, modify it, and use it freely. This way, Apache offers flexibility and the ability to customize the server according to the user’s needs.
Apache server supports various protocols and technologies, such as HTTP (Hypertext Transfer Protocol), HTTPS (HTTP Secure), SSL (Secure Sockets Layer), and TLS (Transport Layer Security). These technologies ensure secure communication between the server and the client, which is important for transmitting sensitive data such as passwords or payment information.
The Apache server is also capable of performing various tasks such as data compression, caching (storing frequently used data for faster access), and controlling user access to web pages using a rules file (e.g., .htaccess).
You can find a complete installation guide for Apache here: https://linuxhint.com/install_apache_web_server_ubuntu/
I also recommend considering enabling the .htaccess file for rewrite rules and various settings, as well as enabling the mod_deflate module for GZIP compression.
GZIP compression: https://ubiq.co/tech-blog/enable-gzip-compression-apache/
.htaccess file: https://www.digitalocean.com/community/tutorials/how-to-rewrite-urls-with-mod_rewrite-for-apache-on-ubuntu-20-04
MySQL database
Since WordPress requires a database in addition to the web server, you will need to install and set up MySQL as well.
MySQL is one of the most widely used and popular database systems in the world. It is developed as open-source software, which means that the source code is freely available, and anyone can use, modify, and distribute it. This brings advantages in terms of flexibility, adaptability, and an active community that supports it.
MySQL uses a structured language for data manipulation called SQL (Structured Query Language). SQL allows creating database tables, inserting, updating, and selecting data, performing complex queries, managing users, and many other operations.
The installation of MySQL and the creation of a database for your WordPress website are not complicated. A complete guide to follow can be found here: https://computingforgeeks.com/how-to-install-mysql-8-on-ubuntu/?utm_content=cmp-true
It is important not to forget about backups. Personally, I have solved the backup process by using the CRON service to generate a .sql backup of my database on the server every day, which is then saved in a predefined folder. Additionally, I have set the command to delete backups older than 30 days. This way, I have a folder on the server containing the database backups for the past 30 days. I also back up this folder to an external storage using a cloud backup service daily to have copies of the backups outside the server.
phpMyAdmin
For easier database management, I would also recommend installing phpMyAdmin. It will come in handy when you migrate the server. The guide below also explains securing access to phpMyAdmin with a second layer of password and login using the .htaccess and .htpasswd files. For database migration using phpMyAdmin, you will also need to increase the upload limits in the php.ini file settings. The default settings might not be sufficient for uploading. A complete guide, including securing access with the .htaccess and .htpasswd files, can be found here: https://www.digitalocean.com/community/tutorials/how-to-install-and-secure-phpmyadmin-on-ubuntu-20-04.
For the new PHP 8 version and above, I recommend installing the latest version of phpMyAdmin. Otherwise, you may encounter PHP error messages with older versions of phpMyAdmin. The new PHP 8 version and older versions of phpMyAdmin are not fully compatible. With PHP version 7.4, there are no errors when using older phpMyAdmin versions.
Migration of WordPress to a dedicated VPS
VSFTPD – FTP server
To connect to the server for data uploads, you can use either SFTP on port 22 or the traditional FTP server on ports 20 and 21. I used VSFTPD for FTP connection to the server. In the article below, you can find not only the installation and configuration steps but also instructions on securing the transmission using certificates and restricting the user to their own directory using chroot local. Restricting the user is important to ensure that the FTP user does not have access to any other location on the server and can only navigate within the designated folder. You can find the installation and configuration guide for VSFTPD here: https://www.digitalocean.com/community/tutorials/how-to-set-up-vsftpd-for-a-user-s-directory-on-ubuntu-20-04
PHP 8
For my WordPress, I have chosen PHP version 8.26. It is one of the latest versions, which ensures that I will be well-equipped for future updates of both PHP itself and its modules. You can find a very comprehensive guide for installation and configuration here: https://medium.com/@laraveltuts/how-to-install-and-run-php-8-x-on-ubuntu-20-04-8f18e7565c41
After installing PHP on the server, you can make any necessary adjustments to the php.ini file, where you can modify:
- max_execution_time: the time in seconds that a script can run before it is forcibly terminated.
- memory_limit: the amount of memory allocated to the web hosting.
- upload_max_filesize: the maximum size for file uploads using PHP.
- post_max_size: the maximum size for data sent via POST requests using PHP.
- max_file_uploads: the maximum number of files that can be uploaded simultaneously using PHP.
In addition to PHP, I have also installed caching modules on the server. Specifically, Memcached, OPCache, and Redis server. These modules will greatly assist you in caching data and speeding up WordPress. To clear OPCache, you can use a PHP script. If necessary, you can clear Memcached on the server using Telnet on port 11211 and the “flush_all” command.
Memcached: https://www.digitalocean.com/community/tutorials/how-to-install-and-secure-memcached-on-ubuntu-20-04
OPCache: https://linuxways.net/ubuntu/how-to-install-php-opcache-module-on-ubuntu-20-04/
Redis server: https://www.digitalocean.com/community/tutorials/how-to-install-and-secure-redis-on-ubuntu-20-04
SSL certificate Let’s Encrypt
Installing and configuring an SSL certificate from Let’s Encrypt will be significantly simplified, including the renewal process, thanks to Certbot. There’s no need for a lengthy discussion here, so you can directly refer to the procedure outlined here: https://www.digitalocean.com/community/tutorials/how-to-secure-apache-with-let-s-encrypt-on-ubuntu-20-04
If you, like me, use CloudFlare DNS, don’t forget to enable the Full Strict mode for SSL communication. This mode assumes that the SSL certificate is present on the server side. As a result, CloudFlare knows that the communication between itself and your server will be encrypted using your Let’s Encrypt certificate, and the communication between CloudFlare and the user’s browser will be encrypted using their certificate. I have already written about this specifically here: How to set up SSL for WordPress with Cloudflare DNS
Webmin
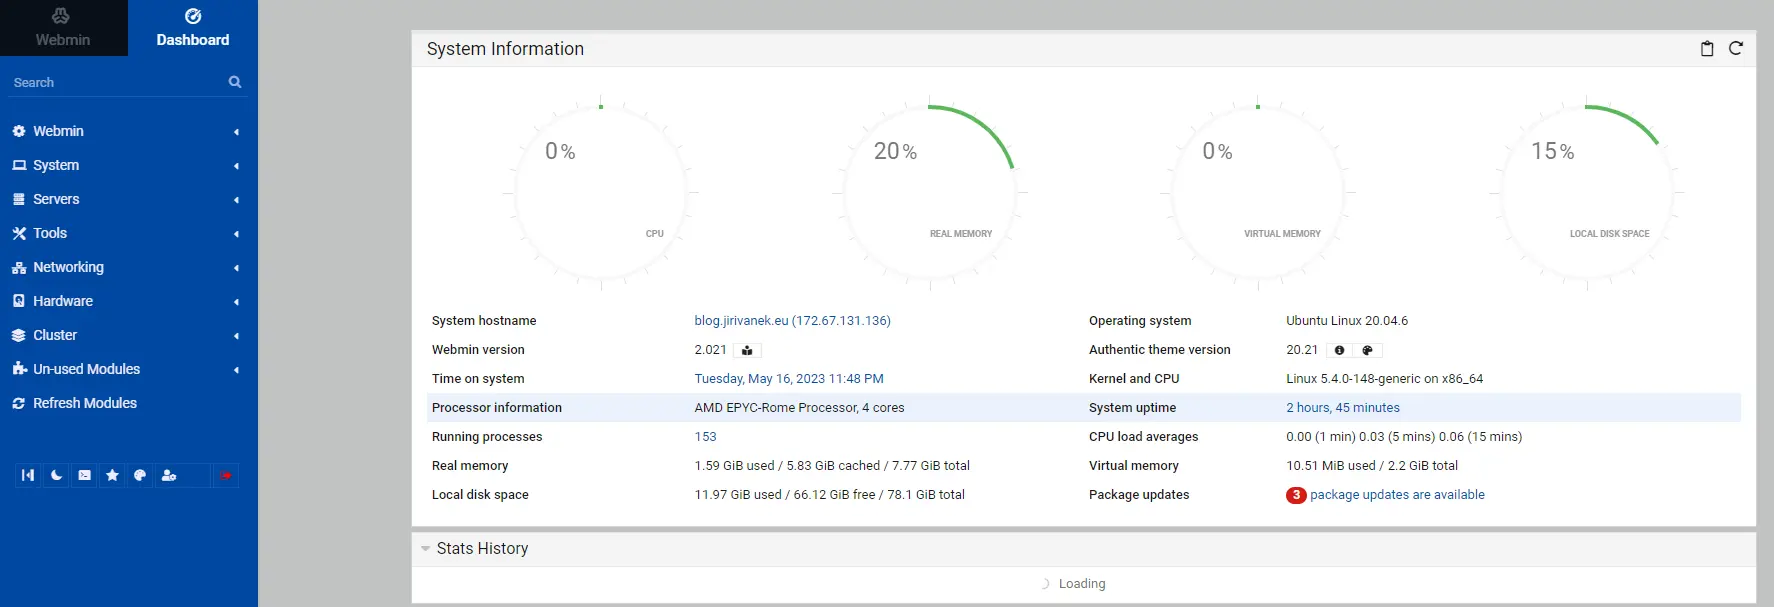
You can use Webmin as a cherry on top. It is a graphical interface that runs on port 10000. Thanks to Webmin, you have a better overview of the server directly from your web browser, including basic graphs of CPU usage, memory, network, and disk.
Migration of WordPress to a dedicated VPS
At this point, you should have the server fully prepared for migration. The actual migration process, depending on the size of your website, will take a few minutes to complete and is not complicated. In principle, it consists of the following steps:
- Backup the data from the original FTP.
- Backup the data from the original MySQL database.
- Upload the data to your server’s FTP.
- Import the MySQL database to your server.
- Modify the WordPress configuration file (wp-config.php).
The entire migration process involves downloading data from the original FTP and exporting the MySQL database. Upload the FTP data using VSFTP to the designated folder on your new website, and then import the MySQL database using phpMyAdmin into your new database. Additionally, don’t forget to edit the wp-config.php file located in the root directory of WordPress via FTP. In this file, the database connection information is stored. You need to change the server to “localhost” and modify the database name, username, and password to match your new setup.
You can temporarily fine-tune and test the migrated website using the HOSTS file: How to test web hosting without a domain pointing to it?
Once everything is functioning according to your expectations, you will need to modify the DNS records of your domain. Change the A record’s IP address to the IP address of your new VPS. After the TTL limit has expired, your domain will start running from the new server.
Migration of WordPress to a dedicated VPS in Conclusion.
In conclusion, that’s the gist of migrating WordPress to your own server. I would like to add that I haven’t mentioned setting up a mail server or mail functionality. I handle all website forms by using SMTP connections to external email services, so I didn’t require either of those on my own server. If you embark on the journey of migrating your website to your own server, I wish you good luck and, most importantly, strong nerves.
The website is created with care for the included information. I strive to provide high-quality and useful content that helps or inspires others. If you are satisfied with my work and would like to support me, you can do so through simple options.
Byl pro Vás tento článek užitečný?
Klikni na počet hvězd pro hlasování.
Průměrné hodnocení. 0 / 5. Počet hlasování: 0
Zatím nehodnoceno! Buďte první
Je mi líto, že pro Vás nebyl článek užitečný.
Jak mohu vylepšit článek?
Řekněte mi, jak jej mohu zlepšit.

Subscribe to the Newsletter
Stay informed! Join our newsletter subscription and be the first to receive the latest information directly to your email inbox. Follow updates, exclusive events, and inspiring content, all delivered straight to your email.
Are you interested in the WordPress content management system? Then you’ll definitely be interested in its security as well. Below, you’ll find a complete WordPress security guide available for free.
