Table of Contents:
- How to enable maintenance mode in WordPress
- Under Construction Plugin
- Plugin Settings
- Design and Content Tab
- Do you need to grant access to other users?
- How to enable maintenance mode in WordPress
- FAQ – Frequently Asked Questions
- How to enable maintenance mode in WordPress
- Conclusion
Last updated December 8th, 2023 23:19
Are you managing one or multiple WordPress websites? If you answered yes, then you’re likely aware that WordPress maintenance occasionally requires intervention. This involves updating plugins, the system’s core, theme templates, or other aspects. In such situations, it’s good practice to put your website into maintenance mode. Essentially, this temporarily deactivates the site for your visitors during maintenance. As the site administrator, you won’t notice any change. However, users won’t be able to access the site and will only see an information notice indicating that the site is currently under maintenance. How do you enable maintenance mode in WordPress? Very simply, by using a small plugin.
How to enable maintenance mode in WordPress
Let’s first clarify why maintenance mode is useful and why you should use it. When you’re making changes to a heavily visited website, this practice is highly recommended. Users accessing your site during maintenance might, in that time, carry out various activities. They might leave comments, log in to the system, upload images, and perform many other actions that you, as the administrator, have allowed.
If users make these changes on the website during various updates or modifications, unexpected situations might occur. Therefore, it’s counterproductive to leave users unsupervised on the site during these times. Maintenance mode temporarily removes users from the website, giving you sufficient time and peace of mind to make the required changes. Simultaneously, you don’t have to worry about users taking any unexpected actions on the website.
Under Construction Plugin
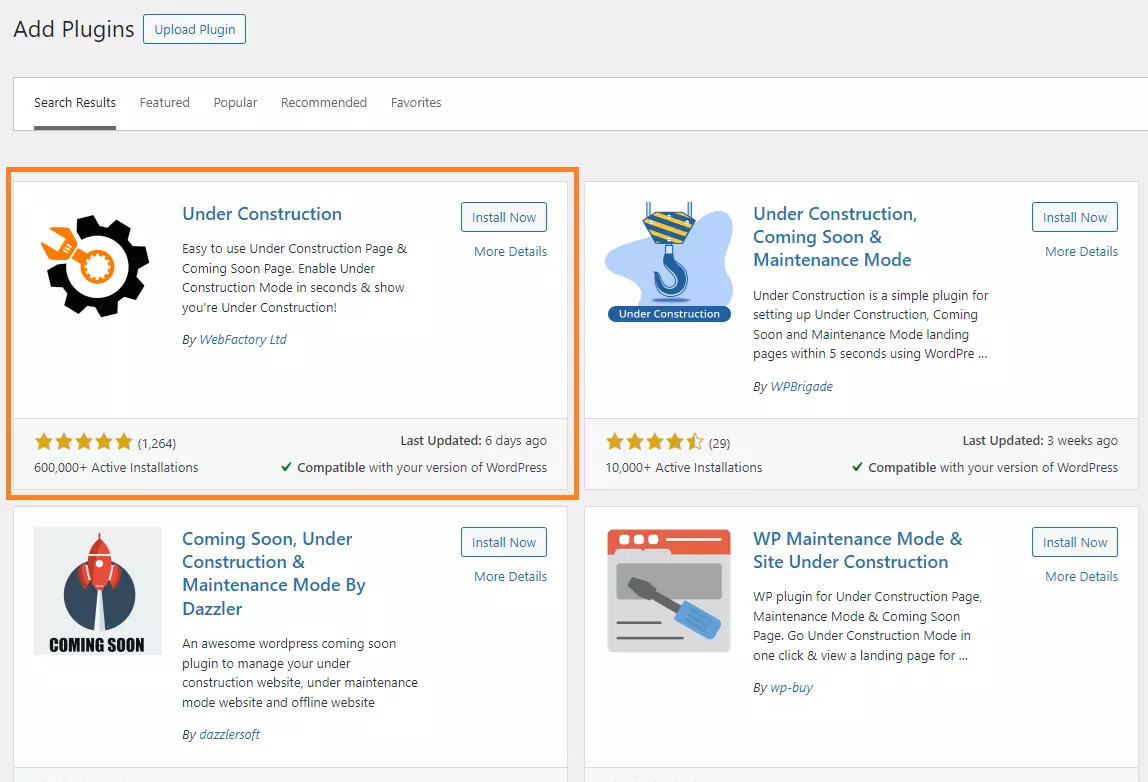
Personally, for this purpose, I highly recommend using the “Under Construction” plugin. This plugin allows you to deactivate the website for a specified time and notifies users that it’s a planned downtime. This way, they can come back later without worrying that something is wrong with the website. To install this plugin:
- Click on “Plugins” in the left menu.
- A submenu will appear, select “Add New Plugin.”
- In the top right corner, there’s a search field.
- Type the name of the plugin “Under Construction” into this field.
- Install the plugin and then activate it.

Plugin Settings
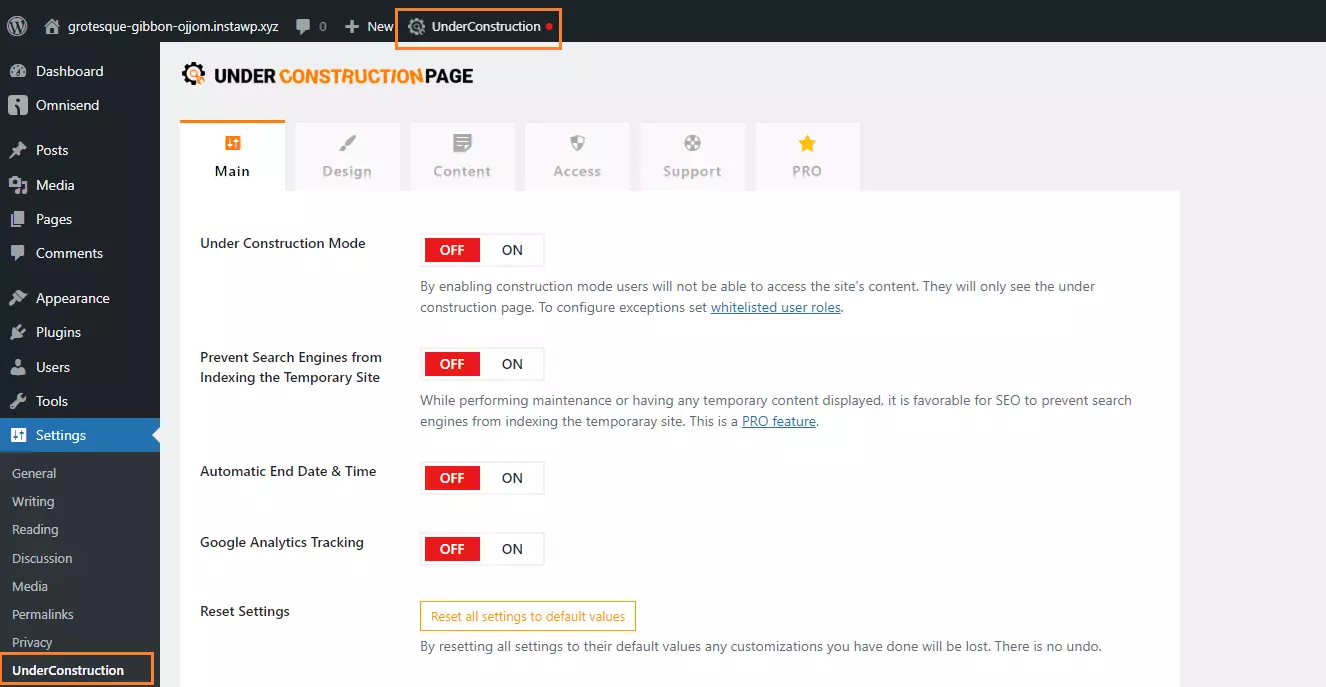
Once you activate the plugin, it will appear in the administration in two main locations. The first location is the admin bar at the top of the dashboard. The second is in the left menu under ‘Settings’ and ‘Under Construction’. Using the admin bar, you can easily toggle the plugin on or off. It’s a quick option but doesn’t offer extensive configuration possibilities. The actual plugin settings, including its appearance on the website, can be accessed through the left menu.
The first tab you’ll encounter is ‘Main’, which offers these options:

- Under Construction Mode: enables or disables the plugin.
- Prevent Search Engines from Indexing the Temporary Site: when this option is active, it informs search engine robots not to index the website’s content.
- Automatic End Date & Time: inserts the current date and time on the website.
- Google Analytics Tracking: if you want to track visitor traffic using Google Analytics during the downtime, this option allows you to do so.
Design and Content Tab
And now we delve into the heart of this plugin. In these two tabs, you define the appearance of the notification and its content. First, in the ‘Design’ tab, choose a template that appeals to you visually. Note that some templates are only available in the PRO version (paid version).
Once you’re content with the appearance, navigate to the ‘Content’ tab. Here, you can write important messages for your users. Essentially, what’s happening with the website, how long the downtime will last, contact information for the website administrator or social media, or an apology for the outage.
If you have all the information filled in the plugin, save the changes. When you need to temporarily disable the website, you can conveniently use the quick action button in the admin bar at the top of the dashboard. The result for users might look like this:

Do you need to grant access to other users?
The developers of this plugin have thought of that too. To do this, use the “Access” tab. You have several exception options to choose from. You can allow specific IP addresses, ensuring the website remains accessible even when the plugin is active. However, please note that this exception is available only in the paid version of the plugin.
If you’re using the Lite version, which is free, the only functional exception is limited to user roles and individual users themselves. You can, for instance, grant access to the website during maintenance to anyone with an author or editor role, or to specific registered users. Unfortunately, the secret access link for the website is also available only in the paid version.
How to enable maintenance mode in WordPress
FAQ – Frequently Asked Questions
By preventing users from accessing the website during updates, you minimize potential issues related to site instability, ensuring smooth adjustments and reducing the chances of encountering problems.
There are several plugins available that allow easy activation of maintenance mode. One of the popular ones is a plugin named “Under Construction” or “WP Maintenance Mode”.
During maintenance mode, website users will see a page indicating ongoing maintenance and unavailability. This provides them with information that it’s a planned outage, not an error.
Keep maintenance mode active only for the time necessary to make the changes or updates. The website’s unavailability should be as brief as possible.
Short-term unavailability of the website during maintenance mode typically doesn’t have a significant impact on SEO. However, ensure it lasts for the shortest duration possible to avoid search engines detecting prolonged unavailability.
How to enable maintenance mode in WordPress
Conclusion
The Under Construction plugin offers a relatively simple and functional solution when planning website downtime and aiming to inform your users about it. Personally, I use the Lite, the free version, and it has sufficed in many situations. If you require more sophisticated solutions and filtering, such as by IP addresses, you can always switch to the paid version of the plugin. At the time of writing this article, the full version of the plugin costs between $49 and $199.
The website is created with care for the included information. I strive to provide high-quality and useful content that helps or inspires others. If you are satisfied with my work and would like to support me, you can do so through simple options.
Byl pro Vás tento článek užitečný?
Klikni na počet hvězd pro hlasování.
Průměrné hodnocení. 0 / 5. Počet hlasování: 0
Zatím nehodnoceno! Buďte první
Je mi líto, že pro Vás nebyl článek užitečný.
Jak mohu vylepšit článek?
Řekněte mi, jak jej mohu zlepšit.

Subscribe to the Newsletter
Stay informed! Join our newsletter subscription and be the first to receive the latest information directly to your email inbox. Follow updates, exclusive events, and inspiring content, all delivered straight to your email.
Are you interested in the WordPress content management system? Then you’ll definitely be interested in its security as well. Below, you’ll find a complete WordPress security guide available for free.

