Table of Contents:
- How to load Google fonts faster in WordPress
- Time To First Byte
- Find out your template’s default font
- How can you upload fonts to your website?
- How to load Google fonts faster in WordPress using CSS snippet
- Original code
- Modified code
- Conclusion
- More content about WordPress
Last updated December 6th, 2023 00:29
Most WordPress templates available today use fonts from Google. It’s great because you have the option to customize your website’s text to your liking. However, there is one significant drawback. The fonts are not stored locally on your web hosting, and they are remotely downloaded from Google servers. If you have ever measured your website’s performance using PageSpeed Insight, you may have found that this font downloading significantly affects performance, especially for mobile versions of the website. It slows down TTFB (Time To First Byte) significantly. Let’s take a look at how to load Google fonts faster in WordPress by storing the specific font locally on the web hosting.
How to load Google fonts faster in WordPress
Time To First Byte
Time To First Byte (TTFB) measures the time it takes for a server to load and send the first byte of data after receiving a request. TTFB affects the speed of loading web pages. A low TTFB means a faster server response. Higher TTFB can be caused by many factors, such as server distance, poorly written code, or a large number of users on the server. To improve page loading speed, it is important to monitor TTFB and optimize your web applications. Additionally, TTFB also affects another performance metric, which is LCP or Largest Contentful Paint.
One of the many optimizations that you can consider is to not load the fonts of your website remotely from Google servers, but to have them uploaded locally to your web hosting. As an example of how this can be done in practice, I will use the popular GeneratePress template. However, this process will be the same for all other templates. You will need the following for the entire process:
- Firstly, find out in the template settings which specific font you are using for your text.
- Then, download this font from Google servers to your computer.
- Upload the font to your website through the media option in WordPress.
- Thanks to a short snippet inserted into WordPress, you will subsequently load the font locally. Therefore, you will need a plugin to insert custom code onto your website. I personally recommend WP Code.
And now, let’s take a step-by-step look at how to load Google fonts faster in WordPress by storing fonts locally on your website.
Find out your template’s default font
At the beginning, it’s important to know which font you’re actually going to download for your website. If you left the template settings as default, it will be the default font. If you set up your own font type, then you’ll need the exact same font you have set up. Either way, you can find out in the template settings through the left menu and the appearance item. If the template only shows the option for the default font instead of the font type, I recommend checking the template developer’s website, where you can find the answer to the font type question.
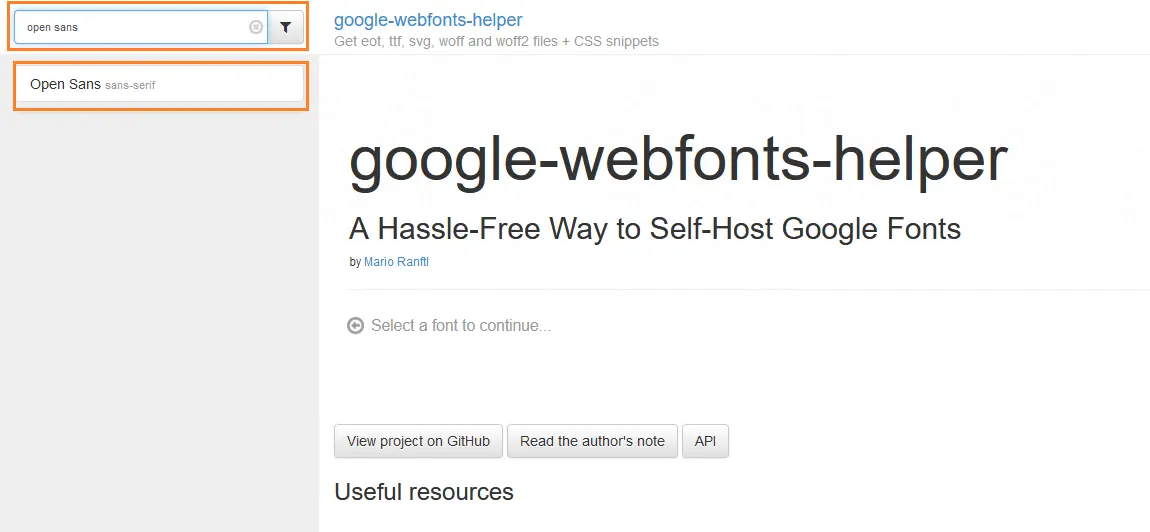
The template I use, GeneratePress, uses the Open Sans font (Latin and Regular). Once you know exactly what font type you need to download, go to https://gwfh.mranftl.com/fonts. In the upper left corner, there is a search field where you enter the font you are looking for.
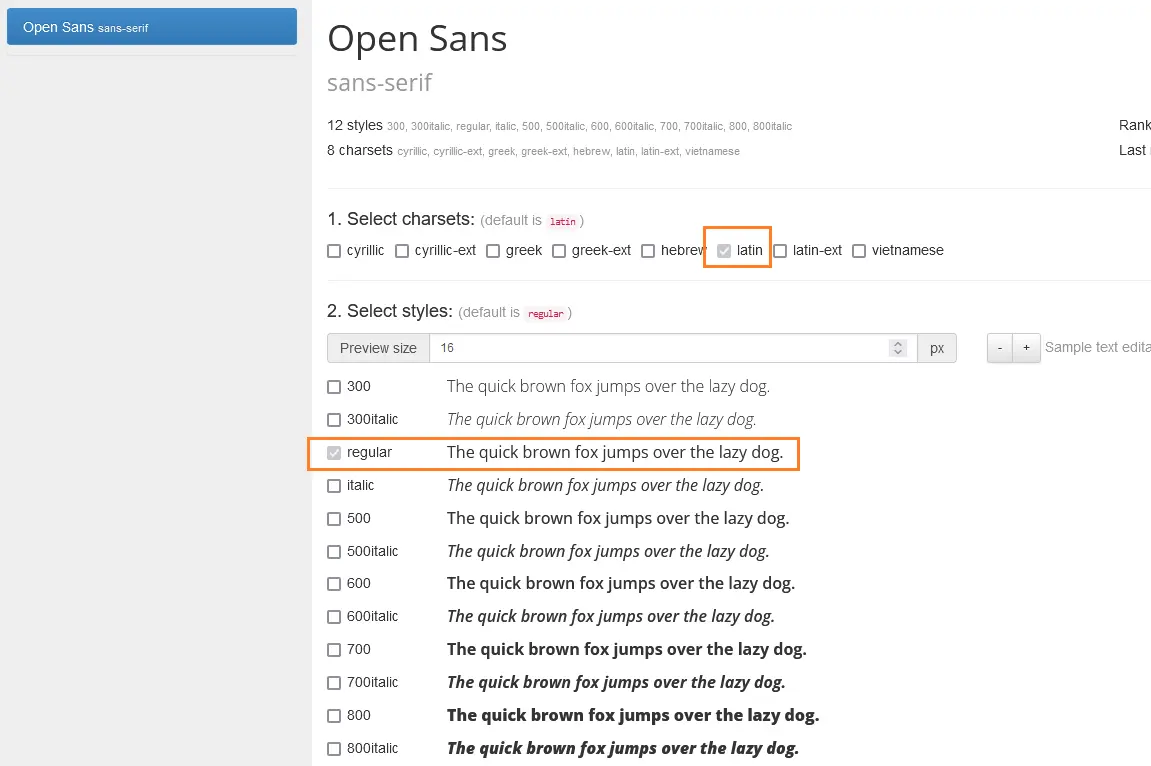
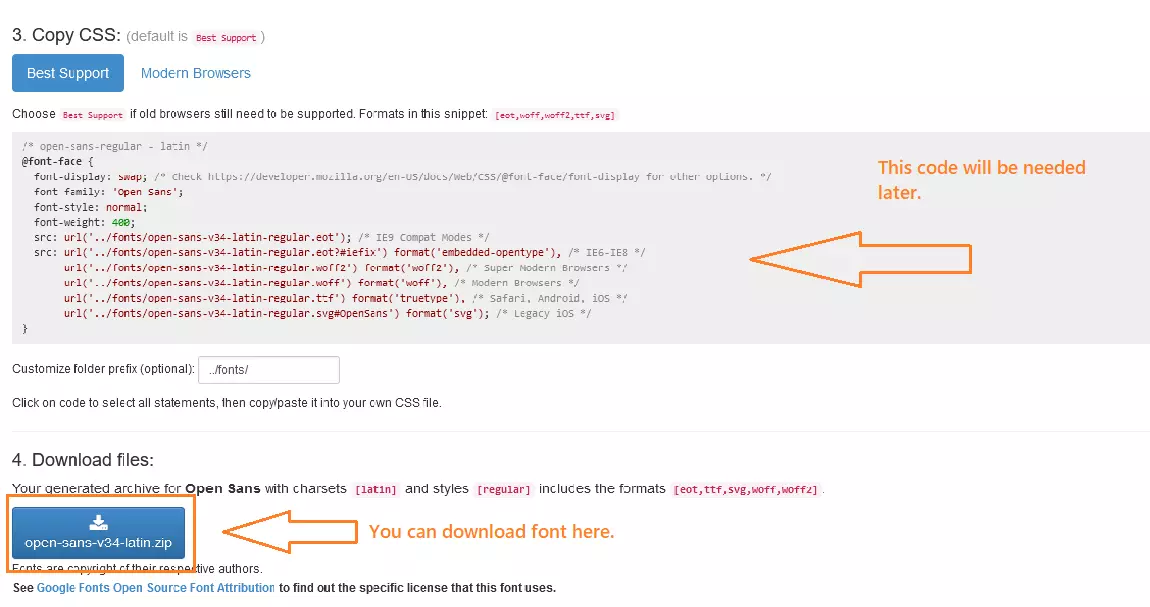
After clicking on the specific font, further refine the parameters. In this case, for GeneratePress, “Latin” and “Regular.” Then click on the download button. Keep the font page open, as you will need the CSS code listed in the last part.


How can you upload fonts to your website?
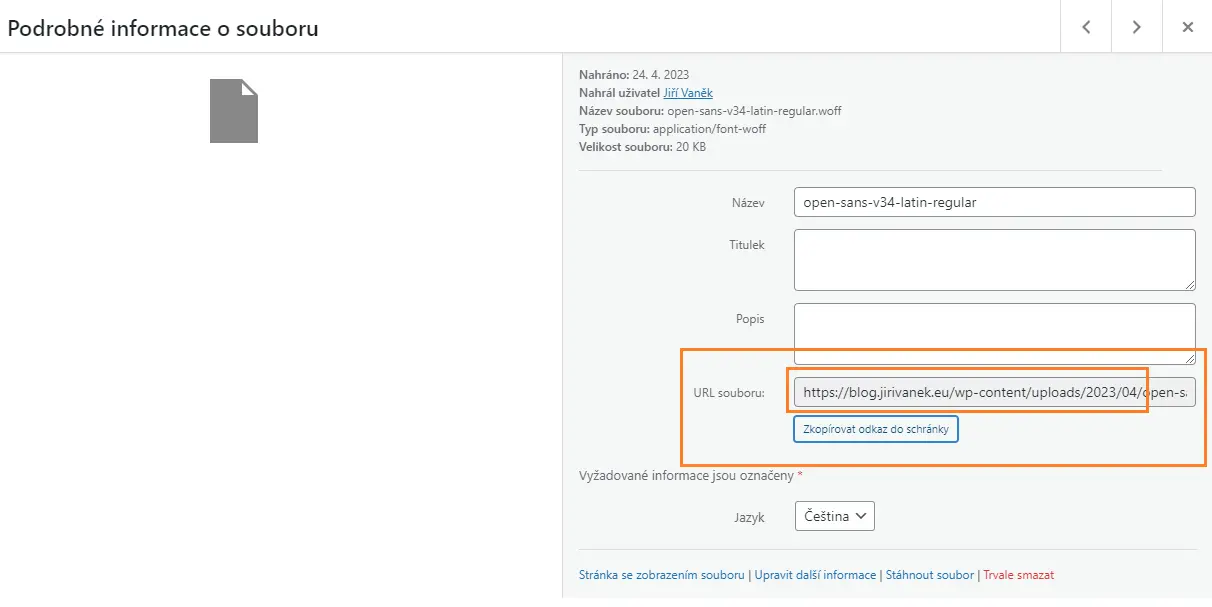
First, unpack the .zip file on your computer. You will get a total of 5 files. In the WordPress administration, navigate to the media item in the left menu and upload all 5 files here. Once WordPress finishes uploading the files, copy the path to the file. In my case, it will be https://blog.jirivanek.eu/cs/wp-content/uploads/2023/04/. As you can see, I removed the name of the file itself from the path. You will only need the path to the folder where all 5 files are uploaded.

How to load Google fonts faster in WordPress using CSS snippet
To start loading the fonts from the web hosting where you have just uploaded them, you need to tell your template about them. This is done using the inserted CSS code, which is provided on the font page. It looks like this:
Original code
					/* open-sans-regular - latin */
@font-face {
  font-display: swap; /* Check https://developer.mozilla.org/en-US/docs/Web/CSS/@font-face/font-display for other options. */
  font-family: 'Open Sans';
  font-style: normal;
  font-weight: 400;
  src: url('../fonts/open-sans-v34-latin-regular.eot'); /* IE9 Compat Modes */
  src: url('../fonts/open-sans-v34-latin-regular.eot?#iefix') format('embedded-opentype'), /* IE6-IE8 */
       url('../fonts/open-sans-v34-latin-regular.woff2') format('woff2'), /* Super Modern Browsers */
       url('../fonts/open-sans-v34-latin-regular.woff') format('woff'), /* Modern Browsers */
       url('../fonts/open-sans-v34-latin-regular.ttf') format('truetype'), /* Safari, Android, iOS */
       url('../fonts/open-sans-v34-latin-regular.svg#OpenSans') format('svg'); /* Legacy iOS */
}
You need to define the path to the files on your FTP in this code. To put it simply, you replace the part of the code with “../fonts/” with the path you copied above. In my case, the modified code looks like this:
Modified code
					/* open-sans-regular - latin */
@font-face {
  font-display: swap; /* Check https://developer.mozilla.org/en-US/docs/Web/CSS/@font-face/font-display for other options. */
  font-family: 'Open Sans';
  font-style: normal;
  font-weight: 400;
  src: url('../fonts/open-sans-v34-latin-regular.eot'); /* IE9 Compat Modes */
  src: url('https://blog.jirivanek.eu/cs/wp-content/uploads/2023/04/open-sans-v34-latin-regular.eot?#iefix') format('embedded-opentype'), /* IE6-IE8 */
       url('https://blog.jirivanek.eu/cs/wp-content/uploads/2023/04/open-sans-v34-latin-regular.woff2') format('woff2'), /* Super Modern Browsers */
       url('https://blog.jirivanek.eu/cs/wp-content/uploads/2023/04/open-sans-v34-latin-regular.woff') format('woff'), /* Modern Browsers */
       url('https://blog.jirivanek.eu/cs/wp-content/uploads/2023/04/open-sans-v34-latin-regular.ttf') format('truetype'), /* Safari, Android, iOS */
       url('https://blog.jirivanek.eu/cs/wp-content/uploads/2023/04/open-sans-v34-latin-regular.svg#OpenSans') format('svg'); /* Legacy iOS */
}
Insert the modified code into your website using the WP Code plugin. If you’re not sure how to do this, take a look at this article where I’ve described the code insertion step-by-step: How to Insert Custom Code into WordPress. Just make sure to select CSS as the code type.
Now you’re done, and your template will load the font from the web. If you’re using a cache plugin on your website, I recommend clearing the cache.
Conclusion
In total, loading a font consists of three steps. Downloading the font, uploading it to the web, and inserting the CSS script into the website code. That’s all you need to do. Once you’re done, your pagespeed insight or gmetrix measurement should be slightly better. If you’ve cleared the cache plugin, I recommend waiting for a while before taking further measurements when the website is cached again. Otherwise, the measurements might be skewed.
The website is created with care for the included information. I strive to provide high-quality and useful content that helps or inspires others. If you are satisfied with my work and would like to support me, you can do so through simple options.
Byl pro Vás tento článek užitečný?
Klikni na počet hvězd pro hlasování.
Průměrné hodnocení. 0 / 5. Počet hlasování: 0
Zatím nehodnoceno! Buďte první
Je mi líto, že pro Vás nebyl článek užitečný.
Jak mohu vylepšit článek?
Řekněte mi, jak jej mohu zlepšit.

Subscribe to the Newsletter
Stay informed! Join our newsletter subscription and be the first to receive the latest information directly to your email inbox. Follow updates, exclusive events, and inspiring content, all delivered straight to your email.
Are you interested in the WordPress content management system? Then you’ll definitely be interested in its security as well. Below, you’ll find a complete WordPress security guide available for free.

